background image

Player Functions

Menu/Title

Press the MENU key during DVD playback to return to the disc's Main menu.
Press the TITLE key during DVD playback to return to the disc's Title menu.
Press the TITLE key during VCD playback to the disc's PBC menu.

Mute

Press MUTE to mute/ restore sound.

Setup

Press the SETUP key to enter the player's setup menu. Enter the Setup menu to adjust the player's internal 
settings; please see the SETUP section for more details.

On-Screen Display/OSD

The On-Screen Display (OSD) indicator is a user-friendly interface designed to display playback type status. 
The OSD indicator will display information based on the type of disc that has been loaded (i.e., DVD or CD).

Time

To select the desired section to play(search).
Press the TIME button to display the search bar.
Press the DIRECTION button to select the desired item.
Press the NUMERIC button to input data.
Press the OK button to start playback.

N/P

Set the format of this player to select the color format of TV: “NTSC/PAL/AUTO”.

L/R

Press this button repeatedly to select between left, right or both audio channels in CD/VCD/SVCD discs.

RETURN

Press this button to go back(menus).

Play/Pause/Stop

Press     to play the disc for the first time.
Press     during playback to pause. Press again to resume playback.
Press     during playback to stop the disc (Pre-Stop). Press      to resume playback at the time-point at which 
the disc was stopped.
Press     when the disc is Pre-Stopped to stop playback completely. (When      pressed, the disc will start 
playing from the beginning.)

Previous/Next (Skip)

Press      to skip to the next track (DVD, CD, etc).
Press      to return to the previous track (DVD, CD, etc).

Forward/Reverse (Search)

Repeatedly press      to search forward through a disc.
Repeatedly press      to reverse.
Press      for normal playback.

Slow

Press SLOW for slow-motion playback. Each successive press of SLOW will change the rate of slow-motion 
playback.
Press      to resume normal playback.

Step

Press STEP for frame-by-frame playback. Each successive press of STEP will advance the video one frame. 
Press      to resume normal playback.

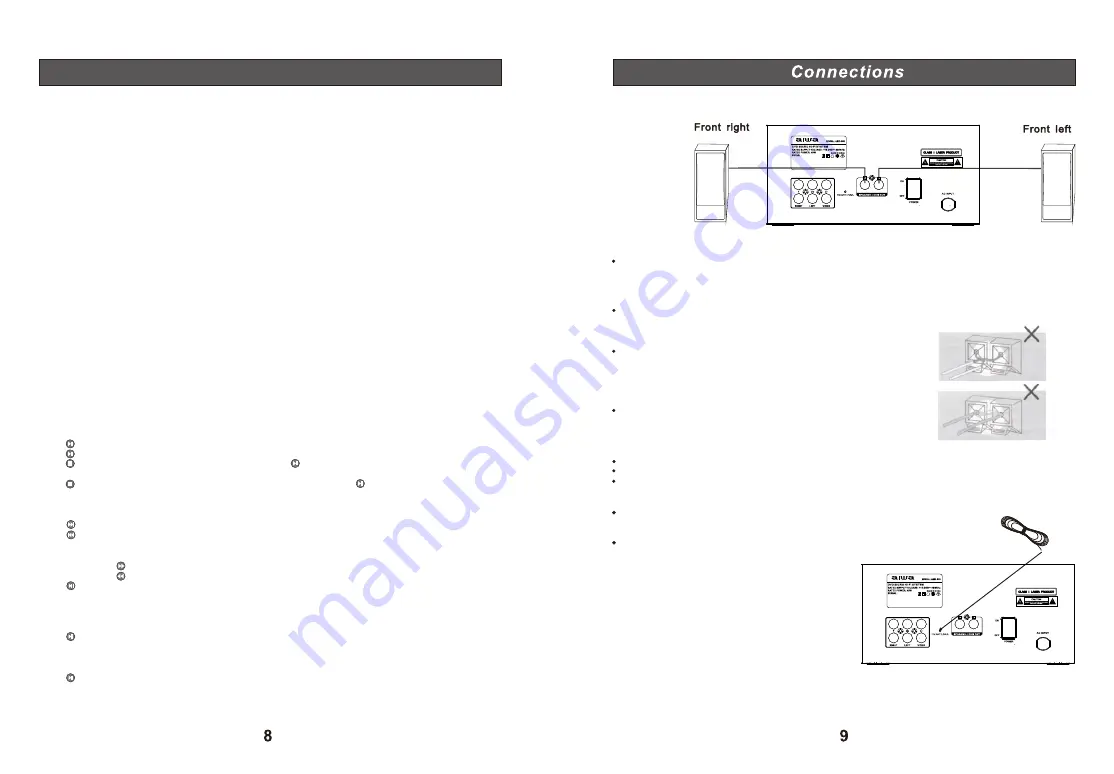
Connection to Speakers:

Connect the supplied speakers using the supplied speaker wires matching the colors of the jacks and 
speaker wires:
   Connect the supplied speaker wire to the R, L terminal jacks.

To avoid short-circuiting the speakers:
Short-circuiting of the speakers may damage the system. To prevent this, make sure to take the following 
precautions when connecting the speakers:
   Make sure the stripped end of each speaker cord does not touch another speaker terminal or the stripped 
end of another speaker cord.

Incorrect installations of speaker cord:

   Stripped speaker cord is touching another speaker terminal.
   

   Stripped cords are touching each other due to excessive 
   removal of insulation.

Please note:

   Be sure to match the speaker cord correctly.
   For optimal sound performance, use the supplied speakers.
   Do not use speakers with an impedance lower than the supplied speakers.

Extension of the FM Aerial:

   Extend and move the aerial in various directions until the clearest signal is received.

Please note:
   Keep the aerial as far away as possible from the TV, 
   VCR or any radiation source to prevent interference.

If you have poor FM reception:
For better FM reception, use a 75 ohm coaxial cable (not supplied) to connect the system to an outdoor FM 
aerial.

Summary of Contents for AMD-006

Page 1: ......

Page 2: ...g the Audio Channel 15 Special Functions Angle Selection 16 Picture Zooming 16 Selecting Subtitle Language 16 Selecting Audio Language 16 Other Functions FM Radio Operating Instruction 17 Bluetooth Connection Operation 17 USB Operation 17 Troubleshooting 18 Specifications 19 WARNING DUE TO THE HIGH RISK OF FIRE OR ELECTRIC SHOCK DO NOT EXPOSE THIS APPLIANCE TO RAIN OR MOISTURE DO NOT OPEN THE CABI...

Page 3: ...ace Ensure that where you place the unit is stable and cannot easily be tipped over Warning and Precautions Warning and Precautions Warnings 1 This appliance is not intended for use by persons including children with reduced physical sensory or mental capabilities or lack of experience and knowledge unless they have been given supervision or instruction concerning use of the appliance by a person ...

Page 4: ...structions given on the screen This manual only covers basic disc operations For some functions the icon may appear on the screen This indicates that the functions described in this manual are not allowed for that specific disc The drawings of the front panel display used in this manual are purely for explanation purposes The actual display may differ slightly from what is shown here Notes about D...

Page 5: ... 21 ANGLE 22 SUBTITLE 23 SOURCE FM AUX BT DVD 24 DVD USB switch between DVD and USB inputs 25 PLAY PAUSE 26 VOLUME 27 NEXT CH 28 VOLUME 29 FWD TUNE 30 REPEAT 31 AUTO SEARCH 32 PROGRAM 33 OSD 34 STEP 35 N P Front Panel Back Panel Remote Control 1 OPEN CLOSE 2 VOLUME 3 PLAY PAUSE 4 STOP 5 USB 32 GB Max 1 2 3 4 5 6 7 8 9 10 USB STANDBY AUX PREV NEXT 6 PREV 7 NEXT 8 AUX 9 SOURCE 10 STANDBY 2 3 4 1 5 6...

Page 6: ...to the next track DVD CD etc Press to return to the previous track DVD CD etc Forward Reverse Search Repeatedly press to search forward through a disc Repeatedly press to reverse Press for normal playback Slow Press SLOW for slow motion playback Each successive press of SLOW will change the rate of slow motion playback Press to resume normal playback Step Press STEP for frame by frame playback Eac...

Page 7: ...captions are data that are hidden in the video signal of some discs Before you select this function please ensure that the disc contains closed captions information and your TV set also has this function Screen Saver This function is used to turn the screen saver on or off HDCD This function is used to change the HDCD playback settings Last Memory This function is used to turn the Resume Playback ...

Page 8: ...it Contrast This function is used to set contrast of picture Highlight Contrast then press ENTER or button to enter Contrast submenu then press to set contrast from 16 to 16 Press ENTER or OK button to save and exit Gamma Press to choose Gamma level None Low Medium or High Press ENTER to exit Hue Press to adjust the Hue data Press the ENTER to exit Saturation Press to adjust the saturation data an...

Page 9: ...en playing a Video CD disc 1 Press the Title button and the following menu will appear on the TV screen 2 Use the number buttons 0 9 10 to input the time you want 3 Press Title button again to exit Program Play In audio CD mode you can play the contents of the disc in the order you want by programming the order of the tracks to be played Up to 99 tracks can be stored 1 Press PROG to enter program ...

Page 10: ...rom your USB memory device see Specifications section for details Angle Selection Some DVD discs contain scenes which have been shot simultaneously from a number of different angles For these discs the same scenes can be viewed from each of the different angles the recorded angles differ from disc to disc 1 While playing a title shot from different angles the angle mark appears on the TV screen 2 ...

Page 11: ...uctor laser Wavelength 650nm Signal system PAL NTSC AUTO Video format 16 9 4 3 panscan 4 3 letter box Video output level 1 Vp p 75 ohm Video Y output level 1 Vp p 75 ohm Video C output level 286 mV P P 75 ohm Audio frequency response 20Hz 22 KHz 48 Khz 20Hz 22 KHz 96 Khz Tuner Section Tuning Range FM87 5 108 Mhz Usable Sensor FM20dB S N 30dB Auto Stop Sensor FM23dB Signal to Noise Ratio FM 50 dB S...

Reviews: