background image

5

EN

Elements and Installation

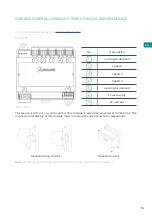
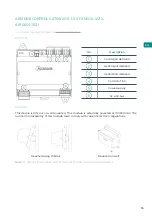
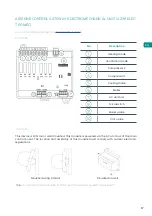
MAIN CONTROL BOARD (AZCE6CB1IAQ)

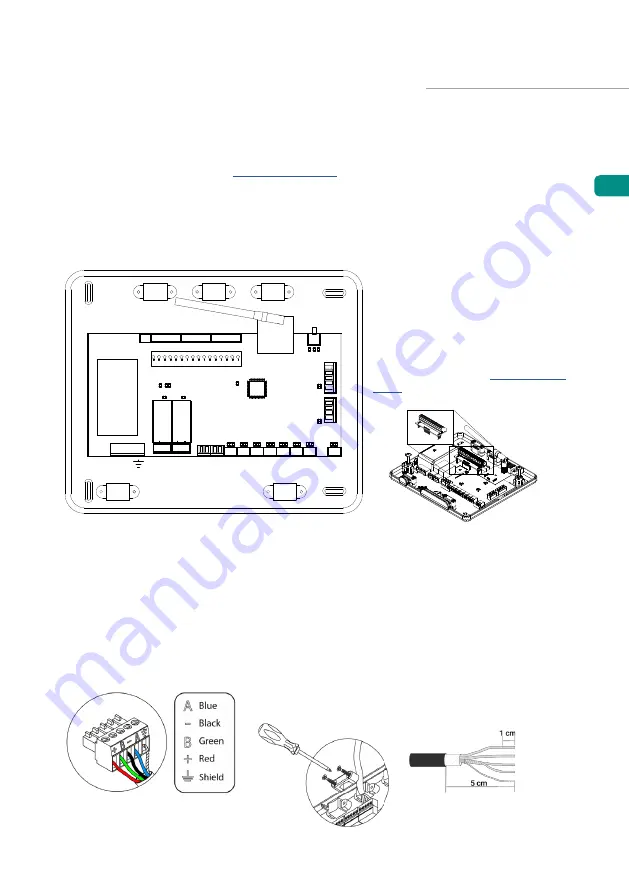
Assembly

Connection

The system's main control board is already installed in the plenum.

AI1 DI1

O1

O2

AZ1 AZ2 AZ3

N L

IAQ

SW1

IU

DM1

IO1 IO2 IO3 IO4 IO5 IO6 IO7

IO8

ON/OFF MODULE

P3

For further information, see the 

technical fact sheet

.

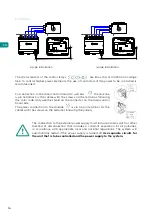
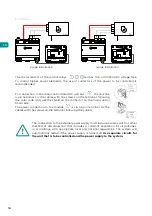
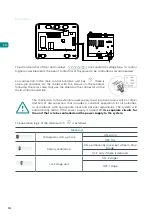
To connect the Airzone connection bus, there are three 5-pin terminals. This system allows star 

and bus connection. Use 2x0.5 + 2x0.22 mm

2

 Airzone cable. Fix the cables with the screws on 

the terminal, following the color code.

Important:


For elements with external power supply at 110/230 VAC, it is only necessary to 

connect poles "A" and "B" of the bus for communications.

For increased safety, fix the cables to the main control 

board using the turrets: 

AZ1 - AZ2 - AZ3 

The Airzone connection bus is used to connect all the internal elements independent of the 

main control board and can control up to 8 zones.

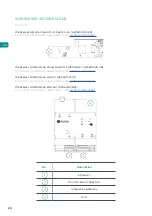
Important:

 If you have a Flexa 4.0 

system, you have the option of 

incorporating a zone On/Off control 

module (AZCE6ACCOFF) on the 

main control board. 

For further information on the On/

Off module, see th

technical fact 

sheet

.

Summary of Contents for AZCE6LITER

Page 1: ...Installation Manual Easyzone ...

Page 2: ...ne Control Gateway 3 Speed Fancoil AZX6FANCOILZ ____________________ 13 Elements______________________________________________________________________________ 13 Assembly______________________________________________________________________________ 13 Connection____________________________________________________________________________ 14 Airzone Control Gateway 0 10 V Fancoil AZX6010VOLTSZ _____...

Page 3: ...___________________ 34 Easyzone plenum assembly____________________________________________________________ 34 Assembly in the indoor unit_______________________________________________________ 34 Fresh air intake CMV assembly_________________________________________________ 35 Additional Easyzone information______________________________________________________ 36 Bypass damper assembly__________...

Page 4: ...___________________________________ 62 Airzone Blueface__________________________________________________________________________ 62 Screensaver__________________________________________________________________________ 62 Main screen___________________________________________________________________________ 62 Advanced settings___________________________________________________________________ 63 ...

Page 5: ...AZCE6BLUEFACEC AZCE6THINKC AZCE6LITEC AZCE6THINKR AZCE6LITER AZX6CABLEBUS D3 R1 R2 R3 R4 R5 R6 R7 R8 AZCE6OUTPUT8 ...

Page 6: ...de matières particulaires FR Platine centrale du système FR Passerelle de contrôle FR Unité intérieure IT IAQ Easyzone IT Ionizzatore Airzone IT Sensore di particolato IT Scheda centrale del sistema IT Interfaccia di controllo IT Unità interna PT QAI Easyzone PT Ionizador Airzone PT Sensor do material particulado PT Central do sistema PT Gateway de controlo PT Unidade interior DE Easyzone RLQ DE A...

Page 7: ... urban waste For correct environmental management at the end of its useful life the equipment should be taken to the collection centers provided for this purpose The parts that make it up can be recycled Therefore please respect the regulations in force regarding environmental protection If you replace the equipment the original equipment must be returned to your dealer or deposited at a specializ...

Page 8: ...power lines fluorescent lights actuators etc as this may cause interference in communications The connection to the external power supply must include a main switch or other method of disconnection that includes a constant separation for all polarities in accordance with appropriate local and national regulations The system will Before Starting automatically restart if the power supply is turned o...

Page 9: ...ables with the screws on the terminal following the color code Important For elements with external power supply at 110 230 VAC it is only necessary to connect poles A and B of the bus for communications For increased safety fix the cables to the main control board using the turrets AZ1 AZ2 AZ3 The Airzone connection bus is used to connect all the internal elements independent of the main control ...

Page 10: ...portant For elements with external power supply at 110 230 VAC it is only necessary to connect poles A B and Shield of the communications bus Only use the shield on the connector on the main control board side IU The communication gateway controller gateway will already be connected to the system s main control board at the port For more information refer to your gateway s data sheet IO1 IO8 Conne...

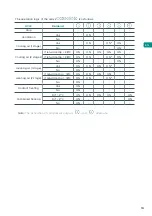
Page 11: ...and ON OFF OFF OFF OFF ON Demand OFF OFF OFF OFF OFF OFF The technical characteristics of the CMV Boiler relays are Imax 1 A at 24 48 V voltage free To control higher power elements the use of contactors of the power to be controlled is recommended The technical characteristics of the Stop Start relays are Imax 1 A at 24 48 V voltage free To control higher power elements the use of contactors of t...

Page 12: ...matically restart if the power supply is turned off Use separate circuits for the unit that is to be controlled and the power supply to the system Once all the connections have been made make sure the cover of the main control board is correctly replaced TEMPERATURE PROBE AZX6SONDPROTEC For further information see the technical fact sheet Connects to the temperature probe AI1 connector Protects th...

Page 13: ... OX demand of the radiant element in zone X Note To remove the module pull the tab downwards to release it For further information see the technical fact sheet The characteristics of the control relays are Imax 10 A at 110 230 VAC voltage free To control higher power elements the use of contactors of the power to be controlled is recommended Remember to connect the neutral directly from the circui...

Page 14: ...ration is repeated once a week to ensure correct operation of the valves The connection to the external power supply must include a main switch or other method of disconnection that includes a constant separation for all polarities in accordance with appropriate local and national regulations The system will automatically restart if the power supply is turned off Use separate circuits for the unit...

Page 15: ...t Place the anti vandalism rods to better hold the thermostat in place optional Airzone thermostats are elements that are connected to the Airzone connection bus on the main control board Fix the cables with the screws on the terminal following the color code Important Use the tool provided to press on the fastening tabs Main control board connection Thermostat connection AZCE6BLUEFACEC For furthe...

Page 16: ...at and insert the CR2450 button battery Fix the back of the thermostat to the wall Place the display over the fixed support Place the anti vandalism rods to better hold the thermostat in place optional Note If you wish to change the battery please see the user s manual Elements AZCE6THINKR For further information see the technical fact sheet AZCE6LITER For further information see the technical fac...

Page 17: ...upply AC unit bus This device is DIN rail or wall mounted This module is externally powered at 110 230 VAC The location and assembly of this module must comply with current electronic regulations Mounted on wall Mounted using DIN rail Note To remove the module on DIN rail pull the tab downwards to release it For further information see the technical fact sheet ...

Page 18: ...the cables with the screws on the terminal following the polarity The connection to the external power supply must include a main switch or other method of disconnection that includes a constant separation for all polarities in accordance with appropriate local and national regulations The system will automatically restart if the power supply is turned off Use separate circuits for the unit that i...

Page 19: ...ower supply AC unit bus This device is DIN rail or wall mounted This module is externally powered at 110 230 VAC The location and assembly of this module must comply with current electronic regulations Mounted on wall Mounted using DIN rail Note To remove the module on DIN rail pull the tab downwards to release it For further information see the technical fact sheet ...

Page 20: ...the terminal following the color code Only use the shield on the connector on the main control board side The power connection to the module is via a 3 pin terminal Fix the cables with the screws on the terminal following the polarity The connection to the external power supply must include a main switch or other method of disconnection that includes a constant separation for all polarities in acc...

Page 21: ...oswitch Boiler probe Unit probe This device is DIN rail or wall mounted This module is powered via the AC unit bus of the main control board The location and assembly of this module must comply with current electronic regulations Mounted on wall Mounted using DIN rail Note To remove the module on DIN rail pull the tab downwards to release it For further information see the technical fact sheet ...

Page 22: ...nt separation for all polarities in accordance with appropriate local and national regulations The system will automatically restart if the power supply is turned off Use separate circuits for the unit that is to be controlled and the power supply to the system The characteristics of the control relays are 24 48 VAC voltage free To control higher power elements the use of contactors of the power t...

Page 23: ...temp 28 C ON ON ON ON No ON ON Heating air 1 stage Yes ON ON ON ON No ON Heating air 2 stage If return temp 18 C ON ON ON ON If return temp 18 C ON ON ON No ON Radiant heating Yes ON No ON Combined heating Dif Z C ON ON ON ON ON Dif Z C ON ON No ON The operation logic of the relays is as follows Note The activation of compressor outputs and alternate ...

Page 24: ...rzone Lutron AZX6WSPLUT For further information please refer to the technical datasheet Webserver HUB Airzone BACnet AZX6WSPBAC For further information please refer to the technical datasheet Webserver Airzone Cloud Wi Fi Dual 2 4 5G AZX6WSC5GER For further information please refer to the technical datasheet No Description Ethernet Domotic Bus connection Integration gateway WiFi ...

Page 25: ...ish to connect the Webserver and engage the connector System control board AZX6WSC5GER AX6CCPGAWI AZX6WSC5GER Note Remove the fixing post from the Webserver for mounting on the CCPGAWI The Webserver HUB AZX6WSPxxx is DIN rail or surface mounted The location and the assembly of this module must be compliant with the applicable electronic regulations DIN rail mounting Wall mounting Note to remove th...

Page 26: ...ystem control boards If the Webserver Airzone Cloud is connected to the CCP use the CCP s internal domotic bus to connect to the system control board ON 1 2 D34 D35 D3 D11 D9 D8 AZX6WSC5GR from AX6CCPGAWI to system control boards Note Remember that for this module to operate properly all the control boards must be addressed see the Advanced system configuration section The connection icon indicate...

Page 27: ...he control board Attach the wires with the terminal screws following the colour code Use the ground only in the connector on the side of the control board ROUTER Ethernet AZX6WSPxxx ROUTER Wi Fi AZX6WSPxxx All Airzone systems must be connected to the Internet to provide technical support AZX6WSC5GER AZX6WSPHUB Only one Webserver per installation needs to be connected control up to 32 systems AZX6W...

Page 28: ...sembly and make the relevant connections Use the washers and screws to fix the display to the embedded box Replace the frame Make sure that it is properly secured Surface mounted AZX6CSMASTERS Embedded AZX6CSMASTERE Connection The Supermaster controller is an element that connects to the automation bus on the system s main control board For the surface mounted supermaster use the tabs on the back ...

Page 29: ...regulations To mount the production control board follow these steps Locate the production control board close to the AC unit to be controlled Unscrew the cover to fix the rear part to the wall Once all connections have been made screw the cover back on Important This element is not compatible with the supermaster controller AZX6CSMASTER Important This element is not compatible with the supermaste...

Page 30: ...ard has an analogue input for connecting a temperature probe to protect the boiler The automation bus allows several systems to be interconnected in order to manage all of them using the control peripherals offered by Airzone or their integration into a higher level control network To connect the automation bus there are two 5 pin terminals This system only uses bus connections Fix the cables with...

Page 31: ...nection of gateway AZX6ACUACP to AZX6CCP Control relays This device has 6 relays for controlling the installation The characteristics of the control relays are Imax 10 A at 110 230 VAC voltage free To control higher power elements the use of contactors of the power to be controlled is recommended Important Remember to connect the neutral directly from the circuit to the element to be controlled De...

Page 32: ...a 4 0 and Innobus Pro8 system main control boards Gateway modules AZDI6MCIFR C R AZDI6MCxxx C R AZDI6ZMOxxx C R in Acuazone e Innobus Pro32 v 4 4 0 or lower systems when configured as a zoning system or mixed system For Acuazone and Innobus Pro 32 systems versions v 4 4 1 or higher In any configuration of the Acuazone central operating logic zones with air flow stage configured as Direct Expansion...

Page 33: ...W1 for 10 seconds SW2 The SW2 microswitch configures the type of installation to be controlled by the production control board The operation logic of the microswitch is as follows Meaning Aerothermal 2 pipes 3 4 pipes RadianT Once all the connections have been made make sure the cover of the main control board is correctly replaced Power supply Integration bus output This connector supplies power ...

Page 34: ...ith current electronic regulations Note To remove the module pull the tab downwards to release it For further information see the technical fact sheet To configure it follow the steps described in the KNX installation manual The Airzone KNX integration gateway is connected to the automation bus on the main control board To do this there is one 5 pin terminal Fix the cables with the screws on the t...

Page 35: ...ote Remove the fixing post adhesive first For further information see the technical fact sheet Important The use of the Airzone BACnet gateway is incompatible with the following elements Webserver Airzone Cloud AZX6WEBSCLOUD C R and AZX6WSCLOUDDIN C R Airzone production control board AZX6CCP Airzone supermaster controller AZX6CSMASTER S E Airzone KNX integration gateway AZX6KNXGTWAY Airzone Lutron...

Page 36: ...move the fixing post adhesive first For further information see the technical fact sheet Important The use of the Airzone Lutron integration gateway is incompatible with the following elements Webserver Airzone Cloud AZX6WEBSCLOUD C R and AZX6WSCLOUDDIN C R Airzone production control board AZX6CCP Airzone supermaster controller AZX6CSMASTER S E Airzone KNX integration gateway AZX6KNXGTWAY Airzone ...

Page 37: ...o the module is via a 2 pin terminal Fix the cables with the screws on the terminal following the polarity To connect to the Airzone system main control board carry out the following steps 1 Open the system s wireless channel 2 Press to associate the consumption meter 3 The LED will be displayed in search status blue and will change to associated green If it doesn t please refer to the self diagno...

Page 38: ... a screwdriver to uncover them to fix the Easyzone to the unit Important If your unit has a front with circular adapters remove this and mount the supplied adapter Place the Easyzone over the unit s supply vent and fix it using the screws Be sure to insulate the connection neck Use strips of 25 mm thick insulation material glass wool or polyethylene foam The width of these insulation strips is 97 ...

Page 39: ... the lower part of the supply dampers to allow the air to pass through Fresh air intake CMV assembly Remember that the motorized elements are numbered in the following manner Connect the duct from each zone to its corresponding damper Follow the instructions for proper insulation Make a cut in the duct to keep the motor outside If your Easyzone has CMV and you wish to use this function ...

Page 40: ... area on the sides corresponding to the bypass Using a utility knife remove the insulation covering the bypass area and uncover the bypass fixing slots Fit the bypass damper into the slots and turn from left to right until it reaches the stop Damper override Ensure that the damper to be overridden is closed Disconnect the actuator Insert the sealing cap on the damper ...

Page 41: ...pers are manufactured and delivered with the override already done so the plenums are as follows For plenums with 7 dampers the damper that is overridden is no 8 so when carrying out the initial configuration you must take into account that zone 8 will not be connected ...

Page 42: ...Place the display over the fixed support 5 Place the anti vandalism rods optional to better hold the thermostat in place AZ1 AZ2 AZ3 AZ1 AZ2 AZ3 CONNECTION TO THE INDOOR UNIT Follow the instructions on the gateway s technical data sheet Installation of the AC unit s thermostat is recommended D3 Indoor unit OTHER PERIPHERALS Follow the instructions on their technical data sheet Important For elemen...

Page 43: ... the terminal to the power supply input and tighten the cable gland to attach the power supply cable The connection to the external power supply must include a main switch or other method of disconnection that includes a constant separation for all polarities in accordance with appropriate local and national regulations The system will automatically restart if the power supply is turned off Use se...

Page 44: ...icating the opening of motorized elements light up in sequence 3 Power supply to wired and wireless thermostats D62 D67 D60 D61 D63 D64 D65 D66 D36 D38 D40 D42 D44 D46 D54 D56 D37 D39 D41 D43 D45 D47 D55 D57 D3 D11 D9 D8 D1 D2 D5 D4 D18 D19 D10 D6 D7 AI1 DI1 O1 O2 AZ1 AZ2 AZ3 N L IAQ SW1 IU DM1 IO1 IO2 IO3 IO4 IO5 IO6 IO7 ON OFF MODULE P3 IO8 Blinking Steady Switches IO1 IO8 IO1 IO8 Green Damper o...

Page 45: ...ding control output actuator output or radiant element control relay output Languages Spanish English French Italian Portuguese German The system allows you to associate more than one control output to a zone if needed It is therefore possible to manage several control outputs from a single thermostat Finish the process access the advanced settings and or activate the basic function the latter all...

Page 46: ...element control relay output Wireless Think Open the wireless association channel To do so click SW1 Once opened you have 15 minutes to perform the association You can also open the wireless association channel through the Blueface thermostats Wired Think Go to step 4 IMPORTANT Remember not to have more than one channel open in the same installation at the same time SW1 Languages Spanish English F...

Page 47: ...s from a single thermostat Master Allows the control of all installation parameters Zone Only allows the control of the zone parameters Stages to be controlled Air Radiant Combined Finish the process access the advanced settings and or activate the basic function the latter allows on off speed setting operation mode setting and temperature setting ...

Page 48: ...ciation channel through the Blueface thermostats IMPORTANT Remember not to have more than one channel open in the same installation at the same time Wired Lite Go to step 3 If you want to configure other thermostat settings you must access the zone advanced settings menu from an Airzone Blueface thermostat The icon will blink 5 times in green to indicate that the association is correct If the icon...

Page 49: ...nd on to check that the associated control outputs are correct 4 Check that the static pressure in the ducted AC unit is in accordance with the conditions of the airflow distribution network in which it is installed see the manufacturer s manual for the AC unit if you need to modify this parameter SYSTEM RESET If you need to return the system to factory settings press and hold SW1 until LED D19 st...

Page 50: ...one damper to be adjusted 3 Adjust the desired maximum opening with the REG lever I II III IV 4 Turn on the zone and verify that the airflow is correct MINIMUM AIR ADJUSTMENT A M 1 Turn on and generate demand in all the zones to open all the dampers 2 Adjust the desired minimum opening with the A M lever a b c d 3 Turn off the zone and verify that the minimum airflow is correct A M REG Damper open...

Page 51: ...47 EN System Advanced Settings AIRZONE BLUEFACE AIRZONE THINK Press and hold Press and hold Press and hold ...

Page 52: ...of the Control stages parameter in the user Zone settings menu Hysteresis Config This defines the temperature differential between the room temperature and the set point temperature to begin to apply the RadianT algorithm which aims to prevent underfloor heating installations overheating In installations with radiators set this value to 0 C By default it is set to 0 C Type of opening This allows y...

Page 53: ...for Airzone Think thermostats 1 In direct expansion units This allows you to define the airflow control algorithm that best fits the duct installation The options available are Maximum The system operates at maximum speed regardless of the number of zones Power The system operates at a higher speed than in Standard mode to ensure airflow is increased Standard by default The system changes speed de...

Page 54: ...ic mode are On Off Set point temperature Operation mode only if this is the master thermostat Fan speed If you need to reset the thermostat to Advanced mode access the Advanced settings menu and activate Advanced use mode Note It cannot be configured as Master if there is already another thermostat configured as such Control stages Only available in installations with AZCE6OUTPUT8 modules This all...

Page 55: ... gateway Main control board Gateway Indoor unit Webserver Airzone system Control module of radiant elements Main control board Expansion module Main control board Consumption meter Main control board Lutron gateway Airzone system Production control board Main control board Air to water gateway Production control board Air to water gateway Air to water unit AC unit error Anomaly in the AC unit 1 8 ...

Page 56: ...ck that the voltage between poles A and B is 1 8 VDC 5 Restart the zone and reassociate it to the system Blueface thermostats Press on the word Reset to restart the device If the error persists press and hold the icon and reset the thermostat Carry out the initial configuration of the system Think thermostats Press and hold on and perform the initial system configuration process 6 Restart the syst...

Page 57: ...associate it to the system To do this press and hold on and perform the initial system configuration process Remember that in order to associate wireless devices you should first open the wireless association channel either through the SW1 button on the main control board or from any thermostat in the Radio channel parameter of the System advanced settings menu Zone parameters 5 Restart the system...

Page 58: ...e thermostat and initiate the association sequence 1 8Vdc 1 8Vdc The zone loses the room temperature measurement of an associated wireless Lite thermostat leaving the zone disabled and unable to generate demand From your Blueface thermostat check whether the Lite thermostat has lost communications To resolve this issue make the following checks 1 Power supply Check the battery s status and if in d...

Page 59: ...stat To resolve this issue make the following checks 1 Check that the gateway is properly connected to the main control board s IU port 2 If the gateway is a DIN rail format check that the polarity of the connectors of the gateway and the main control board s IU port is correct 3 Check that the status of the connected gateway s LEDs is correct To do so make use of the troubleshooting section or yo...

Page 60: ...heck that the AC unit is powered To do this check that the AC unit s thermostat is switched on 2 Check whether the AC unit operates properly independently of the system To do so disconnect the AC unit from the Airzone system and activate the unit from the AC unit s thermostat 3 Connections Check that the polarity of the connections to the gateway and indoor unit is correct Consult your gateway s t...

Page 61: ...rrect To do so make use of your Webserver s self diagnostics section or technical fact sheet Webserver Airzone Cloud This issue does not allow the system to control the device To resolve this issue make the following checks 1 Status of control module of radiant elements Check that the power supply is correct 2 Status of control module of radiant elements and the main control board Correct operatio...

Page 62: ...LED bring the meter closer to the main control board If it recovers communications it will be necessary to relocate it because it was out of range 2 Status of the consumption meter Check that the power supply is correct This incident doesn t allow you to measure the AC unit s consumption To resolve this issue make the following checks Check that the ammeter clamp is properly connected to the AC un...

Page 63: ...ctions Check that the polarity of the connections to the CCP and the main control board are correct Blinking The gateway loses communication with the air to water unit Control of the system will be disabled thus allowing the air to water unit to operate from the manufacturer s thermostat To resolve this issue make the following checks 1 Check that the gateway is properly connected to the productio...

Page 64: ...C unit Error IAQ1 Loss of communication between the main control board and its bottom side Error IAQ2 Loss of communication between the Airzone particle sensor main control board Consult the type of incident on the AC unit s thermostat and perform the repair actions indicated by the manufacturer Occurs when synchronization or communication between the two sides of the main control board is lost It...

Page 65: ...urification This error occurs when an actuator is directly connected to the outputs intended for the ionization boards on the main control board It can cause the actuators to stop running If you reset the system the error will become IAQ3 and will allow ionization in all zones except this one You can resolve this issue by following the steps below 1 Check that you have not connected an actuator di...

Page 66: ...ystem consumption On Off R e l a t i v e humidity HVAC control Time schedules Operation mode Eco Adapt function Zone navigation Room temperature Time and date Room temperature IAQ On Off Zone name R e l a t i v e humidity Zone status warnings or errors IAQ Note If the system has Webserver weather information will also appear ...

Page 67: ...ng Heating Dry Ventilation Stop ECO Adapt Off A A A Automatic High Medium Low Fan speed Temp Temp Lang Country Brightness Date and time Clean screen Screensaver Information Period of activity Energy Press and hold on the zone settings Icon Sleep mode Anti freezing Grille angle Control stages Q Adapt Lite settings Purification Associated outputs Thermostat settings Use mode Control stages Offset Re...

Page 68: ... mode Eco Adapt function Fan speed Set point temperature Access the main screen by pressing Airzone from the screensaver Sleep mode Main screen confirm AIRZONE THINK Screensaver Date Zone status Main screen confirm Control bar On Off Note If the system has Webserver weather information will also appear ...

Page 69: ...and IAQ Operation mode Cooling Heating Dry Ventilation Stop ECO Adapt Off A A A Automatic High Medium Low Fan speed Temp Temp Press and hold twice on Airzone Mode Speed Sleep mode Zone navigation Purification Associated outputs Thermostat settings Use mode Control stages Offset Reset thermostat System address Temperature range Combined stage Hysteresis Config Type of opening Q Adapt Relay settings...

Page 70: ...airzonecontrol com Marie Curie 21 29590 Málaga Spain v 201 ...

Reviews: