background image

21

Voice Processor 2x

Going Online • Upgrading Firmware

Going Online

Once you have completed the Hardware Connections, 
connected your network (refer to Network Configuration), 
launched the 2x software and run the Connection Wizard, 
you should be ready to Go Online with your device.
The process of Going Online with a device can go one of 
two ways: either you are transferring a file currently open on 
your computer to the device, or you are transferring a file 
on the device to your computer. Either way, the 2x software 
must “know” about the device first, which is what the 
Connection Wizard accomplishes.
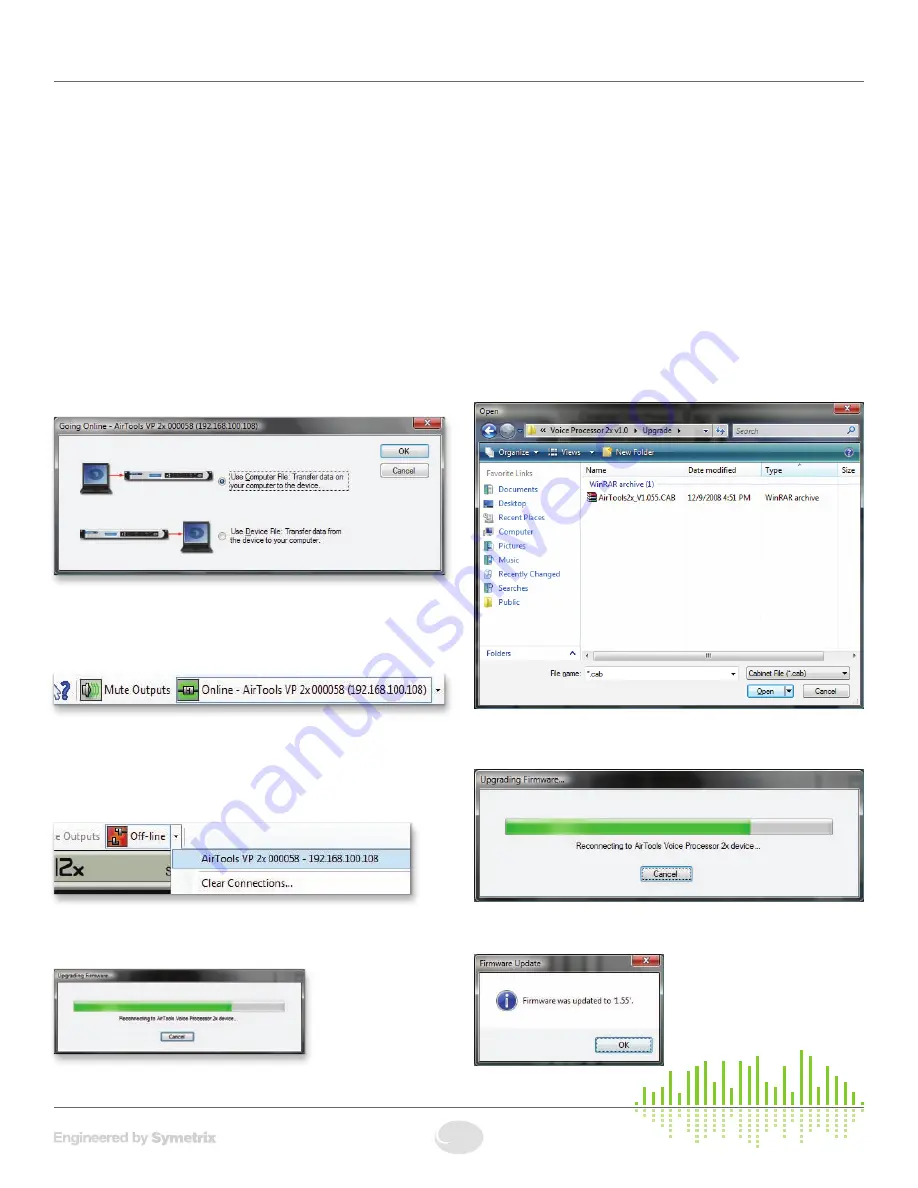
After you have successfully run the Connection Wizard 
and determined the unit you will be going online with, you 
can click the “Offline” button in the toolbar to toggle it to 
“Online”. The following dialog will appear offering you the 
two choices detailed in the previous paragraph:

Make your choice and click OK. You are now online and the 
“Online/Offline” button in the toolbar will display “Online” as 
well as the device’s name and IP address with which you  
are online:

Additionally, the 2x software keeps a list of recently 
connected devices which you can use to quickly get online 
with a specific unit - if you already know the name and/or IP 
address of the unit you wish to connect to and that unit is 
currently available on the network:

If the specified unit can not be found on the network, you 
will be prompted to run the Connection Wizard to discover a 
unit to go online with:

Upgrade Firmware.

IMPORTANT: 

The 2x Firmware must be matched with the 

version of the Room Combine Application you are using. 
The correct firmware for the Application is always distributed 
with the Application and installed on your hard drive by the 
Application’s installer. If there is every any doubt, follow the 
instructions below to check your firmware version or to 
upgrade the firmware.
You must be online with a unit to upgrade the firmware. 
To upgrade the firmware, launch the Voice Processor 2x 
Application and go online to access the Upgrade Firmware 
dialog found in the Tools pull down menu.
From the Firmware Update dialog, click Browse... to locate 
the upgrade .cab file.
Select the firmware upgrade .cab file and click Open.

Click the Start button to begin the process and a status bar 
will show progress of the upgrade.

When finished a confirmation window will appear. Click OK 
to complete the Firmware Upgrade process.

Summary of Contents for Voice Processor 2x

Page 1: ...Voice Processor 2x Quick Start Guide...

Page 2: ...6408 216th Street SW Mountlake Terrace WA 98043 USA T 1 425 778 7728 F 1 425 778 7727 www SymetrixAudio com 2 Quick Start Guide...

Page 3: ...heat This apparatus shall be connected to a mains socket outlet with a protective earthing connection Do not defeat the safety purpose of the polarized or grounding type plug A polarized plug has two...

Page 4: ...45 connectors labeled REMOTE are only for use with AirTools Multiband Processor 2m remotes DO NOT plug the REMOTE connectors on this product into any RJ45 connector labeled ETHERNET SYMLINK or COBRANE...

Page 5: ...ttings are saved as named presets for later recall from the front panel or remotely Any mic can be optimized for a diverse air staff with either male or female voices Our Voice Processor legacy began...

Page 6: ...al to the signal source ground preferred or ground the minus input to the adjacent ground terminal tie low to ground Using the second method deprives you of the common mode rejection inherent in a bal...

Page 7: ...h UTP CAT5 cabling 1 Warning Refer to the Remote Warning for compatibility information REAR PANEL ITEM DESCRIPTION DETAILS Power Input IEC 3 prong jack Accepts power from detachable IEC power cable 10...

Page 8: ...OTE connectors on this product into any RJ45 connector labeled ETHERNET COBRALINK or SYMLINK Refer to the Remote Warning for compatibility information RS 485 Reserved for factory use only Ethernet Usi...

Page 9: ...may also be switched to Mic Level output For more information see Mic Level Output Conversion NOTE Wiring the outputs to an unbalanced cable will typically result in an output level that is 6 dB lowe...

Page 10: ...ter 40 dBu 50 dBu 10 dBV 20 dBu 4 dBu Inv Gain Set Inverter Channel 2 DSP Bypass Compressor Bypass Active Compressor Bypass Active Equalizer Bypass Active Equalizer Bypass Active Bypass Active Equaliz...

Page 11: ...head screwdriver Top Cover Removal 1 Ensure that the 2x is disconnected from the AC power source 2 Remove the 6 32 x 1 2 inch screw from the top panel 3 Slide the top cover rearward and lift free of t...

Page 12: ...into the INPUT of a device Balanced Connections Any of these connectors can appear on either side of a balanced connection NOTE In the case of an XLR connector the Female attaches to an output while t...

Page 13: ...ections Balanced out to unbalanced in When your output requires a balanced connector but you are sending signal to an unbalanced input the rules change Use a single strand shielded wire Wire only to t...

Page 14: ...ode However if your PC is using the default network settings it should also have automatically self assigned a similar private IP address in the range of 169 254 x x and if this is the case you should...

Page 15: ...nnecting to the 2x through a Firewall VPN We have successfully tested control of a 2x through a firewall and VPN but are unable to guarantee performance of these types of connections at this time Conf...

Page 16: ...er is not required for connection to a 2x Otherwise leave set to Obtain an IP address automatically if using DHCP 6 Press OK to save and Close to exit out of the Local Area Connection Properties Confi...

Page 17: ...nd 7 for Internet Protocol Version 6 TCP IPv6 if on an IPv6 network Consult your IT staff if you are unsure 9 Press OK to save and Close to exit out of the Local Area Connection Properties For more in...

Page 18: ...the software browse the rest of the Help File or move on to the Connection Wizard to get connected to your 2x Launch the software You can launch the Voice Processor 2x software via either the Start M...

Page 19: ...Next button However there are a few more functions on this screen worth mentioning Properties The device Properties dialog allows you to give a device a unique name to help identify it It also allows...

Page 20: ...r your PC you may need to configure your PC with a static IP in the range of 169 254 x x with a Subnet Mask of 255 255 0 0 in order to communicate with the 2x in a direct connect mode However if your...

Page 21: ...a list of recently connected devices which you can use to quickly get online with a specific unit if you already know the name and or IP address of the unit you wish to connect to and that unit is cur...

Page 22: ...upon the particular remote in use and shall be via industry standard CAT5 cable with RJ45 connectors to the front or rear panel REMOTE ports All program memory shall be non volatile and provide progra...

Page 23: ...luded from this warranty Limitation of Liability The total liability of Symetrix on any claim whether in contract tort including negligence or otherwise arising out of connected with or resulting from...

Page 24: ...poses only and constitutes neither an endorsement nor a recommendation Symetrix assumes no responsibility with regard to the performance or use of these products Under copyright laws no part of this b...

Reviews: