12
UVHEALTH BIO2000 Installation Manual
3. Detach the unit from the duct or Ductboard Adaptor
Plate by removing the four sheet metal screws. Save
the sheet metal screws for reattaching the unit.
Carefully slide unit out of duct.
4. Remove the lamp with the following steps. Disconnect
the ballast from the lamp by unplugging the four pin
connector (see Figure 7). Loosen lamp clip and slide
through the front end of the unit (see Figure 6). Be
careful not to break lamp.
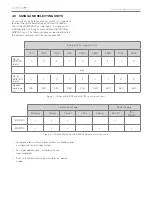
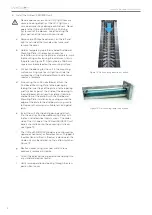
5. Unscrew the end bracket by removing the hex screws.
Save the hex screws for reattaching the end bracket.
The end bracket is located on the opposite side of the
model to the power source. See Figure 14.
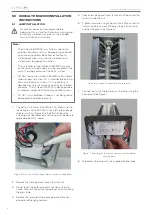
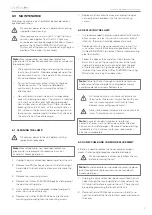
6. With the end bracket taken off, the honeycomb and
carbon media can be slid out of the opening in the back
of the unit. See Figure 15. The honeycomb panel and
the carbon media insert must be removed together
even if only one needs replacing.
Figure 14: Removing the end bracket hex screws
7. Replace any removed pieces of either honeycomb or
carbon media with the specified replacement parts
only. When sliding the replacement pieces back into
the unit, check and make sure the honeycomb is placed
on the inside while the carbon media is touching the
outside side panel.
8. Once the replacements are slid all the way into the
opening, attach the end bracket with previously
removed hex screws.
9. Carefully insert the lamp through the grommet on
the front end of the unit. Re-attach the lamp clip by
tightening down on the plastic end cap of the lamp. Re-
attach ballast by plugging connector into the four pins
of the lamp. Use a cotton cloth with isopropyl alcohol
and gently clean surface of lamp.
Figure 15: Removing the honeycomb and carbon media
10. Insert the unit back into duct opening and attach to duct
or Ductboard Mounting Plate using the four sheet metal
screws that were previously removed. The V shape of the
unit should face into the panel, see Figure 12. Replace
front electrical cover and plug the quick connect power
cord back into the unit.
11. Look through the round sight glass hole and verify the UV
lamp is lit. There should be a blue glow along the length.
If the lamp is not lit, follow the Troubleshooting guide.

