5
AC DOC
REV 9/14/2016
1.0 INSTALLATION & CONFIGURATION INSTRUCTIONS
1.1 AIRCYCLER® G1 CONTROLLER LOCATION
The AirCycler® g1 controller can be installed near the thermostat or out of view on/near the air handler unit.
Warning: Before installing the AirCycler®, turn off all power to the furnace. There may be more than one power to disconnect.
Electrical shock can cause injury or death.
1.2 CONFIGURING THE AIRCYCLER G1®
On power up, all icons will be illuminated for 3 seconds.
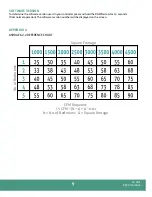
There are two set up methods: Calculated Flow and Calculated Time. If you know the amount of fresh air coming into the
air handler as well as flow required by code you can use Calculated Flow to meet requirements. If you prefer to configure
the amount of time you want fresh air to enter the home per hour, use Calculated Time.
To set up the AirCycler® g1 based on
Calculated Flow
press and hold the
UP
arrow for 10 seconds.
To set up the AirCycler® g1 based on
Calculated Time
press and hold the
DOWN
arrow for 10 seconds.
OPERATING MODE DISPLAY
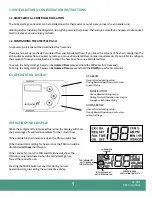
When the AirCycler® is in Normal Operation, the display will show
the percentage of ventilation complete for the current hour.
If the outside fresh air damper is open the OA icon will show.
If the thermostat is calling for heat or cool, the FAN icon will be
illuminated
without
the ON icon.
If the central fan is on, the FAN and ON icons will show. The
ON icon is only illuminated when the AirCycler® g1 has
forced the central fan on.
Pressing the MODE button at any time during normal
operation will go to setting the current time of day.
THE THERMOSTAT
HAS TURNED ON
THE CENTRAL FAN
THE AIRCYCLER® G1
HAS FORCED THE FAN
THE DAMPER
IS OPEN
PERCENTAGE OF
VENTILATION COMPLETE
G1 OPERATION & DISPLAY
UP ARROW
Use as directed during set up.
During Normal Operation, use to view
current status
MODE BUTTOM
Use as directed during set up.
During Normal Operation, use to cycle
through current time of day
DOWN ARROW
Use as directed during set up.
During Normal Operation, use to view
current settings


