background image

Page 9

Air Techniques, Inc. 

compUTeR sysTem ReqUIRemenTs

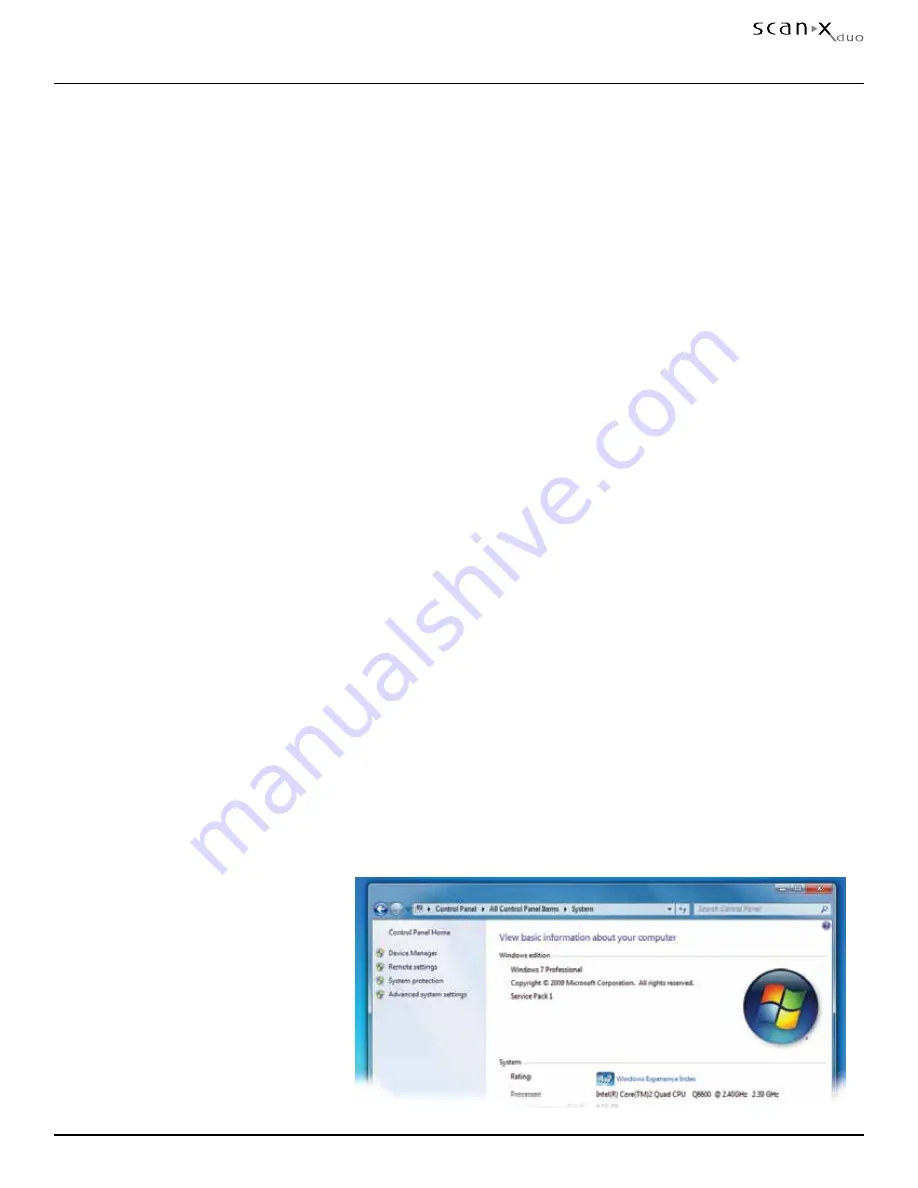
System Properties.

If unsure of the operating system 
version installed, check that it 
meets the necessary requirements 
by checking the 

System Settings


window as shown to the right .  
The 

System  Settings

 window 

can also be opened from the 

Control Panel 

button . Just 

press the 

Start

 button and select 

Control Panel

 and then click the 

System

 icon .

IMPORTANT:

  To operate ScanX, it must be connected to a compliant Computer System 

supplied by the customer.  In addition, authorized Imaging Software, 

purchased from your dealer or other company, must be installed on the 

computer in order to operate ScanX.  Contact your dealer for available 

Computer System and Software options.

Computer System Required Components.  

The minimum computer system, computer and monitor, 

requirements necessary to operate ScanX are listed below . 

Operating System: 

Windows XP Professional with Service Pack 3 or later for an Intel 32-bit 
processor;


Microsoft Windows XP Professional 64-bit Edition with Service Pack 2 or 
later for an Intel 64-bit extended (x64) processor;


Microsoft Windows Vista Business, Enterprise, or Ultimate with Service 
Pack 2 or later for an Intel 32-bit or an Intel 64-bit extended (x64) 
processor; 


Microsoft Windows 7 Professional, Enterprise, or Ultimate with Service 
Pack 1 for an Intel 32-bit or an Intel 64-bit extended (x64) processor .

USB Port/Version: 

USB 1 .1 or later

Hard Drive: 

200 MB available disk space required to start scanning .

Image Management 

Compatible authorized third-party software 

Software: 

(not included with product) . 

Optical Drive: 

Device capable of reading a CD-ROM required

Recommended Components.  

The items listed below are recommended (but not required) computer 

system components to aide in ScanX operation 

CPU/Speed: 

3 GHz Intel CORE2

System RAM: 

2 GB

Monitor  

SVGA 24”, 1280x1024 or higher resolution, contrast ratio 
10,000:1,  .22 dot pitch

Video Display Adapter: 

32 MB RAM

Peripherals: 

Standard Keyboard & Mouse, Backup Device, External Surge 
Protector and Power supply backup

Summary of Contents for ScanX Duo

Page 1: ...ScanX Duo Digital Imaging System Instruction Manual...

Page 2: ...s a leading manufacturer of dental medical and veterinary equipment since 1962 The ScanX Duo is designed to process intraoral imaging plates only See the sections Unpacking and Inspection and Technica...

Page 3: ...or symbols are used on the equipment on the serial number label or in this manual to denote information of special importance DANGER AVOID DIRECT EXPOSURE TO BEAM LASER RADIATION WHEN OPEN CAUTION CLA...

Page 4: ...of ScanX is only accessible by removing hardware with tools It should be opened and ser viced only by an authorized dealer service technician Failure to heed this warning may result in equip ment dam...

Page 5: ...a trained technician from an authorized dealer should remove a cover from ScanX Direct eye contact with the output beam from the laser may cause serious damage and possible blindness Do not open ScanX...

Page 6: ...ich accumulate condensation or become wet through a change of temperature may only be operated after they are fully dry Air Techniques regard themselves as being responsible for the equipment with reg...

Page 7: ...e The manufacturer is not to be held liable for any damage caused as a result of incorrect usage The operator bears all risks This manual provides the information necessary for the setup operation and...

Page 8: ...item is missing notify your dealer Unpacking and inspection System Components Description Quantity Part No 10 Foot Power Cord 1 73096 6 Foot 2 0 USB Cable 1 B3554 Accessory Kit containing Pack of 4 S...

Page 9: ...rvice Pack 3 or later for an Intel 32 bit processor Microsoft Windows XP Professional 64 bit Edition with Service Pack 2 or later for an Intel 64 bit extended x64 processor Microsoft Windows Vista Bus...

Page 10: ...indicator Illuminates steady blue to indicate that the Erase function is ON and PSPs will be erased after scanning Flashes blue to indicate that the Erase function is OFF and PSPs will not be erased...

Page 11: ...d Resolution Range Horizontal 10 to 12 lp mm Vertical 10 to 18 lp mm Compliance Data Laser Class Class I Laser Product 21 CFR 1040 10 Class 1 Laser Product IEC 60825 1 Laser Product Report Accession N...

Page 12: ...s AC or a c alternating current CD ROM compact disk read only memory CFR Code of Federal Regulations CPU central processing unit your computer cm centimeter D depth GB gigabyte 230 109 bytes GHz Giga...

Page 13: ...e computer meets all requirements listed on page 9 3 Verify that an authorized Imaging Software is installed properly on the computer 4 Verify that the supplied ScanX Drivers and Utilities Disk which...

Page 14: ...Press HERE to turn ON or OFF Standby Main Power Switch 1 0 See Note IEC Connector 2 A Circuit Breakers TO AC OUTLET Line Cord Keypad Control Panel USB Connector Type B USB TO COMPUTER POWER Switch ER...

Page 15: ...must always be erased prior to use Note Use PSPs within 24 hours of last erasure Repeat erasing process if PSPs have been stored longer than 24 hours Erase the PSP Each Intraoral PSP should be used i...

Page 16: ...Plate surface Wipe back and forth and then in a circular motion 2 Allow the plate surface to air dry Make sure that the PSP is completely dry before re using Disinfecting the Phosphor Storage Plates T...

Page 17: ...lates in the X ray session have been exposed prepare each plate by performing the procedure below Preparing the Exposed Plate for Scanner Processing 1 Disinfect the Barrier Envelope with plate still i...

Page 18: ...th the green and blue LED indicators above the POWER and ERASER switches respectively illuminate Default mode has eraser ON 4 Use the user supplied authorized Imaging Software to activate the Scanner...

Page 19: ...when removing from the scanner outlet 10 View and save each scanned image using the user supplied authorized Imaging Software IMPORTANT PSPs will not be erased after scanning when operating ScanX wit...

Page 20: ...fect the Plate Guide unless contamination is suspected If a Plate Guide has touched a contaminated surface it may be immersed briefly in a cold sterilant according to sterilant manufacturers direction...

Page 21: ...or white side remains relatively smooth This scratched look on the black side has absolutely no effect on the quality of the image and should be expected under normal conditions If the phosphor side...

Page 22: ...m Verify Computer requirements Page 9 Make sure that the POWER switch is set to ON and the green indicator light is lit Reconnect the cable Check for tightness Replace if necessary Verify that the Set...

Page 23: ...ge due to exposure to light during handling of the PSP Make sure ScanX is operating with eraser turned on blue LED indicator above the ERASER switch is illuminated steadily Make sure the plates are in...

Page 24: ...s Size Order No Qty 0 73248 0 100 1 73248 1 100 2 73248 2 300 3 73248 3 100 4 73248 4 50 ScanX Cleaning Sheets Description Order No Qty ScanX DUO Sheets D1010 12 ScanX DUO Sheets D1020 25 One re usabl...

Page 25: ...al imaging ScanX Systems and Polaris Intraoral Cameras Key Features Easy to learn and simple to use Acquire mount view and store images with just a few mouse clicks Customize images to personal prefer...

Page 26: ...replaced at our option at no charge provided that our inspection shall indicate it to have been defective and that the system is returned to our factory properly received Dealer labor shipping and han...

Page 27: ...care professionals only This equipment may cause radio interference or may disrupt the operation of nearly equipment It may be necessary to take mitigation measures such as reorienting or relocating t...

Page 28: ...ine s 2 kV line s to earth 1kV N A Mains power quality should be that of typical commercial or hospital environment Voltage dips short interruptions and voltage variations on power supply input lines...

Page 29: ...rom fixed RF transmitters as determined by an electromagnetic site survey a should belessthanthecompliance level in each frequency b Interference can occur nearby devices bearing the following symbol...

Page 30: ...er W Separation distance as a function of the transmitter s frequency m 150 kHz to 80 MHz 80 MHz to 800 MHz 800 MHz to 2 5 GHz d 1 16 P d 1 16 P d 2 33 P 0 01 0 116 0 116 0 233 0 1 0 366 0 366 0 736 1...

Page 31: ...Page 31 Air Techniques Inc Notes...

Page 32: ...hnical support Whether the need is digital imaging utility room equipment or merchandise Air Techniques can provide the solution via our network of authorized professional dealers Proudly designed tes...

Reviews: