Air Live FE-200VD User Manual Download Page 45

4. Administrating the Device 


AirLive FE-200VD Manual


39

z


Upload Setting:   
Click the “Browse” button to locate the saved backup file and then click the “

Upload 

Setting

” button. The settings will be restored to the previous configuration.   
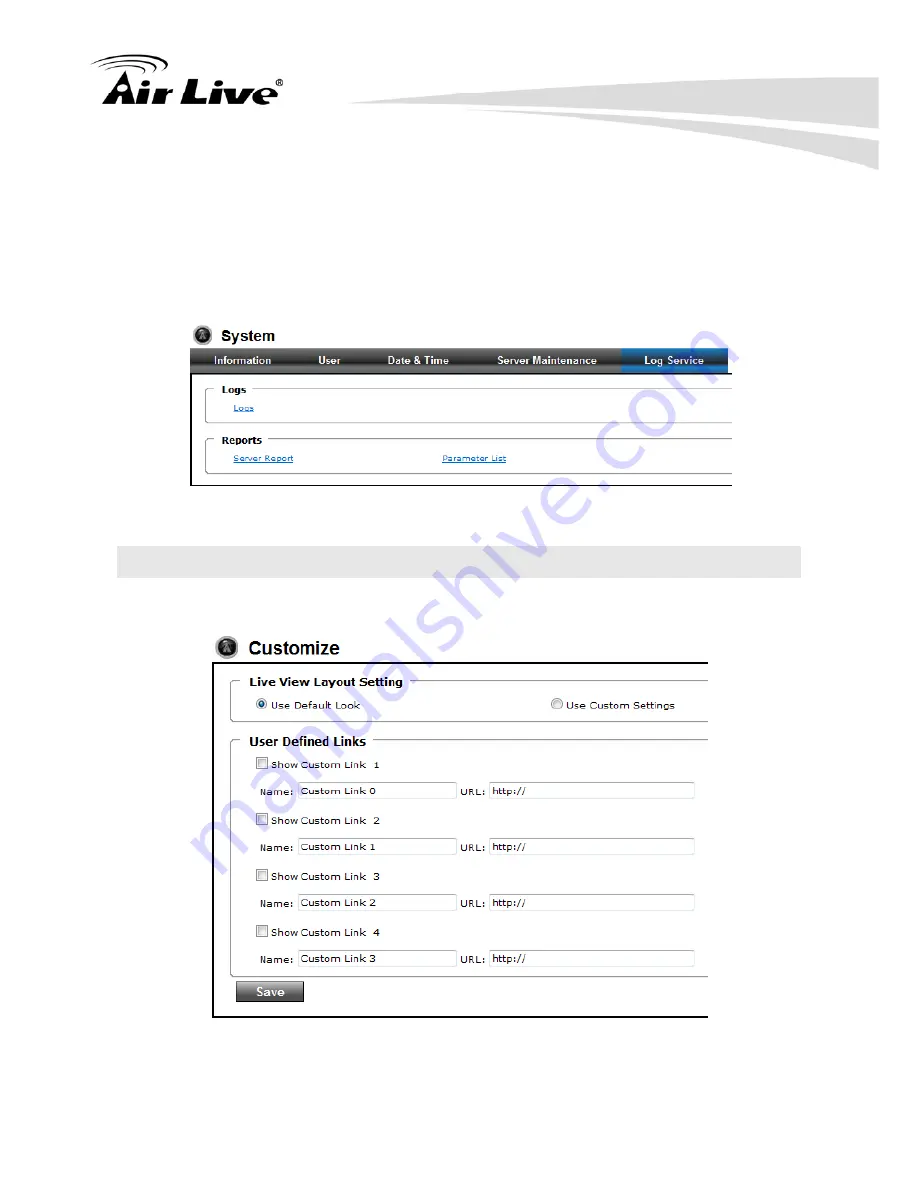
 

4.6.5 Log Service 

Most system operations and / or process will be kept in a log system.    The link provides 
the review of these records. 


4.7 Customize 

This page provides the user features to customize the outlook of the web user interface 
There are two types of layout settings: Use Default Look or Use Custom Settings. 


z


Use Default Look:   
The default layout of live/configuration pages. 

Summary of Contents for FE-200VD

Page 1: ...AirLive FE 200VD Manual 1 FE 200VD 2 MegaPixel Vandal Dome Fish Eye PoE IPCAM User s Manual ...

Page 2: ...r dealer regarding this product Model No ____________________ Serial No ____________________ To prevent fire or shock hazard do not expose the unit to rain or moisture For AC Adaptor to avoid electrical shock do not open the cabinet Refer servicing to qualified personnel only Notice The changes or modifications not expressly approved by the party responsible for compliance could void the user s au...

Page 3: ...n between the equipment and receiver Connect the equipment into an outlet on a circuit different from that to which the receiver is connected Consult the dealer or an experienced radio TV technician for help You are cautioned that any changes or modifications not expressly approved in this manual could void your authority to operate this equipment The shielded interface cable recommended in this m...

Page 4: ...TO THIS MANUAL THE SOFTWARE OR OTHER INFORMATION CONTAINED HEREIN AND HEREBY EXPRESSLY DISCLAIMS ANY IMPLIED WARRANTIES OF MERCHANTABILITY OR FITNESS FOR ANY PARTICULAR PURPOSE WITH REGARD TO THIS MANUAL THE SOFTWARE OR SUCH OTHER INFORMATION IN NO EVENT SHALL WE BE LIABLE FOR ANY INCIDENTAL CONSEQUENTIAL OR SPECIAL DAMAGES WHETHER BASED ON TORT CONTRACT OR OTHERWISE ARISING OUT OF OR IN CONNECTIO...

Page 5: ...8 2 3 Install the Device behind a NAT Router 9 2 4 Access the Device from the Internet Explorer for the First Time 10 2 5 Logging in as an User 11 2 6 Logging in as an Administrator 11 3 Operating the Network Camera 12 4 Administrating the Device 16 4 1 Video Configure Profile 16 4 1 1 General 16 4 1 2 Advanced 17 4 2 Camera Adjust Camera Parameters 19 4 2 1 General 19 4 2 2 Advanced 21 4 3 Event ...

Page 6: ...35 4 6 3 Day Time 36 4 6 4 Server Maintenance 37 4 6 5 Log Service 39 4 7 Customize 39 5 Appendix 41 Appendix A Alarm I O Connector 41 Appendix B Troubleshooting Frequently Asked Questions 43 Appendix C PING IP Address 49 Appendix D Bandwidth Estimation 49 Appendix E Specifications 50 Appendix F Configure Port Forwarding Manually 52 Appendix G DDNS Application 55 Appendix H Power Line Frequency 61...

Page 7: ...preset points without moving parts It can execute part of traditional PTZ camera functions and thus save lot of traditional mechanical Pan Tilt maintain cost The hardware based panorama video processing ability can provide users multiple video modes including source image double broad view triple mode view and quad view The PoE feature provides an easy installation through a single Ethernet cable ...

Page 8: ...r later to playback recorded file z VGA Monitor resolution 1280 x 1024 or higher z Pentium 4 3 6 GHz or higher z Memory Size 1GB or more z Windows XP Vista 7 1 2 Package Contents A user can find the following items in the package 1 FE 200VD 2 Power Adapter dedicates 12V DC electric power output to Network Camera 3 Installation CD provides installation software application program tutorial videos i...

Page 9: ...nsmission speed of the network automatically Please use Category 5 cable to connect the Network Camera to a 100Mbps Fast Ethernet network switch or hub In the LAN socket there are two LEDs embedded LAN LED green color This LED will be flashing while network accessing via Ethernet Power orange color This LED is used to indicate whether DC power is on or not In addition this LED will be flashing whi...

Page 10: ...t wire connecting two revert to factory default settings 3 Factory Default Reset To restore factory default please follow the steps 1 Unplug the power jack to turn off the camera 2 Short pin 5 and pin 6 with a wire 3 Plug in the power jack to turn on the camera The power LED will start flashing in a short while 4 Break the short when the LED starts quick flashing Wait for a few minutes the device ...

Page 11: ...e composite video format will be sent out through this connector User might connect the IP Camera to a monitor or DVR via this connector 1 4 Mounting the Camera Ceiling Mount Fix the camera with as below 1 Take out the camera and accessories from the package The installation sticker wrench and FE 200VD 2 Use the wrench to open the cover 3 Paste the sticker to a suitable position ...

Page 12: ...twork 2 Connect the external power supply to Camera Connect the attached power adapter to the DC power jack of the camera Note Use the power adapter 12VDC included in the package and connect it to wall outlet for AC power Once you have installed the camera well and powered it on the power LED orange will turn on later The power LED turns on it means the system is booting up successfully Furthermor...

Page 13: ...o easy ways to search your Camera by IPWizard II or UPnP discovery Here is the way to execute IPWizard II to discover Camera s IP address and set up related parameter in a Camera 2 1 1 Search When launch the IPWizard II a searching window will pop up IPWizard II is starting to search Network Cameras on the LAN The existed devices will be listed as below ...

Page 14: ...ftware and peripherals This device is an UPnP enabled device If the operating system Windows XP Vista or 7 of your PC is UPnP enabled the Network Camera will be very easy to be found Please refer to Appendix J to enable UPnP settings only if your operating system of PC is running Windows XP Note Windows 2000 does not support UPnP feature To discover your device go to your Desktop and click My Netw...

Page 15: ...r function of router needs to be setup However if your NAT router supports UPnP feature it can be very easy to achieve NAT traversal automatically To do this enable the NAT traversal feature which will attempt to automatically configure the router to allow access to the camera Installing the device with an UPnP router on your network is an easy 3 step procedure 1 Enable UPnP option of your NAT rou...

Page 16: ...il DIPS information 2 4 Access the Device from the Internet Explorer for the First Time 1 Start the web browser on the computer and type the IP address of the Camera you want to monitor as below The Login Window of the Camera is prompted 2 Type in your login name and password under USERNAME and PASSWORD textbox For the first time use default value input the User Name admin Password airlive After t...

Page 17: ...to your PC Otherwise the system will load the ActiveX silently 4 After the ActiveX control is installed and ran the first image will be displayed 2 5 Logging in as an User If you log in the Camera as an ordinary User Configuration function will be not accessible 2 6 Logging in as an Administrator If you log in the Camera as the Administrator you can perform all the settings provided by the device ...

Page 18: ...o matter an ordinary users or an administrator Configuration Click for configuring the camera settings Language The device can provide multiple languages to meet customer s requirement Display Mode Click on different video modes to display different views Actual Size Display the actual resolution size of the video when checked ...

Page 19: ...ng to networking environment Manual Trigger Trigger manually a preset event in the configuration page PTZ The PTZ function will display in Broad view Quad view Quad with source view Double view and Triple view of Ceiling Mount Click on the PTZ icon the web will popup the control panel to control e PTZ function of FE 200VD z Broad view PTZ control panel 1 Step Set the speed of Pan Function 1 10 2 P...

Page 20: ... Arrow Click to control the Pan Tilt Function 4 Zoom Digital zoom in out 1 10 5 Move the control panel 6 Close the control panel 7 List of preset points 1 16 2 Way Audio The device supports 2 way audio function User can chose to enable or disable this function by toggling the icon below Disable speaker function Enable speaker function Disable audio uploading function Enable audio uploading functio...

Page 21: ...e saved image select the file to display the saved image by using any one of graph editing tools Snapshot Location Select Snapshot Location to select the save path and file name prefix select OK to continue Record Click Record to activate this function Press Record button to start recording The video file is saved as ASF format into your local PC While you want to stop it press Stop to stop record...

Page 22: ...st camera parameters Event Setup Event server Motion Detection I O Ports and Event configuration Schedule Configure the schedule while event triggered Network Configure Network settings such as DHCP DDNS RTSP PPPoE and UPnP System Configure system information date time maintenance and view system log file Customize Provides the user features to customize the outlook of the web user interface 4 1 V...

Page 23: ...x600 SVGA 640x480 VGA 320x240 QVGA while Stream2 has the options of VGA and QVGA z Video Mode This option allows the selection of two bit rate modes the Constant Bit Rate CBR or Variable Bit Rate VBR CBR refers to the setting of a fixed Target Bit Rate configuration in the rage of 64Kbps to 6Mbps that would apply in the case of limited bandwidth or and storage requirement While CBR concerns a fixe...

Page 24: ...ibes how the different types of frames are arranged The frame types implemented here are I frame full image information and P frame motion compensated difference information This setting configures the GOP length which is the number of frames before next I frame appears Having more I frames usually increases the stream size and therefore more bandwidth and storage are required z Frame Rates The Fr...

Page 25: ...el z Camera General Setting Brightness Set the luminance of image Hue Refer to pure color it modifies the different display of specific color such as red green or blue Saturation Set the intensity of a specific color Contrast Set the difference in color and light between parts of an image Sharpness Set the sharpness of camera The 5 parameters above are referring to image appearance in terms of col...

Page 26: ...cord Setting Save Path File name Click on the Browse button to select the desired path to save as well as naming the video file z Web Snapshot Image Setting Save Path File name Click on the Browse button to select the desired path to save the snapshot as well as naming it z Save Save the changes that have been made ...

Page 27: ...rrect color compensation due to different light environment z Exposure Anti flicker setting for image sensor to fit the frequency of light power source For instance the power frequency is 50Hz for most European countries while 60Hz is typically for US This setting is therefore regionally different Note Default setting is 50Hz z Max Exposure Time Referring to the shutter speed z Max Gain Control Th...

Page 28: ...change Day or Night mode The default is 20 lux It indicates that when the lux is lower than 20 lux the camera will automatically change to night mode and allow Infrared to enter the camera z Color Mono Mode The default is automatically switched according to light intensity It can also be forced to display color image even in a low light environment z Camera Mount Choose camera mounting type Wall C...

Page 29: ...23 3 Quad with source view 4 Triple view 2 Ceiling Mount For Choosing Ceiling mount go back to live view There are 6 kinds of video layout to choose from Original view Broad view Quad view Quad with source view Double view and Triple view 1 Original view ...

Page 30: ...4 Administrating the Device AirLive FE 200VD Manual 24 2 Broad view 3 Quad view 4 Quad with source view 5 Double view ...

Page 31: ...nual 25 6 Triple view 3 720P Wall Mount For Choosing 720P Wall Mount type go back to Live view There are 3 kinds of video layout to choose including Broad view Double view Double with source view 1 Broad view 2 Double view 3 Double with source view ...

Page 32: ...address of the FTP server Upload Path Choose the desired upload path for events Port Input the port number of the FTP server Login Information Username Password Input the username and password of the FTP z Add HTTP Server Click on the Add HTTP to expand HTTP server setting HTTP Server Name Give a name for the HTTP server URL Input the network address of the HTTP server Username Password Input the ...

Page 33: ...4 Administrating the Device AirLive FE 200VD Manual 27 z Remove Click Remove to delete selected event servers 4 3 2 Motion Detection z To add a motion detection area ...

Page 34: ...ame to this window area 3 Select the trigger level and sensitivity for this detection window 0 100 low high 4 Select color for detection window 5 Draw detection window on the image 6 Once everything is done click on Save to save the configuration made Configured detection window will be displayed in motion detection list Circled in blue ...

Page 35: ...etection windows need to be modified if users change video layout 4 3 3 I O Ports AirLive FE 200VD supports 1 photo coupled relay inputs and 1 relay outputs Refer to Appendix A I O Terminal Connectors for detail pin description and application The below table shows the status of the external trigger alarm devices ...

Page 36: ...oad images and Activate Output Port and Send Email Notification and Send HTTP Notification to and Send Message Notification TCP Click on Save to save the configuration made 5 4 4 Schedule 4 4 1 General Define the day specified by days of a week and time specified by each single hour for that will be recorded during the scheduled period Note only video data will be recorded A user can select which ...

Page 37: ...warning message shows when recording is on process Micro SD card should not be removed during the recording process 4 5 Network 4 5 1 General Device IP configuration includes DHCP and Static IP setting Enable ARP Ping enable device to accept ARP or ping packets from the network Disable this option may provide extra security from intentional ping ...

Page 38: ...by itself z IP address Subnet mask and Gateway If you do not select Obtain an IP address automatically then you need to enter these network parameters manually z DNS 1 and DNS2 If you do not select Obtain DNS from DHCP then you need to enter these parameters manually Enable this checked box when a DHCP server is installed on the network and provide DNS service z PPPoE A standard builds on Ethernet...

Page 39: ...Access the device enter Setting Î Network Î PPPoE as below PPPoE To enable or disable the PPPoE service here User name Type the user name for the PPPoE service which is provided by the ISP Password Type the password for the PPPoE service which is provided by the ISP 4 5 2 Advanced Enable or configure other network functions z NTP Configure a NTP Network Time Protocol server so that the device syst...

Page 40: ... email on behalf of the configured email account in a circumstance like sending an email notice to a specified mail address Event Configuration Complete the Mail Server Server Port Authentication information if required and the sender email address 4 5 4 DDNS Dynamic DNS Dynamic DNS configuration the network device can be assigned with a host name by registering this service Internet access requir...

Page 41: ... 4 6 System 4 6 1 Information Lists System and Network configurations z Firmware Version This information shows the firmware version of the device 4 6 2 User Use this menu to add update or remove the usernames and passwords of the Administrator and viewer ...

Page 42: ... make it synchronized with PC or remote NTP server Also you may select your time zone in order to synchronize time locally z Current Server Time Displaying the date and time of the device z Synchronize with computer time Click this option to enable time synchronization with computer time z Synchronize with NTP Click this option if you want to synchronize the device s date and time with those of ti...

Page 43: ... maintenance of the device Reboot and Load default settings as well as functionalities of launching upgrade process backup restore user settings and language defines z Reboot The device is restarted without changing any of the network settings I t means the IP address of the device will not change after firmware upgrade z Load Default Excluding Network setting The unit is restarted and most curren...

Page 44: ...to this device once update it will be burned into FLASH ROM of system 5 Once the firmware file was selected click Firmware Upgrade button 6 The upgrade progress information will be displayed Once the uploading process completed the device will reboot the system automatically 7 Please wait for timer countdown and then you can use IPWizard II to search the device again Warning The download firmware ...

Page 45: ...the previous configuration 4 6 5 Log Service Most system operations and or process will be kept in a log system The link provides the review of these records 4 7 Customize This page provides the user features to customize the outlook of the web user interface There are two types of layout settings Use Default Look or Use Custom Settings z Use Default Look The default layout of live configuration p...

Page 46: ...b link s will be presented on the live page when enabled It can be a link to another IP camera for instance or other preferred web link z Use Custom Settings The allowed modifications are changing of Background Text Color Background picture Title Description Logo Link and Logo ...

Page 47: ...er the current that will go through the 2 nodes must not exceed 130mA An external Relay can also be connected to the terminals as an implementation In this case current or and voltage limitation is specified by the external Relay 3 GND 4 DIGITAL IN Connect to GND to activate or leave floating or unconnected to deactivate 5 GND 6 DEFAULT PIN with a short wire connecting two revert to factory defaul...

Page 48: ... DO THE WIRING NOT BY YOURSELF INCORRECT WIRING COULD DAMAGE NWTWORK CAMERA YOU COULD RECEIVE THE FATAL ELECTRIC SHOCK THE EXTERNAL I O IS NOT CAPABLE OF CONNECTING DIRECTLY TO DEVICES THAT REQUIRE LARGE AMOUNTS OF CURRENT IN SOME CASES A CUSTOM INTERFACE CIRCUIT CUSTOMER PROVIDED MAY HAVE TO BE USED SERIOUS DAMAGE TO NETWORK CAMERA MAY RESULT IF A DEVICE IS CONNECTED TO THE EXTERNAL I O THAT EXCE...

Page 49: ...solution codec type frame rate and bandwidth Obviously the performance of the each connected client will slow down when many users are logged on The device can be used outdoors or not The device is not weatherproof It needs to be equipped with a weatherproof case for outdoors using However equipped with a weatherproof case might disable the audio function of the device Install this device Status L...

Page 50: ...rd II program cannot find the device Re power the device if cannot find the unit within 1 minutes Do not connect device over a router IPWizard II program cannot detect device over a router If IP address is not assigned to the PC which running IPWizard II program then IPWizard II program cannot find device Make sure that IP address is assigned to the PC properly Antivirus software on the PC might i...

Page 51: ...ct the Network Camera from the network first and then run the PING utility to check it out Maybe due to the network cable Try correcting your network cable and configuration Test the network interface by connecting a local computer to the Network Camera via a crossover cable Make sure the Internet connection and setting is ok Make sure enter the IP address of Internet Explorer is correct If the Ne...

Page 52: ...aulty Contact your dealer for further help Image or video does not appear in the main page The first time the PC connects to Network Camera a pop up Security Warning window will appear to download ActiveX Controls When using Windows XP or Vista log on with an appropriate account that is authorized to install applications Network congestion may prevent the Image screen from appearing quickly You ma...

Page 53: ... target bit rate the video streaming will not work correctly The unreadable characters are displayed Use the operating system of the selected language Set the Encoding or the Character Set of the selected language on the Internet Explorer Frame rate is slower than the setting The traffic of the network and the object of the image affect the frame rate The network congestion causes frame rate slowe...

Page 54: ...d The lens is dirty or dust is attached Fingerprints dust stain etc on the lens can degrade the image quality The color of the image is poor or strange Adjust White Balance To insure the images you are viewing are the best they can be set the Display property setting color quality to 16bit at least and 24 bit or higher if possible within your computer The configuration on the device image display ...

Page 55: ...s of the device The replies as illustrated below will provide an explanation to the problem If you want to detect any other devices conflicts with the IP address of Network Camera also can utilize the PING command but you must disconnect the device from the network first Appendix D Bandwidth Estimation The frame rate of video transmitted from the device depends on connection bandwidth between clie...

Page 56: ...modem upload speeds could not even reach up to 128 kbps Thus you may not be able to receive good quality video while also streaming audio on a 128 kbps or lower connection Even though the upload speed is more than 128kbps for optimal video performance disabling audio streaming will get better video performance Appendix E Specifications Camera Model Name FE 200VD Image Device 2 Mega pixel image sen...

Page 57: ...ded options Alarm Events File upload via FTP SD Card or email Notification via email HTTP External output activation General RAM 128MB ROM 2GB Power Supply 12V DC external power adapter PoE IEEE 802 3af Power Consumption 5W IP Level IP66 Vandal proof Yes Connectors 1 x RJ 45 10BaseT 100BaseTX 1 x DC power jack 1 x Terminal Connector 1 x Audio Line out and 1 x Audio Line in 1x Micro SD Slot 1 x DI ...

Page 58: ...the router Manually setup the device with a fixed IP address for example 192 168 0 100 2 Access the Router with Your Web browser The following steps generally apply to any router that you have on your network The D Link DI 624 is used as an example to clarify the configuration process Configure the initial settings of the router by following the steps outlined in the router s Quick Installation Gu...

Page 59: ... the router and most routers prevent users from accessing the video from the device over the Internet The router connects to the Internet over a series of numbered ports The ports normally used by the device are blocked from access over the Internet Therefore these ports need to be made accessible over the Internet This is accomplished using the Virtual Server function on the router The Virtual Se...

Page 60: ...check with your ISP so that you can open the appropriate ports accordingly If your ISP does not pass traffic on port 80 you will need to change the port the camera uses from 80 to something else such as 8080 Not all routers are the same so refer to your user manual for specific instructions on how to open ports Enter valid ports in the Virtual Server section of your router Please make sure to chec...

Page 61: ...y necessary for the users that could only obtain dynamic IP addresses As to the users that could obtain the static valid IP address they do not usually have to apply the DDNS service Before we decide if DDNS is necessary for the users we have to check what kind of Ethernet network environment we have to install our Networked Device on 1 Environment of Fixed Valid IP Network If users could obtain v...

Page 62: ...columns show up at the left side click Create Account 4 Fill the application agreement and necessary information a Username b E mail address and confirmation c Password and confirmation d Submit all the input information and finish creating an account ...

Page 63: ...l 57 5 Check your e mail mailbox There will be an e mail with a title Your DynDNS Account Information Click the hyperlink address to confirm the DDNS service that you just applied Then DDNS you applied activated Click these two options ...

Page 64: ...ndns org again Input your username and password that you just applied to login administration interface of DDNS server 7 If the correct username and password are input you can see the following picture at the top right of the login page Click to confirm Input your account ...

Page 65: ...5 Appendix AirLive FE 200VD Manual 59 8 Click the Services 9 Click the Dynamic DNS 10 Click the Get Started ...

Page 66: ... Host to submit the domain name information and finish DDNS application Pink No 4 z Setup the DDNS and PPPoE of Networked Device At last users have to enter the web page of Networked Device and setup the necessary information of DDNS and PPPoE after the application of DDNS service Please check the user manual to access the DDNS and PPPoE pages After saving the modification restart the device Then ...

Page 67: ...stria 230V 50 Hz Brazil 110 220V 60 Hz 127V found in states of Bahia Paran including Curitiba Rio de Janeiro S 緌 Paulo and Minas Gerais though 220V may be found in some hotels Other areas are 220V only with the exception of Fortaleza 240V Canada 120V 60 Hz China People s Republic of 220V 50 Hz Finland 230V 50 Hz France 230V 50 Hz Germany 230V 50 Hz Hong Kong 220V 50 Hz India 230V 50 Hz Italy 230V ...

Page 68: ...configuration to make this function work Note that to use the 3GPP function it strongly recommends to install the Networked Device with a public and fixed IP address without any firewall protection RTSP Port Port 554 is the default for RTSP service However sometimes some service providers change this port number for some reasons If so user needs to change this port accordingly Dialing procedure 1 ...

Page 69: ...0VD Manual 63 Appendix J Enable UPnP of Windows XP Use the following steps to enable UPnP settings only if your operating system of PC is running Windows XP Go to Start Settings Click Control Panel Click Add or Remove Programs ...

Page 70: ...5 Appendix AirLive FE 200VD Manual 64 Click Add Remove Windows Components The following screen will appear Select Networking Services Click Details ...

Page 71: ...5 Appendix AirLive FE 200VD Manual 65 Select Universal Plug and Play Click Ok Click Next ...

Page 72: ...5 Appendix AirLive FE 200VD Manual 66 Please wait while Setup configures the components Click Finish ...

Reviews: