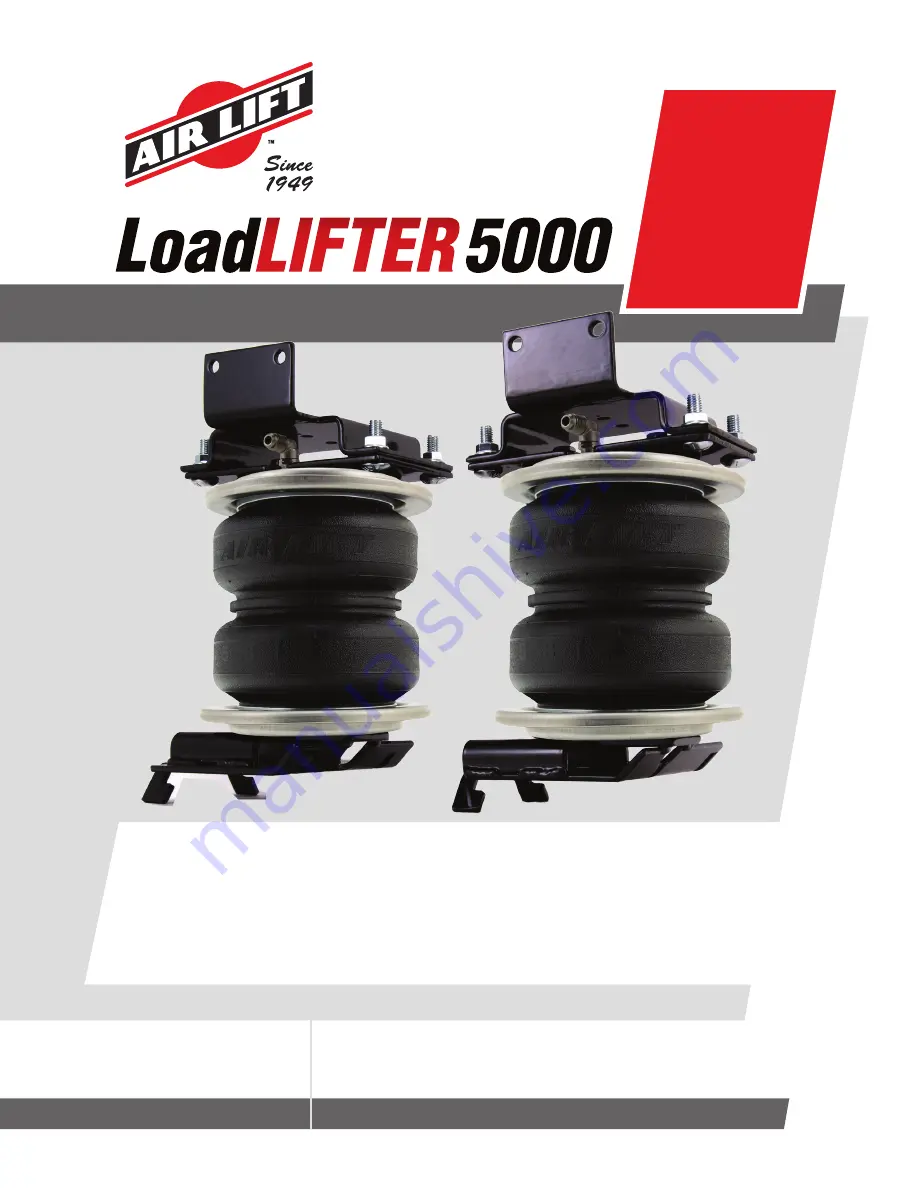
Air Lift 57365 Installation Manual Download Page 1

Kits 57365 

|

 88365 

|

 89365

For maximum effectiveness and safety, please read these instructions 
completely before proceeding with installation.

S E R I E S

Installation 
Guide

TM

MN-1052 • (031711) • ECR 8949

Failure to read these instructions can result in an incorrect installation.

Dodge/RAM 1500

Summary of Contents for 57365

Page 1: ...eness and safety please read these instructions completely before proceeding with installation S E R I E S Installation Guide TM MN 1052 031711 ECR 8949 Failure to read these instructions can result i...

Page 2: ...ylon air lines LoadLifter 5000 Ultimate Plus Stainless steel roll plates braided stainless steel air lines stainless steel air spring mounting hardware Air Lift offers two Ultimate Plus upgrade kits 5...

Page 3: ...less Steel Air Lines 15 Tips for Installing Air Lines 15 Installing the Heat Shield 15 Finished Installation Photos 16 Before Operating 17 Checking for Leaks 17 Fixing Leaks 17 Installation Checklist...

Page 4: ...ITIONS AND AS AN ADMISSION OF THE EXCLUSIVE OWNERSHIP IN AND TO THE DRAWING OF THE AIR LIFT COMPANY P O BOX 80167 LANSING MI 48908 X 040 in X XXX 020 in X XX 030 in ANGLES 1 SHEET SIZE PERMISSIBLE TOL...

Page 5: ...10466 Zip tie 6 CC 21230 Valve cap 2 DD 18501 M8 Flat washer 2 FF 18411 Star washer 2 GG 21233 5 16 Hex nut 4 Unique Parts in Each Kit The photos in this manual show the LoadLifter 5000 Ultimate kit...

Page 6: ...m IMPORTANT SAFETY NOTICE The installation of this kit does not alter the gross vehicle weight rating GVWR or payload of the vehicle Check the vehicle s owner s manual and do not exceed the maximum lo...

Page 7: ...Remove the rear wheels 2 Mark the bottom of the right hand and left hand coil springs and lower spring seat mounts with chalk or a paint marker to make sure the spring is put back the same way it is r...

Page 8: ...e with paint or undercoating to cover the bare surface after grinding Fig 7 7 Install the socket head M8 bolt M into the frame bracket A slot closest to the flange on the bracket Fig 8 Cap with the ny...

Page 9: ...g 10 10 The bracket should sit flush to the bottom of the frame If there is any leftover weld holding the bracket off the frame remove and grind down so the bracket is flush 11 With the socket head bo...

Page 10: ...he frame Tighten the screw making sure the washer head portion of the screw is flat to the bracket and torque to 15 lb ft 20Nm 14 Make sure the bracket is flat to the bottom of the frame center punch...

Page 11: ...ground Torque the lug nuts to the manufacturer s torque specs 19 Install the lower shock bolts back onto the axle and torque to 100 lb ft 135Nm ASSEMBLING THE AIR SPRINGS 1 Set a roll plate E onto the...

Page 12: ...tboard and away from each other Fig 19 The finished assemblies will be left and right hand specific and the fittings that are on the top of the air springs should be facing the outside tire side of th...

Page 13: ...eft driver s side assembly into position with the carriage bolt still in the slot previously installed Set into place on the axle making sure the back of the bracket is hooked below the jounce bumper...

Page 14: ...ing the lower bracket with the tabs under the jounce bumper strike plate and with the exception of using the slot for the carriage bolt in the lower bracket install the carriage bolts in the same mann...

Page 15: ...ting plate s carriage bolts with the frame mounting bracket holes Cap all carriage bolts once in position with 3 8 serrated lock nuts N and torque all the installed nuts to 31 lb ft 42Nm Fig 28 8 Left...

Page 16: ...e fuel tank filler door B Inside rear wheel wells C License plate or rear bumper area For LoadLifter Ultimate Plus kits the recommended location for the Schrader valves is the rear bumper area or lice...

Page 17: ...ts Star washer Rubber washer Air Line Setup for Compressor Integration Air Line Setup Without Compressor System Vehicle body or bumper Hex nuts Flat washer Star washer Rubber washer Nylon air line to...

Page 18: ...LoadLifter 5000 Series MN 1052 16 Finished Installation Photos 1 Back view of left driver s side assembly Fig 36 2 Back view of right passenger s side assembly Fig 37 fig 36 fig 37...

Page 19: ...r line Trim 1 25mm off the end of the air line Be sure the cut is clean and square see Fig 31 Reinsert the air line into the push to connect fitting b Check the threaded connection by tightening the s...

Page 20: ...pressures Drive the vehicle 10 miles 16km and recheck for clearance loose fasteners and air leaks Operating instructions If professionally installed the installer should review the operating instructi...

Page 21: ...or other load assist The springs in this kit will support approximately 40 pounds of load combined on both springs for each 1 PSI 07BAR of pressure The required air pressure will vary depending on th...

Page 22: ...include roll control bounce dive during braking and sponginess Fig 40 Tuning out these problems usually requires an increase in pressure GUIDELINES FOR ADDING AIR 1 Start with the vehicle level or sli...

Page 23: ...r fold in the air line Replace any air line that has been kinked FREQUENTLY ASKED QUESTIONS Q Will installing air springs increase the weight ratings of a vehicle No Adding air springs will not change...

Page 24: ...LoadLifter 5000 Series MN 1052 22 Notes...

Page 25: ...LoadLifter 5000 Series MN 1052 23 Notes...

Page 26: ...LoadLifter 5000 Series MN 1052 24 Notes...

Page 27: ...etailer If there is a problem with the price Contact Information Mailing address P O Box 80167 Lansing MI 48908 0167 Shipping address 2727 Snow Road for returns Lansing MI 48917 Phone Toll free 800 24...

Page 28: ...ed Help Contact Air Lift Company Customer Service at 800 248 0892 or email service airliftcompany com For calls outside the U S or Canada dial 517 322 2144 Thank you for purchasing Air Lift Products t...

Reviews: