


www.airkinglimited.com
210572120 Rev. i 11-12
4 of 12
LIMITED WARRANTY
WHAT THIS WARRANTY COVERS:
This product is warranted against defects in workmanship and/or materials.
HOW LONG THIS WARRANTY LASTS:
This warranty extends only to the original purchaser of the product and lasts for one (1) year from the date of original purchase or until the original
purchaser of the product sells or transfers the product, whichever first occurs.
WHAT AIR KING WILL DO:
During the warranty period, Air King will, at its sole option, repair or replace any part or parts that prove to be defective or replace the whole product with the same
or comparable model.
WHAT THIS WARRANTY DOES NOT COVER:
This warranty does not apply if the product was damaged or failed because of accident, improper handling or operation, shipping damage, abuse,
misuse, unauthorized repairs made or attempted. This warranty does not cover shipping costs for the return of products to Air King for repair or replacement. Air King will pay return shipping
charges from Air King following warranty repairs or replacement
ANY AND ALL WARRANTIES, EXPRESSED OR IMPLIED (INCLUDING, WITHOUT LIMITATION, ANY IMPLIED WARRANTY OF MERCHANTABILITY), LAST ONE YEAR FROM THE DATE OF
ORIGINAL PURCHASE OR UNTIL THE ORIGINAL PURCHASER OF THE PRODUCT SELLS OR TRANSFERS THE PRODUCT, WHICHEVER FIRST OCCURS AND IN NO EVENT SHALL AIR KING’S
LIABILITY UNDER ANY EXPRESS OR IMPLIED WARRANTY INCLUDE (I) INCIDENTAL OR CONSEQUENTIAL DAMAGES FROM ANY CAUSE WHATSOEVER, OR (II) REPLACEMENT OR
REPAIR OF ANY HOUSE FUSES, CIRCUIT BREAKERS OR RECEPTACLES. NOTWITHSTANDING ANYTHING TO THE CONTRARY, IN NO EVENT SHALL AIR KING’S LIABILITY UNDER ANY EX-
PRESS OR IMPLIED WARRANTY EXCEED THE PURCHASE PRICE OF THE PRODUCT AND ANY SUCH LIABILITY SHALL TERMINATE UPON THE EXPIRATION OF THE WARRANTY PERIOD.
Some states and provinces do not allow limitations on how long an implied warranty lasts, or the exclusion or limitation of incidental or consequential damages, so these exclusions or
limitations may not apply to you. This warranty gives you specific legal rights. You may also have other rights which vary from state to state and province to province. Proof of purchase is
required before a warranty claim will be accepted.
CUSTOMER SERVICE:
Toll-Free (800) 465-7300
Our Customer Service team is available to assist you with product questions, service center locations, and replacement parts. They can be reached Monday through Friday, 8am-4pm Eastern.
Please have your model number available, as well as the type and style (located on the label inside of your product).
Please do not return product to place of purchase.
www.airkinglimited.com
PARTS FOR DISCONTINUED, OBSOLETE AND CERTAIN OTHER PRODUCTS MAY NOT BE AVAILABLE. DUE TO SAFETY REASONS, MANY ELECTRONIC COMPONENTS AND MOST
HEATER COMPONENTS ARE NOT AVAILABLE TO CONSUMERS FOR INSTALLATION OR REPLACEMENT.
Troubleshooting Guide
Trouble
Probable Cause
Suggested Remedy
1. Fan does not operate when the switch is on.
1a. A fuse may be blown or a circuit tripped.
1a. Replace fuse or reset circuit breaker.
1b. Connector plug from motor is not plugged in. 1b. Turn off power to unit. Remove Grill and plug motor into receptacle
in housing. Restore power to unit.
1c. Wiring is not connected properly.
1c. Turn off power to unit. Check that all wires are connected.
1d. Motor has stopped operating.
1d. Replace motor.
2. Fan is operating, but air moves slower than normal.
2.
Obstruction in the exhaust ducting.
2.
Check for any obstructions in the ducting. The most common are bird nests
in the roof cap or wall cap where the fan exhausts to the outside.
3. Fan is operating louder than normal.
3a. Motor is loose.
3a. Turn off power to unit. Remove grill and check that all screws are fully
tightened. Restore power to unit.
3b. Fan blade is hitting housing of unit.
3b. Call your dealer for service.
SECTION 7
Use and Care
CAUTION:
MAKE SURE POWER IS SWITCHED OFF AT SERVICE PANEL BEFORE
STARTING INSTALLATION.
1.
Cleaning the Grill:
Remove grill and use a mild detergent, such as dishwashing liquid,
and dry with a soft cloth. NEVER USE ANY ABRASIVE PADS OR SCOURING POWDERS.
Completely dry grill before reinstalling. Refer to instructions in
Section 6
Completing the
Installation
, to reinstall grill.
2.
Cleaning the Fan Assembly:
Unplug the motor cord from receptacle and loosen the
venturi screw to remove the venturi from the unit. Wipe all parts with a dry cloth or gently
vacuum the fan. NEVER IMMERSE ELECTRICAL PARTS IN WATER. Refer to instructions in
Section 6
Completing the Installation
, to reinstall venturi.
CAUTION:
MAKE SURE POWER IS SWITCHED OFF AT SERVICE PANEL BEFORE
STARTING INSTALLATION.
3.
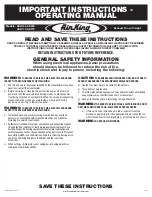
Changing the Light Bulb:
Disconnect power to the unit. Remove the light lens by
squeezing at the tabs and pulling down
(Figure 13)
. Remove light bulb and refer to
instructions in
Section 6
Completing the Installation
, to complete the light bulb change
and installation of light lens
Figure 13
Tabs