


www.airkinglimited.com
A210572216 Rev. A 5-14
4 of 4
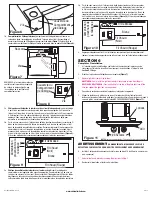
SECTION 7
Use and Care
CAUTION:
MAKE SURE POWER IS SWITCHED OFF AT SERVICE PANEL BEFORE
STARTING INSTALLATION.
1.
Cleaning the Grill:
Refer to instructions in
Section 6
Completing the Installation
, to
remove grill and glass light lens. Use a mild detergent, such as dishwashing liquid,
and dry with a soft cloth. NEVER USE ANY ABRASIVE PADS OR SCOURING POWDERS.
Completely dry all parts before reinstalling. Refer to instructions in
Section 6
Completing
the Installation
, to reinstall grill and glass light lens.
2.
Cleaning the Fan Assembly:
Wipe all parts with a dry cloth or gently vacuum the fan.
NEVER IMMERSE ELECTRICAL PARTS IN WATER.
CAUTION:
ALLOW BULBS TO COOL BEFORE REPLACING.
3.
Changing the Light Bulb:
Disconnect power to the unit. Remove light lens from grill by
following the instructions in
Step 3
of
SECTION 6
-
Completing the Installation
. Replace
light bulb(s) with 60 watt maximum, type A19 medium base incandescent bulb(s).
4. Reinstall the lens by reversing the instructions in
Step 3
of
SECTION 6
-
Completing the
Installation
.


