AIPTEK AHDH150 User Manual Download Page 34

11

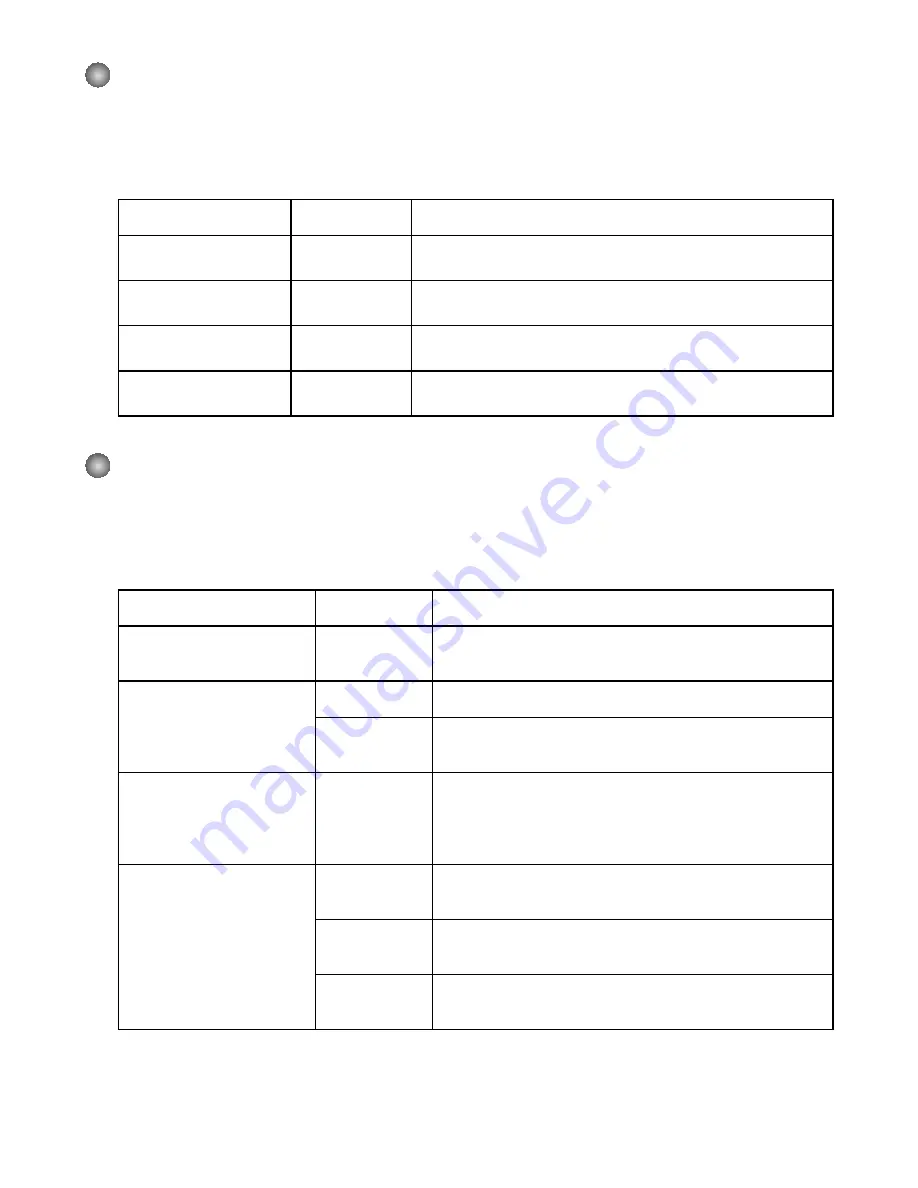
 Menüoptionen im Wiedergabemodus

Einschalten 

 Modus 

Playback


(Wiedergabe)

 aufrufen 

 Verwenden Sie den 

Joystick nach Rechts.

Eintrag

Option

Beschreibung

File Info 

(Dateiinformationen)

-

Aufrufen von Dateititel, Aufnahmedatum, Uhrzeit, Größe 
und Aufnahmedauer.

Slide show 
(Diaschau)

On/Off 

(Ein/Aus)

Starten der Diaschau. /Wiederholen der Wiedergabe aller 
Videoclips.

Delete One 

(Datei löschen)

Yes/No (Ja/

Nein)

Die aktuelle Datei wird gelöscht.

Delete All 

(Alle löschen)

Yes/No (Ja/

Nein)

Löscht alle Dateien.

 Menüoptionen im Einstellungsmodus

Einschalten 

 Modus 

Setting (Einstellungen)

 aufrufen 

 Verwenden Sie den 

Joystick nach Rechts.

Eintrag

Option

Beschreibung

Beep (Signalton)

On/Off 

(Ein/Aus)

Aktivieren/Deaktivieren des Signaltons.

Start Up (Start)

Menu (Menü)

Verwendet das Standardstartfenster.

Camera 

(Kamera)

Verwendet den Kameramodus als Startfenster.

Auto Off 

(Auto-Aus)

Off (Aus)

1min/3min/

5min

Festlegen der Inaktivitätsdauer, nach der der 
Camcorder automatisch ausgeschaltet wird. Bei [Off] 
(Aus) bleibt der Camcorder so lange eingeschaltet, bis 
er nicht mehr mit Strom versorgt wird.

AV Mode (AV Modus)

Menu (Menü)

Erlaubt Sie vorwählen durch Kopfhörer, oder AV 
Ausgang funktion.

Earphone 

(Kopfhörer)

Wiedergabe des Tons über die Kopfhörer.

AV Out (AV 

Ausgang)

Verwendet den AV Out Ausgang als anlogen TV 
Ausgang zum anschließen an einen Fernseher.

Summary of Contents for AHDH150

Page 1: ...User s Manual High Definition Camcorder English 82 709 90020 Copyright 2009 AIPTEK International Inc All rights reserved All other trademarks are trademarks of their respective companies...

Page 2: ...h can be determined by turning the equipment off and on the user is encouraged to try to correct the interference by one or more of the following measures Reorient or relocate the receiving antenna Mo...

Page 3: ...cord 11 Connector cover 12 LCD display 13 Speaker 14 Zoom in Volume up 15 Zoom out Volume down 16 Shutter 17 HDMI output 18 USB port 19 TV out connector earphone 20 SD MMC card slot 21 Tripod socket 2...

Page 4: ...mcorder s memory capacity Lift the memory card cover as shown 1 Insert the card as the direction of indication until it reaches the end of the slot 2 When the card is inserted successfully the icon 3...

Page 5: ...is powered off The charging LED turns red and the charge starts 2 When the charging is interrupted or the battery pack is fully charged the charging LED will turn 3 off When using a PC to charge the...

Page 6: ...to turn off after it is idle for a period of time Mode selection Use the Joystick 1 Left to enter the Mode menu Use the Joystick 2 Up or Down to select the desired item Use the Joystick 3 Right to co...

Page 7: ...the battery when the icon indicates low battery life Comprehending icons on the screen Camera mode 1 Mode icon camera mode 2 Number of recordings 3 AF 4 Exposure 5 Flash mode 6 Still resolution 7 Vide...

Page 8: ...ode 2 Current total recordings 3 File format 4 Memory card inserted 5 Battery life 6 Recording time 1 2 3 4 5 6 Voice mode 1 Mode icon voice mode 2 Number of recordings 3 Memory card inserted 4 Batter...

Page 9: ...without adjusting focus If you want to take closeup pictures you can push the Joystick button down to switch to Macro mode AF 2 When recording in one spot without zooming in zooming out or moving arou...

Page 10: ...ck Enter 1 Playback mode The last recorded picture video clip or audio clip starts playing 2 Use the Joystick Up or Down to shift between files 3 The file you go to is displayed or automatically begin...

Page 11: ...ecification Stabilizer On Off Enable Disable stabilizer function Stabilizer function can prevent the image from blurring causing by hand shake Night Mode On Off Allows you to take a photograph with a...

Page 12: ...nce table in the Appendix Date Stamp On Off Enable this feature to print a date mark on each picture White Balance Auto The camcorder automatically adjusts white balance Sunny This setting is suitable...

Page 13: ...ff Off 1min 3min 5min Set how long the camcorder will automatically shut down when staying inactive Setting to Off will make the camcorder stay powered on until it runs out of power AV Mode Menu Allow...

Page 14: ...ption Clock Set date and time Format Yes No Format the storage medium Note that all files stored in the medium will be gone Reset Default Yes No Restore factory defaults Note that your current setting...

Page 15: ...setting please refer to the Advanced settings section for more information Taiwan NTSC America NTSC Europe PAL China PAL Turn on your TV and switch the TV to AV 1 mode Connect the audio and video ends...

Page 16: ...For first time use please install the software on the bundled CD Turn on the camcorder 1 Connect the camcorder to your computer by the USB cable 2 The default is set to Disk mode When connected to a...

Page 17: ...er setting is based on the frequency standard of your local power supply System Requirements For Windows Operating system Windows XP Service Pack 2 or Vista CPU 2 8 GHz Pentium 4 or faster processor S...

Page 18: ...s fully charged Using a protected SD card Set the SD card to be writ able The LCD screen displays MEMORY ERROR or CARD ERROR message Or the camcorder cannot read the memory card The format of the memo...

Page 19: ...taking pictures Add extra light sources when recording video clips Noises occur when viewing images on the LCD screen or on the computer The flicker setting does not match the standard of the country...

Page 20: ...cable before installing the driver Install the driver before plug ging in the USB cable The TV screen does not display after connecting the camcorder to the TV The camcorder is not cor rectly connect...

Page 21: ...30fps QVGA 30f Lens 3X Optical Zoom Lens 7 5 22 5mm F3 6 6 7 File format MP4 H 264 JPEG WAV External memory SD MMC card up to 32GB SDHC LCD display 6 1 CM LCD 2 4 LCD DISPLAY Digital zoom 4X TV out HD...

Page 22: ...HD Camcorder Bedienungsanleitung Deutsch...

Page 23: ...n Camcorder nicht hohen Temperaturen aus und lassen Sie ihn nicht in direktem Sonnenlicht liegen Anderenfalls kann der Camcorder besch digt werden 4 Gehen Sie vorsichtig mit dem Camcorder um Dr cken S...

Page 24: ...ste 12 LCD Bildschirm 13 Lautsprecher 14 Vergr ern Lautst rke erh hen Taste 15 Verkleinern Lautst rke verringern Taste 16 Foto Ausl ser Taste 17 HDMI Ausgang 18 USB Anschluss 19 TV Ausgang Kopfh rer 2...

Page 25: ...ng des Speicherkartenfachs wie abgebildet hoch 1 Setzen Sie die Karte in der angezeigten Richtung so weit wie m glich in den Steckplatz ein 2 Wenn die Karte richtig eingesetzt ist erscheint auf dem Bi...

Page 26: ...ausgeschaltet sein Die Lade LED leuchtet rot der Ladevorgang beginnt 2 Wenn der Ladevorgang unterbrochen wird oder der Akku voll geladen ist erlischt die Lade LED 3 Wenn Sie den Akku ber einen PC auf...

Page 27: ...Verwenden Sie den Joystick nach 2 Oben oder Unten Verwenden Sie den Joystick nach 3 Rechts um zu best tigen Verwenden Sie den Joystick nach 4 Links um das Men zu verlassen Einstellen der Men sprache...

Page 28: ...meiden sollten Sie die Batterie auswechseln wenn die Batterie fast leer ist Bedeutung der Symbole Kameramodus 1 Modussymbol Kameramodus 2 Anzahl der Aufnahmen 3 AF 4 Exposure Belichtung 5 Blitzmodus 6...

Page 29: ...e Aufnahme Gesamtzahl der Aufnahmen 3 Dateiformat 4 Speicherkarte eingesetzt 5 Batterieladestand 6 Aufnahmedauer 1 2 3 4 5 6 Sprachmodus 1 Modussymbol Tonmodus 2 Anzahl der Aufnahmen 3 Speicherkarte e...

Page 30: ...unktion zu verwenden oder sich umher zu bewegen dann k nnen Sie die AF Verriegelungsfunktion aktivieren indem Sie den Joystick nach oben bewegen Bewegen Sie noch einmal den Joystick nach oben um diese...

Page 31: ...uf Die Wiedergabe beginnt mit dem zuletzt aufgenommenen Foto dem letzten Video oder 2 Audioclip Verwenden Sie den Joystick nach oben oder unten um zwischen den auszuw hlen 3 Die gew hlte Datei wird an...

Page 32: ...till Resolution Bildaufl sung Die Spezifikation der Videoaufl sung ist auf der Verpackung angegeben Stabilisator Ein Aus Hier aktivieren deaktivieren Sie die Funktion des Stabilisators Der Stabilisato...

Page 33: ...den Sie im Anhang in der Tabelle Einstellung der Flimmerfrequenz Date Stamp Datumsaufdruck On Off Ein Aus Wenn Sie diese Funktion aktivieren erscheint auf jedem Bild das Aufnahmedatum White Balance We...

Page 34: ...llungen aufrufen Verwenden Sie den Joystick nach Rechts Eintrag Option Beschreibung Beep Signalton On Off Ein Aus Aktivieren Deaktivieren des Signaltons Start Up Start Menu Men Verwendet das Standards...

Page 35: ...wird wechselt er automatisch in den Kameramodus PC Camera Disk Disk Wenn der Camcorder an einen PC angeschlossen wird wechselt er automatisch in den Diskmodus Wechseldatentr ger Language Sprache Ausw...

Page 36: ...aiwan NTSC Amerika NTSC Europa PAL China PAL Schalten Sie Ihr Fernsehger t ein und 1 schalten Sie das Fernsehger t in den AV Modus Schlie en Sie den Audio und 2 Videostecker des AV Kabels an das Ferns...

Page 37: ...te Verwendung installieren Sie die Software der mitgelieferten CD Schalten Sie den Camcorder ein 1 Schlie en Sie den Camcorder mit dem USB Kabel an den Computer an 2 Standardm ig ist die Einstellung D...

Page 38: ...der Flimmerfrequenz basiert auf dem Frequenzstandard der regionalen Stromversorgung Systemvoraussetzungen Windows Betriebssystem Windows XP Service Pack 2 oder Vista CPU 2 8 GHz Pentium 4 oder schnell...

Page 39: ...tzt Entfernen Sie den Schreibschutz der SD Karte Auf dem LCD Bildschirm erscheinen die Fehlermeldungen MEMORY ERROR Speicherfehler oder CARD ERROR Kartenfehler Oder der Camcorder kann die Speicherkart...

Page 40: ...oclips zus tzliche Lichtquellen Bei der Wiedergabe von Bildern auf dem LCD Bildschirm oder auf dem Computer erscheinen St rungen Die Flimmereinstellung entspricht nicht dem Standard des Lands in dem S...

Page 41: ...bevor der Treiber installiert wurde Installieren Sie den Treiber bevor Sie das USB Kabel anschlie en Auf dem Fernsehbildschirm erscheint nichts nachdem der Camcorder an das Fernsehger t angeschlossen...

Page 42: ...0f Objektiv 3X optischen Zoom Objektiv 7 5 22 5mm F3 6 6 7 Dateiformate MP4 H 264 JPEG WAV Externer Speicher SD MMC Karte bis zu 32 GB SDHC LCD Anzeige 6 1 CM LCD Bildschirm 2 4 LCD Bildschirm Digital...

Page 43: ...Cam scope Haute D finition Manuel de l utilisateur Fran ais...

Page 44: ...scope des temp ratures lev es ni aux rayons directs du soleil Cela pourrait endommager le cam scope 4 Utilisez la cam scope avec soin Evitez d appuyez avec force sur le corps du cam scope 5 Pour votr...

Page 45: ...Couvercle du connecteur 12 Ecran LCD 13 Haut parleur 14 Bouton Zoom avant Volume 15 Zoom arri re Volume 16 D clencheur Obturateur 17 Connecteur de sortie HDMI 18 Port USB 19 Connecteur TV out couteur...

Page 46: ...capacit de stockage du cam scope Soulevez le couvercle de la carte m moire comme indiqu 1 Ins rez la carte dans la direction indiqu e jusqu ce qu elle atteigne le fond du logement 2 Lorsque la carte e...

Page 47: ...ue le cam scope est teint Le voyant LED de chargement devient rouge et le chargement d marre 2 Lorsque la charge est interrompue ou que la batterie est compl tement charg e le voyant LED 3 de chargeme...

Page 48: ...ystick 1 Gauche pour entrer dans le menu Mode Utilisez le joystick vers le 2 Haut ou vers le Bas pour s lectionner l l ment d sir Utilisez la manette vers la 3 Droite pour confirmer Utilisez le joysti...

Page 49: ...le Comprendre les ic nes l cran Mode Camera Appareil photo 1 Ic ne de mode mode appareil photo 2 Nombre d enregistrements 3 AF mise au point automatique 4 Exposition 5 Mode Flash 6 R solution photo 7...

Page 50: ...tuels totals 3 Format fichier 4 Carte m moire ins r e 5 Autonomie de la batterie 6 Dur e d enregistrement 1 2 3 4 5 6 Mode Vocal 1 Ic ne de mode mode vocal 2 Nombre d enregistrements 3 Carte m moire i...

Page 51: ...se de vue sans faire un zoom avant arri re ou vous d placer vous pouvez activer la fonction de verrouillage AF en poussant la manette vers le haut Pour d sactiver cette fonction poussez de nouveau la...

Page 52: ...ture du dernier enregistrement photo clip vid o ou clip audio commence 2 Utilisez le Joystick vers le 3 Haut ou vers le Bas pour passer d un fichier un autre L affichage ou la lecture du fichier auque...

Page 53: ...allage pour les sp cifications d taill es R solution photo Veuillez vous r f rer l emballage pour les sp cifications d taill es Stabilisateur Marche Arr t Activater d sactiver la fonction Stabilisateu...

Page 54: ...ez consulter le tableau R f rence des param tres d oscillation dans l appendice Impr Date Marche Arr t Activez cette fonction pour imprimer un marquage de date sur chaque photo Balencement de Blancs A...

Page 55: ...marrer Menu Utilise l cran de d marrage par d faut Appareil photo Utilisez le mode Camera Appareil photo comme cran de d marrage Arr t Auto Arr t 1min 3min 5min D finissez la dur e avant que le cam s...

Page 56: ...passe automatiquement en mode Disk Disque Cam ra PC Langue Vous permet de s lectionner la langue utilis e pour l OSD Date Heure D finissez la date et l heure Formater Oui Non Formatez le support de st...

Page 57: ...er la Sortie TV veuillez consulter la section Param tres avanc s pour plus d informations Taiwan NTSC Etats Unis NTSC Europe PAL Chine PAL Allumez votre TV et commutez le mode 1 TV sur AV Connectez le...

Page 58: ...iaux Lors de la premi re utilisation veuillez installer le logiciel du CD fourni Allumer le cam scope 1 Connectez le cam scope votre ordinateur l aide du c ble USB 2 Le mode Disk Disque est d fini par...

Page 59: ...est en fonction de la norme de la fr quence de votre source d alimentation locale Sp cifications du syst me Pour Windows Syst me d exploitation Windows XP Service Pack 2 ou Vista CPU Pentium4 2 8 GHz...

Page 60: ...une carte SD prot g e D finissez la carte SD pour pouvoir crire dessus L cran LCD affiche le message MEMORY ERROR ERREUR M MOIRE ou CARD ERROR ERREUR CARTE Ou le cam scope ne peut pas lire la carte m...

Page 61: ...sources de lumi re suppl mentaires lors de l enregistrement de clips vid o Du bruit appara t lors de l affichage d images sur l cran LCD ou sur l ordinateur La configuration de la fr quence ne corresp...

Page 62: ...er le pilote Installez le pilote avant de brancher le c ble USB L cran de t l vision ne s affiche pas apr s avoir connect le cam scope la t l vision Le cam scope n est pas correctement connect la t l...

Page 63: ...bjectif Objectif zoom optique 3X 7 5 22 5mm F3 6 6 7 Format de fichier MP4 H 264 JPEG WAV M moire externe Carte SD MMC jusqu 32 Go SDHC Affichage LCD LCD 6 1 CM 2 4 LCD Zoom num rique 4X Sortie TV Sor...

Page 64: ...High Definition Camcorder User s Manual Nederlands...

Page 65: ...rder 3 Stel de camcorder niet bloot aan hoge temperaturen en laat deze niet in direct zonlicht liggen De camcorder kan hierdoor beschadigd raken 4 Behandel de camcorder met zorg Druk niet hard op de b...

Page 66: ...e van de aansluitingen 12 LCD scherm 13 Luidspreker 14 Inzoomen Volume hoger 15 Uitzoomen Volume lager 16 Ontspanknop 17 HDMI uitgang 18 USB aansluiting 19 Aansluiting TV uitgang oortelefoon 20 Statie...

Page 67: ...n Til het klepje van de geheugenkaart op zoals weergegeven 1 Schuif de kaart in de aangegeven richting totdat deze de achterkant van de sleuf bereikt 2 Als de kaart op de juiste manier is geplaatst za...

Page 68: ...e pc Zorg ervoor dat de camcorder is uitgeschakeld De laad LED licht rood op en het opladen wordt gestart 2 Wanneer het opladen wordt onderbroken of de batterijdoos volledig is opgeladen 3 wordt delaa...

Page 69: ...tijdje inactief is geweest Modus kiezen Gebruik de joystick 1 Links om in het menu Modus Gebruik de joystick 2 Omhoog of Omlaag om de gewenste item Gebruik de joystick 3 Recht om te bevestigen Gebrui...

Page 70: ...terij of accu te vervangen wanneer het pictogram een laag batterijvermogen aangeeft LCD indicators Cameramodus 1 Modus cameramodus 2 Aantal opnamen 3 AF Autofocus 4 Belichting 5 Flitsermodus 6 Fotores...

Page 71: ...ge opname totaal aantal opnamen 3 Bestandsformaat 4 Geheugenkaart geplaatst 5 Levensduur batterij 6 Opnameduur 1 2 3 4 5 6 Spraakmodus 1 Modus Spraakmodus 2 Aantal opnamen 3 Geheugenkaart geplaatst 4...

Page 72: ...eer u n punt opneemt zonder in uit te zoomen of u te verplaatsen kunt u de Autofocus activeren door de joystick omhoog te verplaatsen Om deze functie uit te schakelen beweegt u Joystick weer aan de op...

Page 73: ...ergave 1 De laatst gemaakte foto video opname of geluidsopname wordt getoond of afgespeeld 2 Gebruik de joystick 3 Omhoog of Omlaag om te schakelen tussen bestanden Het gekozen bestand wordt automatis...

Page 74: ...ie Resolutie Raadpleeg de informatie op de verpakking voor nadere specificaties over de resolutie Stabilisator Aan Uit Hiermee worden vage foto s als gevolg van beweging van de hand zo veel mogelijk v...

Page 75: ...Datumafdruk Aan Uit Schakel deze functie in om de datum op elke foto af te drukken Wit balans Auto De camcorder past de witbalans automatisch aan Zonnig Deze instelling is geschikt voor opnamen buite...

Page 76: ...rm gebruiken Auto Uit Uit 1min 3min 5min Tijd waarna de camcorder automatisch wordt uitgeschakeld als deze niet wordt gebruikt Als u deze optie instelt op Uit blijft de camcorder ingeschakeld tot de b...

Page 77: ...instellen Formaat Ja Nee Het opslagmedium formatteren Houd er rekening mee dat alle bestanden op het medium verloren gaan Standaardwaarden Ja Nee Fabrieksinstellingen herstellen Houd er rekening mee d...

Page 78: ...r meer informatie als u de instelling TV uitgang moet aanpassen Taiwan NTSC Amerika NTSC Europa PAL China PAL Zet de tv aan en schakel de tv in de 1 AV modus Sluit de audio en video connectors van 2 d...

Page 79: ...erste keer de software die op de bijgeleverde cd staat Schakel de camcorder in 1 Sluit de camcorder op de computer aan met de USB kabel 2 Standaard is deze ingesteld in de modus Schijf Wanneer de camc...

Page 80: ...s gebaseerd op de plaatselijke netspanningfrequentie Systeemvereisten Voor Windows Besturingssysteem Windows XP Service Pack 2 of Vista Processor 2 8 GHz Pentium 4 of hogere processor Systeem RAM ten...

Page 81: ...formaat van de geheu genkaart is niet compatibel met de camcorder Gebruik de camcorderfunctie Formatteren om de kaart te formatteren De geheugenkaart is beschadigd Vervang de geheugenkaart door een ni...

Page 82: ...u verblijft Pas de beeldverversing aan Raadpleeg de tabel Beeldver versing voor meer informatie Ik wil de volgnummering van de bestandsnamen IMG_xxxx opnieuw laten beginnen De nummering wordt uit gevo...

Page 83: ...dat u het stuurprogramma hebt ge nstalleerd Installeer het stuurprogramma voor dat u de USB kabel aansluit Het tv scherm verschijnt niet nadat ik de cam corder op de tv heb aangesloten De camcorder is...

Page 84: ...30f Lens 3X optische zoomlens 7 5 22 5mm F3 6 6 7 Bestandsindeling MP4 H 264 JPEG WAV Extern geheugen SD MMC kaart tot 32GB SDHC LCD scherm 6 1 CM LCD 2 4 LCD Digitale zoom 4X TV uitgang HDTV HDMI uit...

Page 85: ...Videoc mara de alta definici n Manual del usuario Espa ol...

Page 86: ...a a temperaturas altas ni la deje a la luz directa del sol Si lo hace podr a da arla 4 Utilice la videoc mara con cuidado Evite presionar fuerte el cuerpo de la videoc mara 5 Por su propia seguridad e...

Page 87: ...Tapa del conector 12 Pantalla LCD 13 Altavoz 14 Bot n Acercar Subir volumen 15 Bot n Alejar Bajar volumen 16 Bot n del obturador 17 Conector de salida HDMI 18 Puerto USB 19 Conector salida TV auricul...

Page 88: ...idad de memoria Levante la tapa de la tarjeta de memoria como se muestra 1 Inserte la tarjeta seg n la direcci n indicada hasta que alcance el extremo de la ranura 2 Cuando la tarjeta est insertada co...

Page 89: ...da El indicador LED de carga se iluminar en color rojo y la carga se iniciar 2 Cuando la carga se interrumpe o la bater a est completamente cargada el indicador de carga 3 se apagar Si utiliza su PC p...

Page 90: ...en el men de modo Utilizar el Joystick hacia arriba o abajo para seleccionar el elemento deseado 2 Utilice el Joystick hacia la 3 Right Derecho para confirmar Utilice el joystick hacia la 4 Left Izqu...

Page 91: ...icaci n de iconos en la pantalla Modo c mara 1 Icono de modo modo c mara 2 N mero de grabaciones 3 AF Enfoque Autom tico 4 Exposici n 5 Modo flash 6 Resoluci n de instant nea 7 Resoluci n de v deo 8 T...

Page 92: ...aciones totales 3 Formato de archivo 4 Tarjeta de memoria insertada 5 Duraci n de la bater a 6 Tiempo de grabaci n 1 2 3 4 5 6 Modo voz 1 Icono de modo modo voz 2 N mero de grabaciones 3 Tarjeta de me...

Page 93: ...mbio de posici n puede activar la funci n de bloqueo AF el joystick hacia arriba Para deshabilitar esta funci n desplace el joystick hacia arriba de nuevo Zoom 3 Utilice los botones del Zoom para acer...

Page 94: ...eproducir Comenzar la reproducci n del ltimo archivo de imagen v deo o audio grabado 2 Utilice el Joystick hacia 3 Up Arriba o Down Abajo para cambiar entre los archivos El archivo al que va aparece o...

Page 95: ...laci n del paquete para las especificaciones de la resoluci n Estabilizador Encender Apagar Habilita y deshabilita la funci n de estabilizador Esta funci n puede evitar que las im genes aparezcan borr...

Page 96: ...onsulte la tabla Valores de configuraci n de parpadeo Date Stamp Sello fecha Encender Apaga Active esta caracter stica para dejar la fecha marcada en cada foto White Balance Balance de blanco Auto Aut...

Page 97: ...liminar todo Yes No S No Elimina todos los archivos Opciones del men en el modo Configuraci n Encienda entre en el modo Setting Configuraci n Utilice el Joystick hacia la Right Derecho Elemento Opci n...

Page 98: ...Inglaterra Italia Holanda China Jap n y Hong Kong Modo USB PC Cam C mara PC Cuando se conecta a un PC la c mara entrar autom ticamente en el modo C mara PC camera Disk Disco Cuando se conecta a un PC...

Page 99: ...V out Salida TV consulte la secci n Configuraci n avanzada para m s informaci n Taiw n NTSC Am rica NTSC Europa PAL China PAL Encienda su televisor y cambie el 1 televisor al modo AV Conecte los extre...

Page 100: ...especiales Para el primer uso instale el software del CD incluido Encienda la videoc mara 1 Conecte la videoc mara en su ordenador con el cable USB 2 El modo predeterminado es Disk Disco Cuando se con...

Page 101: ...rpadeo est basada en la frecuencia est ndar de su suministro de corriente local Requisitos del sistema Para Windows Sistema operativo Windows XP Service Pack 2 o Vista CPU Pentium 4 a 2 8 GHz o superi...

Page 102: ...otegida Ajuste la tarjeta SD para que se pueda grabar en ella La pantalla LCD muestra el mensaje MEMORY ERROR o CARD ERROR La videoc mara no puede leer la tarjeta de memoria El formato de la tarjeta d...

Page 103: ...a fuentes de luz adicionales cuando grabe v deos Aparece ruido cuando visualizo las im genes en la pantalla LCD o en el ordenador La configuraci n del parpadeo no coincide con el est ndar del pa s en...

Page 104: ...instalar el controlador Instale el controlador antes de enchufar el cable USB La pantalla del televisor no aparece tras conectar la videoc mara al televisor La videoc mara no ha sido conectada correct...

Page 105: ...s QVGA 30f Objetivo Lente con zoom ptico 3X 7 5 22 5mm F3 6 6 7 Formato de archivo MP4 H 264 JPEG WAV Memoria externa Tarjeta SD MMC SDHC de hasta 32 GB Pantalla LCD Pantalla LCD de 6 1cm Pantalla LCD...

Page 106: ...Filmadora de Alta Defini o Manual do Utilizador Portugu s...

Page 107: ...permita que fique exposta diretamente ao sol Se isto acontecer a filmadora poder ficar danificada 4 Use a filmadora com cuidado Evite pressionar com muita for a a estrutura da filmadora 5 Para sua pr...

Page 108: ...du o 11 Tampa do conector 12 Ecr LCD 13 Altifalante 14 Bot o Aproximar Aumentar Volume 15 Bot o Afastar Diminuir Volume 16 Bot o do Obturador 17 Conector de sa da HDMI 18 Porta USB 19 Conector TV out...

Page 109: ...dade de mem ria da filmadora Levante a tampa do cart o de mem ria como mostrado 1 Insira o cart o na direc o indicada at que alcance o final da ranhura 2 Depois que o cart o for inserido adequadamente...

Page 110: ...gada O LED indicador do carregamento fi ca vermelho e o carregamento iniciado 2 Quando o carregamento interrompido ou a bateria est j completamente carregada o LED 3 de luz carregando desligar Quando...

Page 111: ...de menu Utilize o Joystick 2 Up Para Cima ou Down Para Baixo para selecionar o item desejado Utilize o Joystick para a 3 Right Direita para confirmar Utilize o joystick para a 4 Left Esquerda para sa...

Page 112: ...quando o cone indicar carga fraca na bateria Compreens o dos cones no ecr Modo Camera 1 cone de modo modo c mera 2 N mero de grava es 3 AF Focagem Autom tica 4 Exposi o 5 Modo Flash 6 Resolu o de Foto...

Page 113: ...rava es atuais totais 3 Formato do ficheiro 4 Cart o de mem ria inserido 5 Dura o da bateria 6 Tempo de grava o 1 2 3 4 5 6 Modo Voice Voz 1 cone de modo modo voz 2 N mero de grava es 3 Cart o de mem...

Page 114: ...sem aplicar mais ou menos zoom e sem movimenta o pode activar a fun o de Focagem Autom tica deslocando o Bot o da dire o para cima Para desactivar esta fun o para mover o bot o para a direc o para cim...

Page 115: ...o Come a a reprodu o da ltima fotografia videoclip ou audio clip gravados 2 Utilize o Joystick 3 Up Para Cima ouDown Para Baixo para alternar entre os arquivos O ficheiro para onde se dirige exibido...

Page 116: ...u o Por favor consulte a impress o na embalagem para especifica es de resolu o Stabilizer Estabilizador On Off Ligado Desligado Minimiza imagens desfocadas pelo movimento da m o Modo Night Noturno On...

Page 117: ...Date Stamp Datador On Off Ligado Desligado Activa o recurso de imprimir uma data em cada fotografia White Balance Bal brancos Auto A filmadora ajusta automaticamente o equil brio do branco Sunny Com...

Page 118: ...o menu no modo Setting Configura o Ligue a filmadora entre no modo Setting Configura o Utilize o Joystick Right Direita Item Op o Description Beep Bip On Off Ligado Desligado Activa o som de bip on of...

Page 119: ...uando conectada a um PC a filmadora automaticamente entra no modo Camera PC c mera Disco Quando conectada a um PC a filmadora automaticamente entra no modo Disk disco remov vel Language Idioma Permite...

Page 120: ...por favor consulte a sec o Advanced settings Configura es avan adas para mais informa es Taiwan NTSC Am rica NTSC Europa PAL China PAL Ligue a sua TV e alterne a TV para o 1 modo AV Conecte as extrem...

Page 121: ...uando utilizar pela primeira vez por favor instale o software inclu do no CD Ligue a filmadora 1 Conecte a filmadora ao seu computador utilizando o cabo USB 2 O padr o est definido como modo Disk Quan...

Page 122: ...aseada no padr o de frequ ncia do seu fornecimento de energia local Requisitos do Sistema Para Windows Sistema Operacional Windows XP Service Pack 2 ou Vista CPU 2 8 GHz Pentium 4 ou processador mais...

Page 123: ...e cart o SD protegido Ajuste o cart o SD para que possa ser gravado O ecr LCD exibe a men sagem MEMORY ERROR ERRO DE MEM RIA ou CARD ERROR ERRO DE CART O Ou a filmadora n o pode ler o cart o de mem ri...

Page 124: ...ente fontes extras de luz ao gravar videoclips Ru dos est o a ocorrer quando visualizo imagens no ecr LCD ou no computador A configura o de flicker oscila o n o corresponde ao padr o do seu pa s Ajust...

Page 125: ...a no PC via cabo USB antes da instala o do driver Instale o driver antes de conectar o cabo USB O ecr da TV n o aparece depois de conectar a filmadora TV A filmadora n o est conectada correctamente TV...

Page 126: ...fps QVGA 30f Lente Lente zoom tico 3X 7 5 22 5mm F3 6 6 7 Formato de ficheiro MP4 H 264 JPEG WAV Mem ria externa Cart o de mem ria SD MMC SDHC at 32 GB Ecr LCD LCD de 6 1 cm LCD de 2 4 Zoom digital 4X...

Page 127: ......

Page 128: ...e radio frequency energy and if not installed and used in accordance with the instructions may cause harmful interference to radio communications However there is no guarantee that interference will n...

Page 129: ...u OK 5 6 Down Focus 7 LED 8 9 Playback 10 Record 11 12 LCD 13 14 Zoom in Volume up 15 Zoom out Volume down 16 Shutter 17 HDMI 18 USB 19 20 SD MMC 21 22 23 Flash Strobe 24 25 11 1 2 4 5 6 3 7 8 9 12 13...

Page 130: ...2 1 2 3 SD MMC SD SDHC MMC MMC 2 0 1 2 3 4...

Page 131: ...3 USB 8 AC USB 1 USB USB LED 2 LED 3 1 2 3...

Page 132: ...4 LCD Power LCD Power Auto O 1 Left 2 Up Down Right 3 Left 4 Setting Language Up Down Right Setting Clock Up Down YY MM DD HH MM Right Left...

Page 133: ...5 Camera 1 2 3 AF 4 5 6 7 8 9 10 11 12 13 14 1 2 4 5 6 7 8 9 10 11 12 13 14 3...

Page 134: ...6 Playback 1 2 3 4 5 6 1 2 3 4 5 6 Voice 1 2 3 4 5 Voice recorder 1 2 3 4 5...

Page 135: ...7 1 2 Record Zoom 3 Right Left 4 Record 5 1 Zoom 2 3 Shutter 4 Voice 1 Record 2 Right Left 3 Record 4 Playback 1 2 Up Down 3 4 100 6 100...

Page 136: ...8 Camera Playback Camera Camera Stabilizer On O Night Mode On O AF On O Flash Strobe Auto Force O Snap Mode Single Self Timer Continuous...

Page 137: ...9 Exposure 2 2 Flicker 50Hz 60Hz 50Hz 60Hz Date Stamp On O White Balance Auto E ect Normal Black White Classic...

Page 138: ...ayback File Info Slide show On O Delete One Yes No Delete current le Delete All Yes No Setting Setting Beep On O Start up Menu Camera Camera Auto o O 1 3 5 O AV Mode Menu Earphone AV Out TV System NTS...

Page 139: ...11 USB USB Mode PC Cam Camera PC camera Disk Disk removable disk Language Clock Format Yes No Reset Default Yes No...

Page 140: ...12 AV TV out NTSC NTSC PAL PAL AV 1 AV 2 3 AV 4 HDMI 1 HDMI 2 3 HDMI 4 HDMI 5 TV...

Page 141: ...13 MP4 1 USB 2 Disk Disk removable disk...

Page 142: ...14 50Hz 50Hz 50Hz 50Hz 50Hz 50Hz 50Hz 60Hz 60Hz 50Hz 50 60Hz 60Hz Windows Windows XP Service Pack 2 Vista 2 8 GHz Pentium 4 512 MB 64 MB 4 H 264 Quick Time Player 7 4 1 USB...

Page 143: ...15 Shutter Record SD MMC SD SD LCD MEMORY ERROR CARD ERROR Format...

Page 144: ...16 LCD IMG_ xxxx Format IMG_xxxx xxxx IMG_0001 MP4 IMG_0001 JPG...

Page 145: ...17 Direct X 9 0c Windows Media 9 0 Codecs http www microsoft com USB USB...

Page 146: ......

Page 147: ...e radio frequency energy and if not installed and used in accordance with the instructions may cause harmful interference to radio communications However there is no guarantee that interference will n...

Page 148: ...1 1 2 3 4 5 6 7 LED 8 9 10 11 12 LCD 13 14 15 16 17 HDMI 18 USB 19 TV 20 SD MMC 21 22 23 24 25 11 1 2 4 5 6 3 7 8 9 12 13 14 15 16 19 17 18 21 20 22 23 24 25 10...

Page 149: ...2 1 2 3 SD MMC SD SDHC MMC MMC 2 0 1 2 3 4...

Page 150: ...3 USB 8 USB 1 USB USB LED 2 LED 3 1 2 3...

Page 151: ...4 LCD Power LCD Power Auto O 1 2 3 4 Setting Language Setting Clock YY MM DD HH MM...

Page 152: ...5 1 2 3 4 5 6 7 8 9 10 11 12 13 14 1 2 4 5 6 7 8 9 10 11 12 13 14 3...

Page 153: ...6 1 2 3 4 5 6 1 2 3 4 5 6 1 2 3 4 5 1 2 3 4 5...

Page 154: ...7 1 2 Record Zoom 3 4 Record 5 1 Zoom 2 3 Shutter 4 Voice 1 Record 2 3 4 Record Playback 1 2 3 4 100cm 6 cm 100cm...

Page 155: ...8 Camera Playback Camera Camera Stabilizer On O Night Mode On O On O Auto Force O Single Self Timer Continuous...

Page 156: ...9 Exposure 2 2 Flicker 50Hz 60Hz 50Hz 60Hz Date Stamp On O White Balance Auto Sunny Cloudy Fluorescent Tungsten Normal Black White Classic Video resolution Still resolution...

Page 157: ...10 Playback Playback File Info Slide show On O Delete One Yes No Delete All Yes No Setting Setting Beep On O Camera Auto o O 1 3 5 O AV Mode Menu Earphone AV Out TV System NTSC NTSC PAL PAL...

Page 158: ...11 USB Mode USB PC Cam PC Camera PC Disk PC Disk Language OSD Clock Format Yes No Reset Default Yes No...

Page 159: ...12 TV HDTV AV TV CRT TV out TV NTSC NTSC PAL PAL AV 1 AV 2 3 AV 4 HDMI 1 HDMI HDMI 2 3 HDMI 4 HDMI 5 TV...

Page 160: ...13 MP4 PC 1 USB 2 PC Disk...

Page 161: ...14 50Hz 50Hz 50Hz 50Hz 50Hz 50Hz 50Hz 60Hz 60Hz 50Hz 50 60Hz 60Hz Windows Windows XP Service Pack 2 Vista CPU 2 8 GHz Pentium 4 512 MB 64 MB CD ROM 4X H 264 Quick Time Player 7 4 1 USB...

Page 162: ...15 Record SD MMC SD SD LCD MEMORY ERROR CARD ERROR Format...

Page 163: ...16 LCD IMG_xxxx Format IMG_xxxx xxxx IMG_0001 MP4 IMG_0001 JPG...

Page 164: ...17 Direct X 9 0c Windows Media 9 0 Codecs http www microsoft com USB PC USB Video Conferencing...

Page 165: ......

Page 166: ...e radio frequency energy and if not installed and used in accordance with the instructions may cause harmful interference to radio communications However there is no guarantee that interference will n...

Page 167: ...1 1 2 3 4 OK 5 6 7 LED 8 9 10 11 12 LCD 13 14 15 16 17 HDMI 18 USB 19 TV 20 SD MMC 21 22 23 24 25 11 1 2 4 5 6 3 7 8 9 12 13 14 15 16 19 17 18 21 20 22 23 24 25 10...

Page 168: ...2 1 2 3 SD MMC SD SDHC MMC MMC 2 0 1 2 3 4...

Page 169: ...3 USB 8 AC USB 1 USB USB 2 3 PC 1 2 3...

Page 170: ...4 LCD LCD 1 2 3 4 YY MM DD HH MM...

Page 171: ...5 1 2 3 AF 4 5 6 7 8 9 10 11 12 13 14 1 2 4 5 6 7 8 9 10 11 12 13 14 3...

Page 172: ...6 1 2 3 4 5 6 1 2 3 4 5 6 1 2 3 4 5 1 2 3 4 5...

Page 173: ...7 1 2 3 4 5 1 2 3 4 1 2 3 4 1 2 3 4 100cm 6cm 100cm...

Page 174: ...8 10...

Page 175: ...9 2 2 50Hz 60Hz 50Hz 60Hz B W...

Page 176: ...10 1 1 3 5 AV AV AV TV NTSC NTSC PAL PAL USB PC PC...

Page 177: ...11 OSD...

Page 178: ...12 HDTV AV CRT TV NTS C NTSC PAL PAL AV 1 AV 2 3 AV 4 HDMI HDTV HDTV 1 HDMI HDMI in 2 HDTV 3 HDMI 4 HDTV HDMI 5 TV...

Page 179: ...13 MP4 CD 1 USB 2...

Page 180: ...14 50Hz 50Hz 50Hz 50Hz 50Hz 50Hz 50Hz 60Hz 60Hz 50Hz 50 60Hz 60Hz Windows Windows XP Service Pack 2 Vista CPU 2 8 GHz Pentium 4 RAM 512 MB RAM 64 MB CD ROM 4X H 264 Quick Time 7 4 1 USB...

Page 181: ...15 SD MMC SD SD LCD...

Page 182: ...16 LCD IMG_xxxx IMG_xxxx xxxx IMG_0001 MP4 IMG_0001 JPG...

Page 183: ...17 Direct X 9 0c Windows Media 9 0 Codecs CD http www microsoft com USB USB...

Page 184: ...HD...

Page 185: ...e radio frequency energy and if not installed and used in accordance with the instructions may cause harmful interference to radio communications However there is no guarantee that interference will n...

Page 186: ...1 1 2 3 4 5 6 7 LED 8 9 10 11 12 LCD 13 14 15 16 17 HDMI 18 USB 19 TV 20 SD MMC 21 22 23 24 25 11 1 2 4 5 6 3 7 8 9 12 13 14 15 16 19 17 18 21 20 22 23 24 25 10...

Page 187: ...2 1 2 3 SD MMC SD SDHC MMC MMC 2 0 1 2 3 4...

Page 188: ...3 USB 8 AC USB 1 USB USB PC LED 2 LED 3 PC 1 2 3...

Page 189: ...4 LCD LCD Auto O 1 2 3 4 Setting Language Setting Clock YY MM DD HH MM...

Page 190: ...5 1 2 3 AF 4 5 6 7 8 9 10 11 12 13 14 1 2 4 5 6 7 8 9 10 11 12 13 14 3...

Page 191: ...6 1 2 3 4 5 6 1 2 3 4 5 6 1 2 3 4 5 1 2 3 4 5...

Page 192: ...7 1 2 3 4 5 1 2 3 4 Voice 1 2 3 4 Playback 1 2 3 4 100cm 6 cm 100cm...

Page 193: ...8 Camera Video Resolution Still Resolution Stabilizer On O Night Mode On O Flash Strobe Auto Force O...

Page 194: ...e Single Self Timer 10 Continuous Exposure 2 2 Flicker 50Hz 60Hz 50Hz 60Hz Date Stamp On O White Balance Auto Sunny Cloudy Fluorescent Tungsten E ect Normal Black White Classic Video resolution Still...

Page 195: ...File Info Slide show On O Delete One Yes No Delete All Yes No Setting Beep On O Start Up Menu Camera Auto O O 1min 3min 5min 1 3 5 Off AV Mode AV Menu AV Earphone AV Out AV TV TV System TV NTSC TV NTS...

Page 196: ...11 USB Mode USB PC Cam PC PC PC Disk PC Language OSD Clock Format Yes No Reset Default Yes No...

Page 197: ...12 TV HDTV AV TV TV TV CRT TV TV TV NTSC NTSC PAL PAL TV TV AV 1 AV 2 TV 3 AV 4 TV HDMI HDTV HDTV 1 HDMI HDMI in 2 HDTV 3 HDMI 4 HDTV HDMI 5 TV...

Page 198: ...13 MP4 PC CD 1 USB 2 PC...

Page 199: ...14 50Hz 50Hz 50Hz 50Hz 50Hz 50Hz 50Hz 60Hz 60Hz 50Hz 50 60Hz 60Hz Windows Windows XP 2 Vista CPU 2 8 GHz 4 512 MB 64 MB CD ROM 4X H 264 Quick Time Player 7 4 1 USB...

Page 200: ...15 SD MMC SD SD LCD MEMORY ERROR CARD ERROR Format...

Page 201: ...16 LCD IMG_xxxx Format IMG_xxxx xxxx IMG_0001 MP4 IMG_0001 JPG...

Page 202: ...17 TV Direct X 9 0c Windows Media 9 0 Codecs CD http www microsoft com USB PC USB TV TV TV TV...

Reviews: