background image

22

23

C O N N E C T I O N S

a n d   c o p y i n g

Copying

Switch off all components when connecting or disconnecting cables.

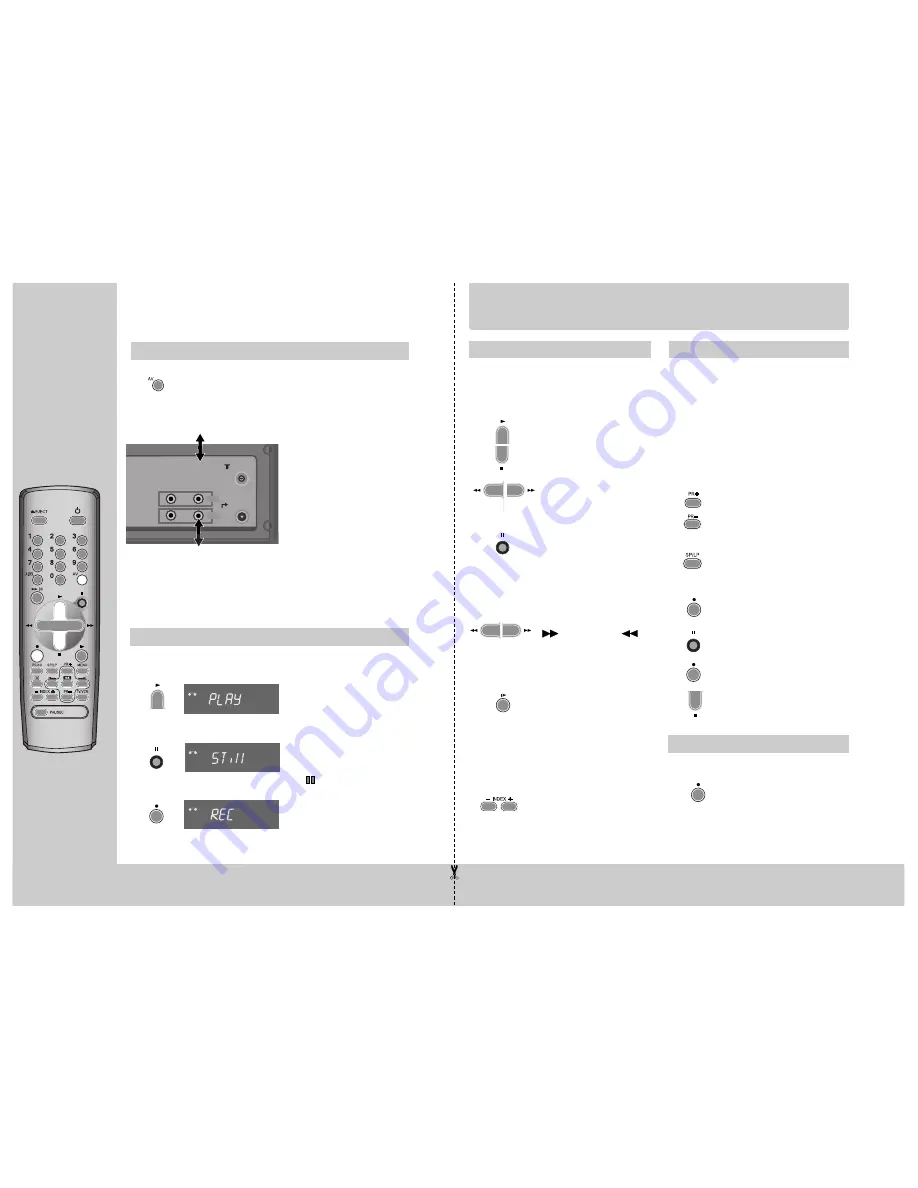
To copy to your video 

from

another video machine

,

connect the two machines with a
cable between their RCA sockets
and select as programme "AV" or
“F. AV” (front sockets) using the
[AV], [PR+/-], or [00] button.
Set the other video machine to
playback and your machine to
record.

To connect a mono audio source,
use the front Audio In socket
marked L.

To copy 

to another video

machine

from your video,

connect the two machines by
means of their RCA sockets.
On the other video, select its AV
input and set the machine to record.
Switch your video to play back
at the position you want
copying to start.

Assembling

For the best results, the source cassette from which you are recording should
already be playing back when you start recording.

Should you wish to assemble your own film, from camcorder footage for
example, use the assembly technique for smooth edit points:

Move the tape to the
position at which the new
scene is to be added using
the play functions (pages
8/9).

Wind back slightly before
the edit point and put the
machine into pause using the

button (do not press

STOP!).

Now go directly into record.

VCR

VCR

VCR

2x

B R I E F   I N S T R U C T I O N

f o r   e x p e r i e n c e d   u s e r s

Playing back

Your TV and your video recorder are switched
on.

To see the picture from your video, press the
station button on the TV reserved for video input
or the AV (Audio/Video) button.

Start playback.

Stop playback.

Fast forward or rewind the
cassette from stop.

Still picture from playback.
Each press of the button
advances the picture one
frame.

PLAY switches back to normal
playback.

Starting from playback you
can control search speed in 
2 steps either forwards
(

) or backwards (

).

Press repeatedly. 

PLAY switches back to normal
playback.

Starting from playback you
can control slow motion
speed in 6 steps (1/15, 1/10,
1/5, 1/30, 1/25, 1/20, 1/15,
...). Press repeatedly.

PLAY switches back to normal
playback.

Select INDEX + or INDEX – to
search forwards or backwards.

The video will now wind to the
beginning of the first recording,
play it for about 6 seconds then
wind on to the next one.
When you see the recording you
want, press PLAY.

Simple recording

One touch recording – OTR

The TV stations on the video have been tuned in
(page 5).

The video is switched on.

You can either watch the picture from the video
on the TV by pressing the station button
reserved for video input or the AV button, watch
another TV station or switch off the TV
altogether.

Load a cassette with its safety
tab in place (see page 17).

Start your recording.

If you wish to interrupt recording
briefly – then continue.

Stop your recording.

Choose the station whose
programme you want to record.
If the programme you wish to
record is very long, double the
possible recording time with
"LP" (Long Play). 

Up to eight hours with an E-240
cassette.

Choose the station you want and
press the button once for every
30 minutes of programme you
wish to record.

Up to ten hours are possible.

TV
(other VCR)

ANT

.

 OUT

ANT

.

 IN

AUDIO

VIDEO

OUT

IN

Other VCR
Decoder for Pay-TV
Camcorder
Video Player

Summary of Contents for AVR7

Page 1: ...uch as vases shall be placed on this apparatus For your own safety There are no components in this video recorder you can service or repair yourself Do not open the case of the video recorder Only allow qualified personnel to repair or service your set This video recorder is designed for continuous operation Switching it off does not disconnect it from the mains stand by To disconnect it from the ...

Page 2: ...ode number buttons to select programmes stations or to type in numbers the menu controls programme station selection PR this button is not available for this set The buttons to use are marked on the following pages C O N T R O L S The machine Press any button to turn on the power On screen display MAIN MENU example The menus show you which button to press for the next step In addition some other f...

Page 3: ...shown on the back of the video Now plug in the mains lead The display of the video should now light Fit the batteries as shown by the pictures in the bay 1 5 V AAA 200 240 V 50 60Hz Protect your environment by returning used batteries to your dealer Since batteries contain toxic substances they require special disposal methods Make sure the batteries are always of the same type and age and remove ...

Page 4: ...hannel between 21 and 69 using the number buttons OSD ON OFF ON OFF PR SELECT OK CONFIRM MENU END OSD On Screen Display ON OFF This VCR is set to OSD On Screen Display ON mode at the factory but you can change it to OFF mode When a function is changed at the front display or remote control the change will be displayed on the screen Call the video s MAIN MENU Choose VCR SETUP And press the OK butto...

Page 5: ...which have been recorded on NTSC color system on this VCR you can watch the pictures on a PAL TV Clock Counter Remaining time page 16 P L A Y I N G c a s s e t t e s Still Variable picture search Variable slow motion Accessing new recordings index scan Still picture from playback Each press of the button advances the picture one frame PLAY switches back to normal playback Keep pressing to vary the...

Page 6: ...OCK SET 0 9 SETUP HOUR CORRECT MENU END TIME DATE CLOCK SET 0 9 SETUP HOUR CORRECT OK CONFIRM MENU END TIME 06 05 DATE 11 04 2003 FRI 2x 2x CM Skip If you press CM Skip button on the remote control tape advances for 30 seconds segment Auto Repeat If you press the PLAY button for 5secs during playback mode REP should appear on your display the video goes into Auto repeat mode This video repeatedly ...

Page 7: ... you wish to record is very long double the possible recording time with LP Long Play Up to eight hours with an E 240 cassette VCR STOP SP PR09 EURO The video stops automatically if pause exceeds five minutes VCR VCR One touch recording OTR If you want to record from a source connected to your video see page 24 To cancel OTR press the button stop more than 5 seconds Clock Counter Remaining time pa...

Page 8: ...ORRECT OK CONFIRM MENU END Wait a few seconds after typing a one digit number If you have made a mistake move to the position you want to change using the buttons and change the setting If programme timings overlap the machine will give a warning message If you don t adjust the times the machine will record the first programme completely then continue with the second one If there is no sufficient ...

Page 9: ...tting the counter to zero Accessing counter zero position Reset the counter The video will wind to the position 0 00 00 and stop COUNTER RESET REW SP GO TO ZERO 0 02 13 M O R E f u n c t i o n s Child lock Press the button for about 5 seconds No buttons of front panel can be operated now and LOCK INDICATOR SAFE will be displayed momentarily on LED display Keep your remote control in a safe place T...

Page 10: ...TION AERIAL AUTOSEARCH CH03 FINE TUNING NAME ____ PR UP DOWN 0 1 CHANGE CREATE OK CONFIRM MENU END T u n i n g i n NEW STATIONS Station names If your video is showing no station name or is showing a station name incorrectly you can correct this Select NAME position on the MANUAL SET menu Press MENU Choose PR Preset by pressing PR then OK Choose Manual Set by pressing PR then OK Select the channel ...

Page 11: ...d for video input to see the picture from the video If you are not using a RCA cable your video can transmit pictures and sound to the TV via the coax aerial cable Just tune the TV to the video s transmitting channel factory set to UHF CH 52 Tune the TV carefully to ensure the best pictures and sound Once you have carried out the steps in Connecting up the video recorder page 4 switch on your TV P...

Page 12: ...V Audio Video button Start playback Stop playback Fast forward or rewind the cassette from stop Still picture from playback Each press of the button advances the picture one frame PLAY switches back to normal playback Starting from playback you can control search speed in 2 steps either forwards or backwards Press repeatedly PLAY switches back to normal playback Starting from playback you can cont...

Page 13: ...quality poor still picture Remote control doesn t work General a cassette won t load the cassette won t rewind fast forward play or record mode timer is recording incorrectly a loud noise when left in Stop mode ERR occurs in the display The mains lead is not connected to the wall socket condensation may have formed when moving the video recorder from a cold to a warm room Wait until the video and ...

Page 14: ...dard Play 12 14 Stand by Precautions Station 5 18 21 Still frame adjustment 8 Test picture 21 Tracking 8 Dimensions W x H x D 360 x 91 x 280 mm Weight 3 3 kg Power supply Voltage 200 240V 50 60Hz Power consumption 14 Watt System Video PAL I I Channel range VHF 2 12 UHF 21 69 CATV S1 S41 x y z Hyperband Channel locations 99 AUX RF Out UHF CH 21 69 52 Video System VHS Speeds SP LP General Temperatur...

Page 15: ...R07 P 07 PR08 P 08 PR09 P 09 PR10 P 10 PR11 P 11 PR12 PR13 PR14 TIME DATE If other stations are positioned on near the current RF OUTPUT CH the guide message appears automatically Press the OK button to confirm the recommended PR The VCR recommends the optimal RF OUTPUT PR number automatically IMPORTANT PLEASE CHANGE THE TV PR TO 54 0 9 SETUP HOUR CORRECT MENU END RF OUTPUT SET RECOMMENDED CH 54 U...

Page 16: ...29 28 MEMO MEMO ...

Page 17: ...Owner s Manual Before operating the unit please read this manual thoroughly and retain it for future reference Video Cassette Recorder AVR7 ...

Reviews: