background image

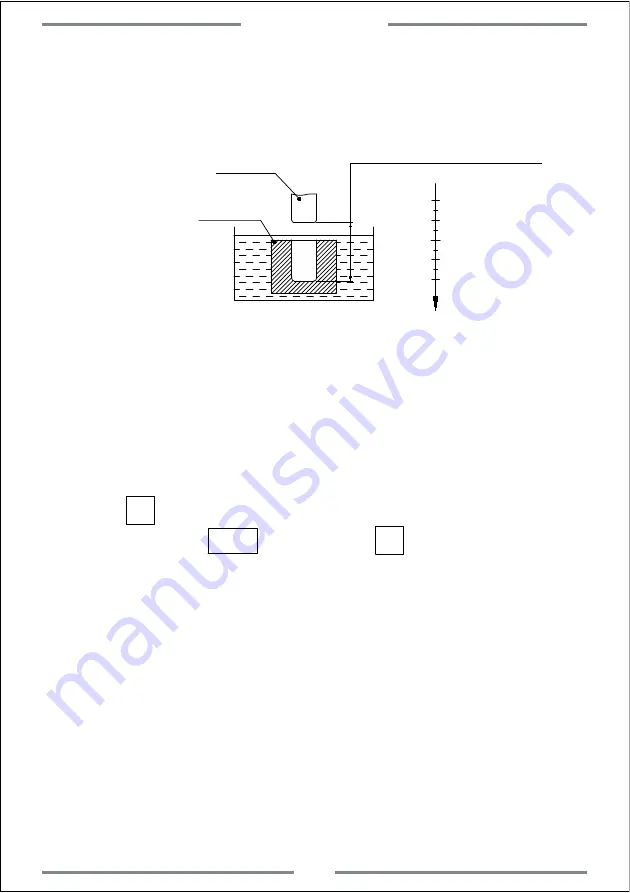
Once the electrode exceed the liquid level,the fire may be brought.This

function will alarm and output a off signal for machining once the electrode

exceed the liquid level.(Figure 2)

0

Figure 2


Electrode

Workpiece


Reversed height of fire prevention

2. Operation Steps:

(1): Set the parameter of fire prevention of reverse height,exit mode,

       machining direction and EDM mode before machining.

(2): Move the electrode on spindle to make it contact with the surface of

       work-piece,and zero or input value.

(3): Press         to input the machining height.(The height will be displayed on

       X axis)Then press               to confirm.Press         to exit DEPTH setting and

       back to machining interface.

T

(4): X axis will display the target height.

       Y axis will display the reached height.

       Z axis will display the current position of electrode.

(5): Once started machining,the value on Z axis will get close to target value

       gradually.The value on Y axis will also get close to the target.If the

       electrode goes up and down now,the value on Z axis will change

       accordingly.While the value on Y axis will remain same which is the

       reached height value.

Special Function

39

SIFT

SIFT

Summary of Contents for A20-2V

Page 1: ...LED DIGITAL READOUTS Operation Manual Version 2 0 Driven by Innovation...

Page 2: ...A20 3V Keypad A20 2V Keypad ENT T ENT T E N N T E N N T...

Page 3: ...ation Key Calculator Function Decimal Point Key Trigonometric function key Calculator Function Back Key Calculation Key Calculator Function Calculation Key Calculator Function Minus Input Key Confirm...

Page 4: ...ey PLD Function Key Sin Function 200 sets of Tool offset Key Cos Function 200 sets of Tool Offset Key Tan Function Key tan cm3 Absolute and Incremental Coordinate Conversion Key ABS INC Switching Key...

Page 5: ...5 Decimal Setting 2 6 Number of Axis Setting 5 3 Basic Function 3 1 Value Zero Value Recovery 3 2 Metric and Imperial Conversion 3 3 Coordinate Input 3 4 1 2 Function 3 5 Absolute and Incremental Coor...

Page 6: ...R Function 4 5 Calculator Function 21 25 27 33 5 1 Parameter 5 2 Dimension 5 3 Troubleshooting 44 45 46 4 4 Simple R Function 30 4 6 Digital Filtering Function 34 4 7 Diameter and Radius Conversion 3...

Page 7: ...elf checking After self checking completed the window at the left side will display the resolution for each axis The window at the right side will display the machine mode Mill applies to milling mach...

Page 8: ...mpensation 12 200 groups of SDM Auxiliary Coordinate 13 Parameter Setting 14 1 2 Function 1 2 Special Function for Milling Machine Dividing hole on oblique line PLD Dividing hole on circle PCD Arc mac...

Page 9: ...14 1 2 Function 1 2 Special Function for Milling Machine Dividing hole on oblique line PLD Dividing hole on circle PCD Arc machining Digital Filtering SIFT Special Function for Lathe Radius and Diame...

Page 10: ...orking status While DRO is under self checking process press to enter the parameter setting The setting includes the following 1 Encoder type Setting Linear or Rotary 2 Resolution 3 Counting Direction...

Page 11: ...resolution of linear encoder includes 0 1um 0 2um 0 5um 1um 2um 2 5um 5um 10um 20um 50um X0 Y0 Z0 5 0 1 0 5 0 X Y Z RES 2 For setting the resolution of rotary encoder we need to input the correspondin...

Page 12: ...Y Z axis X0 Y0 Z0 X Y Z DIR 0 0 X Y Z DIR 1 0 Set the encoder type be rotary X0 Y0 X 1 3 2 CLS Arc sin TOOL Y0 L R TYPE Rotary Input 2000 as the resolution of X axis Input 2000 as the resolution of Y...

Page 13: ...please refer the linear compensation instruction 2 5 Imperial Decimal Setting There is option to display 4 or 5 digits after decimal point under imperial model User could set according to using habit...

Page 14: ...ates the current mode LATHE indicates the set mode Press to save and exit X0 X0 The number of displaying axis could be set in this DRO For example if the DRO gets 3 axis displaying We could turn off 1...

Page 15: ...Function 5 ABS INC Coordinate System Conversion 6 Full Clear of 200 Groups of SDM Auxiliary Coordinates 7 Power off Memory 8 Sleep Function 9 REF Function 10 Linear Compensation 11 Non linear Compens...

Page 16: ...ersion Switch the displaying unit under imperial or metric model Example 1 Switch the current imperial unit inch to be metric unit mm X0 Y0 Z0 25 400 X0 Y0 Z0 1 00000 2 00000 3 00000 50 800 76 200 Exa...

Page 17: ...work piece Example Set the zero point of X axis at the centre of work piece Same operation to Y axis Step 1 Align the edge finder on one side of work piece for X axis then zero the value X0 X0 Y0 X0 Y...

Page 18: ...ate to be INC coordinate ABS INC X0 Y0 X 1 3 2 CLS Arc sin TOOL X0 Y0 X 1 3 2 CLS Arc sin TOOL 26 350 32 120 ABS 12 350 83 652 INC X0 Y0 X 1 3 2 CLS Arc sin TOOL X0 Y0 X 1 3 2 CLS Arc sin TOOL 26 350...

Page 19: ...ero point of work piece quickly work piece Mechanical zero reference point of linear scale Linear Scale Zero point of work piece Schematic Diagram Take note this distance Turn on the DRO to find the m...

Page 20: ...play FIND X The right window will display FD REF again in 2 seconds at this time user could Press Y or Z again to find their reference point when it is necessary 1 3 2 CLS Arc sin TOOL FIND X 1 3 2 CL...

Page 21: ...e table until the value of each axis to be the one we took the note At this time this point is the one we stopped for last machining Step 5 Press to exit the REF function and back to machining model 3...

Page 22: ...the compensated value operation step 1 and 2 are same as above After inputting the compensated value press to exit linear compensation Operations are shown as below X0 Y0 X 1 3 2 CLS Arc sin TOOL 0 02...

Page 23: ...e starting point for compensation Figure 1 2 Take the first mechanical zero reference point of linear scale as the starting point for compensation Figure 2 0 10 20 30 40 50 10 20 30 40 50 Starting poi...

Page 24: ...ngth of each compensation part X0 Y0 X 1 3 2 CLS Arc sin TOOL STEP 10 000 0 ENT 1 Step 6 Select the starting point A most end point of linear scale B Mechanical zero reference point of linear scale X0...

Page 25: ...value to another machine In this case we need cancel the compensation value or reset Same operation as above to enter the non linear compensation Input 0 as number of compensation part At this time a...

Page 26: ...When the zero point in ABS changed all coordinate in SDM will change accordingly Applications for SDM coordinate Zero point of work piece under ABS mode SDM1 SDM2 SDM3 SDM4 1 3 2 CLS Arc sin TOOL SDM...

Page 27: ...1 Zeroing in place 2 Input the number of SDM auxiliary coordinate Zero point of work piece under ABS mode SDM1 50 35 SDM2 50 50 SDM3 50 50 SDM4 50 35 X Axis Y Axis 1 Zeroing in place Set the zero poin...

Page 28: ...her the SDM coordinate is correct X0 Y0 X 1 3 2 CLS Arc sin TOOL 50 000 ABS 35 000 checking SDM4 coordinate value basing ABS SDM1 SDM2 SDM3 Enter ABS coordinate The coordinate value of SDM4 is basing...

Page 29: ...M0 X0 Y0 X 1 3 2 CLS Arc sin TOOL 50 000 ABS Same operation of SDM1 SDM2 SDM3 SDM199 X 5 0 NT Y 5 0 NT 0 199 50 000 SDM0 SDM199 Complete the setting of SDM0 Note When input the SDM coordinate we have...

Page 30: ...unction 4 Simple R Function 5 Calculator Function 6 Digital Filtering Function 7 Diameter and Radius Conversion 8 Axis Summing Function 9 200 sets of Tool Offsets 10 Taper Measuring Function 11 EDM Fu...

Page 31: ...o end hole Figure B ANGLE Angle of oblique line Figure A NO HOLE Number of hole Figure B L STEP STEP Length between two adjacent hole Figure B ANGLE Angle of oblique line Figure A NO HOLE Number of ho...

Page 32: ...only available for 3 axis milling machine and 3 axis EDM machine 2 axis milling machine only gets XY plane In this way there is no need to set enter next setting directly Step 3 Press to select the ma...

Page 33: ...g point Press to exit PLD function Example 2 L STEP Step 1 Move the tool to the starting hole Press to enter the PLD function Step 2 Press to select the machining plane press to confirm ENT This step...

Page 34: ...er of hole T N E ENT ENT T N Step 7 Enter the machining status and the position of first hole will be displayed Step 8 Press to enter the next machining point Move the table until the value of axis be...

Page 35: ...Arc diameter ST ANG Starting angle ED ANG End angle NO HOLE Number of hole The DRO will calculate the position for every hole User could press to select which hole shall be reached Then move the table...

Page 36: ...3 axis milling machine and 3 axis EDM machine 2 axis milling machine only gets XY plane In this way there is no need to set enter next setting directly Step 3 Input the center coordinate of circle Ste...

Page 37: ...exit PCD function X0 Y0 X 1 3 2 CLS Arc sin TOOL 40 000 No 1 ENT 0 000 4 3 Smooth R Function Applies to 2 3axis milling machine User could use the smooth R function to machine any arc even an arc to b...

Page 38: ...the arc starting angle ST ANG 9 Input the arc end angle ED ANG 10 Select the arc machining plane to be RAD RL or RAD RL Convex or Concave 6 Tool Step 1 Locate the zero point of work piece and zero th...

Page 39: ...ut the end angle 0 ENT X0 Y0 X 1 3 2 CLS Arc sin TOOL 90 000 ED ANG 9 Step 10 Select the arc plane convex 1 3 2 CLS Arc sin TOOL RAD RL Note RAD RL indicates concave Step 11 Press to enter the machini...

Page 40: ...lies to 2 3axis milling machine Simple R function enable user to machine the arc with no calculation more easily compared with smooth R function But it offers only the below 8 machining way 1 2 3 4 5...

Page 41: ...the arc on plane of XZ and YZ input the tool diameter as 0 7 Input the maximum cutting amount MAX CUT 8 Select the arc plane as convex or concave RAD RL or RAD RL 9 Machining the point by turn accordi...

Page 42: ...the arc machining plane as convex T Step 8 Press to the machining interface and the first point will be displayed Note RAD RL is the concave ENT Step 9 Press to display the following machining point M...

Page 43: ...or exit calculator function Example 1 Calculate Sin45 T T T T Square Root Calculation Inverse trigonometric function Trigonometric function Zero Data transferring Press theses keys could transfer the...

Page 44: ...will disappear SIFT SIFT Note The digital filtering function is only applicable under ABS INC and SDM status Once this function as be activated other functions cannot be used 4 7 Radius and diameter c...

Page 45: ...the ABS 4 9 200 sets of tool offset Applies to 2 axis and 3 axis Lathe During machining on lathe different tools are needed for one kind of work piece Finding the zero point again after loading and un...

Page 46: ...S Arc sin TOOL 0 000 TOOL 1 0 000 Step 4 Input the coordinate of tool 2 X 5 T Y 0 T X0 Y0 X 1 3 2 CLS Arc sin TOOL 5 000 TOOL 1 10 000 1 Step 5 Press to input the coordinate of next tool Press to exit...

Page 47: ...reference position Likewise user could input or recall 200 sets of tool Note We could only zero under ABS model when the current tool USE is the same with the reference tool BASE or we could only zero...

Page 48: ...to lower the value on Z axis become larger We call this as positive direction Positive When the electrode goes up The machining direction is from lower to upper and the value of Z axis will decrease...

Page 49: ...rk piece and zero or input value 3 Press to input the machining height The height will be displayed on X axis Then press to confirm Press to exit DEPTH setting and back to machining interface T 4 X ax...

Page 50: ...Step 1 Zero all axis and press to enter the EDM function Press to set the different parameter X0 Y0 X 1 3 2 CLS Arc sin TOOL Z0 Y 0 000 DEPTH Step 2 Press to set the fire prevention of reverse height...

Page 51: ...0 X0 Y0 X 1 3 2 CLS Arc sin TOOL Z0 Y 0 MODE 0 E T Press to select mode 1 The output of relay are shown as below a When power off the relay coil is OFF b When the CPU is not initialized the relay coil...

Page 52: ...CLS Arc sin TOOL Z0 Y 20 000 EDM END 20 000 20 000 X0 Y0 X 1 3 2 CLS Arc sin TOOL Z0 Y 0 000 ABS 0 000 20 000 5 Combination using of PCD and EDM function When using the PCD function we could also use...

Page 53: ...o enter EDM parameter setting refer the instruction of EDM setting Input the target height and start machining Once machining completed press to get exit EDM function and get back to PLD function Then...

Page 54: ...1 Parameter 2 Dimension 3 Troubleshooting 5 Appendix Appendix...

Page 55: ...Encoder 0 1 um 0 2 um 0 5 um 1 um 2 um 2 5 um 5 um 10 um 10 Highest Resolution Rotary Encoder 1000000ppr 11 Weight 1 5KGS 12 Dimension 295 175 65mm 13 DB9 Pin diagram 5 4 3 2 1 9 8 7 6 44 Appendix DB...

Page 56: ...5 2 Dimension ENT T T 45 Appendix...

Page 57: ...makes the fixed reading head or the screws loosen 3 The accuracy of the machine tool is not good 4 The DRO resolution isn t consistent with the grating ruler 1 Reinstall the grating ruler and adjust t...

Page 58: ...wiring 1 Repair the grating ruler 2 Repair the grating ruler 3 Repair the grating ruler 4 Repair the grating ruler The grating ruler doesn t count sometimes 1 The small box of the grating ruler is sep...

Page 59: ...Driven by Innovation X 0 Y 0 Z 0 X Y Z Operation Manual Version 2 0 DIGITAL READOUTS...

Reviews: