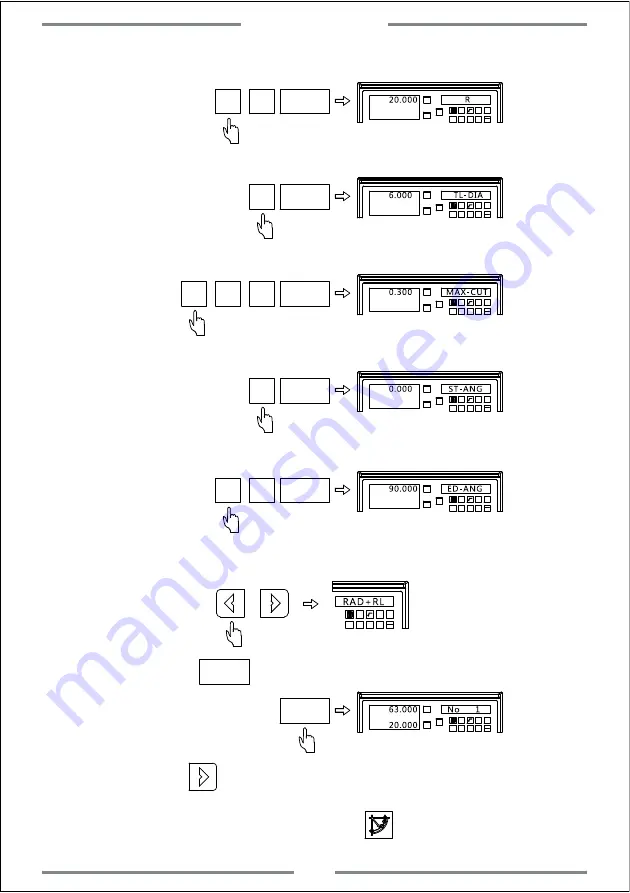
Step 5: Input the arc radius
0
ENT
X
0
Y
0
X
1
3
2
-
+
CLS
Arc
sin
TOOL
2
Step 6: Input the tool diameter
6 ENT
X
0
Y
0
X
1
3
2
-
+
CLS
Arc
sin
TOOL
Step 7: Input the maximum cutting amount
3 ENT
X
0
Y
0
X
1
3
2
-
+
CLS
Arc
sin
TOOL
·
0
Step 8: Input the starting angle
0 ENT
X
0
Y
0
X
1
3
2
-
+
CLS
Arc
sin
TOOL
Step 9: Input the end angle
0
ENT
X
0
Y
0
X
1
3
2
-
+
CLS
Arc
sin
TOOL
9
Step 10: Select the arc plane convex
1
3
2
-
+
CLS
Arc
sin
TOOL
Note:RAD-RL indicates concave
Step 11: Press to enter the machining,and the first point will be
displayed.
ENT
X
0
Y
0
X
1
3
2
-
+
CLS
Arc
sin
TOOL
Step 12: Press to display the following machining point.Move the table
until the value of axis become zero,at this time,the zero point indicates the
exact position for the machining point.Press to exit the smooth R function.
ENT
Special Function
29
Summary of Contents for A20-2V
Page 1: ...LED DIGITAL READOUTS Operation Manual Version 2 0 Driven by Innovation...
Page 2: ...A20 3V Keypad A20 2V Keypad ENT T ENT T E N N T E N N T...
Page 54: ...1 Parameter 2 Dimension 3 Troubleshooting 5 Appendix Appendix...
Page 56: ...5 2 Dimension ENT T T 45 Appendix...
Page 59: ...Driven by Innovation X 0 Y 0 Z 0 X Y Z Operation Manual Version 2 0 DIGITAL READOUTS...


