background image

Safety Guide


1


1.

Before operation, please read all of the instructions in the manual carefully. For your convenience, 

please keep this manual.

2.

The camera power input range is 100-240VACv(50-60Hz). Ensure the power supply input is

within this rate before powering on.

3.

Camera power voltage = 12VDC,rated currency= 2A.Wesuggestyou use it with the original power 

supply adapter supplied by the factory.

4.

Please keep the power cable, video cable, and control cable in a safe place and out of
obstructions.

5.

0perationalenvironment: 0°C-50°C/32°F-122°F,with humidity levels less than 90%.To avoid

any damage, do no put or pour anything inside the camera.

6.

Avoid weight stress, vibration, and pressure on the camera during transportation, storage,

and installation.

7.

Do not remove the camera housing or cover. Doing so will void the warranty.

8.

Do not direct the camera towards strong/intensive light. Doing so could cause

irreversible damage to the camera and void warranty.

9.

Use a dry and soft cloth to clean the camera housing with a neutral cleaning agent, when needed. To 

avoid damage on the camera lens, do not use strong or abrasive cleaning agents on the camera 

housing.

10.

Do not move the camera by moving the camera head. To avoid mechanical trouble, do not rotate

the camera head by hand. Please refrain from moving the camera while it is in motion. Doing so

could cause irreversible damage to the camera and void warranty.

11.

Make sure the camera is on a fixed and balanced platform. Avoid any slanted 

placements.

12.

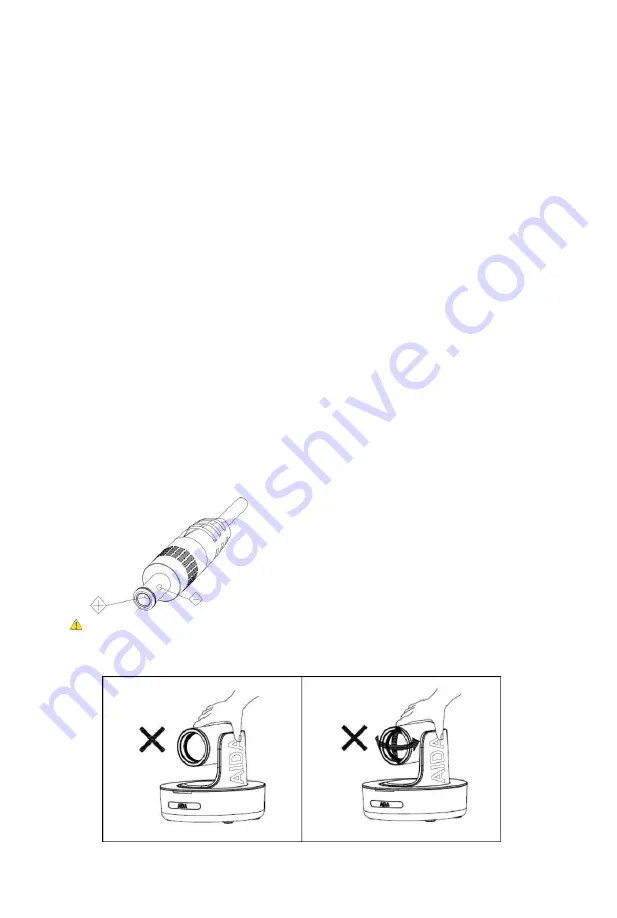
Power Supply Polarity Schematics: 

Warning:


Video quality can be affected 

by specific frequencies of electromagnetic field. 

Never grasp the head of the camera. Never move the camera by hand while is in 
motion

. Doing so can damage the mechanism.


Summary of Contents for PTZ-NDI-X12

Page 1: ...Full HD Optical Zoom PTZ PTZ X12 IP PTZ NDI X12 PTZ X20 IP PTZ NDI X20 Manual V2 0 AIDA ...

Page 2: ...ights Camera Specs 5 Camera Interface Dimension 6 IR Remote Controller 8 OSD Menu 10 Web Settings 15 VISCA Over IP 16 VISCA RS 232 Port 17 VISCA Protocol 26 UVC Control 27 Warranty Support The information within this manual is subject to change at any time without prior notice ...

Page 3: ... remove the camera housing or cover Doing so will void the warranty 8 Donotdirectthe camera towardsstrong intensivelight Doingsocould cause irreversible damagetothecameraandvoidwarranty 9 Useadryandsoftclothtocleanthecamerahousingwithaneutralcleaningagent whenneeded To avoiddamageon thecameralens do notusestrongor abrasivecleaningagentson thecamera housing 10 Donotmove thecamerabymovingthe camera ...

Page 4: ...rve Dial Switch USB SW 5 SW 6 Instruction 1 OFF OFF Undefined 2 ON OFF Working Mode 3 OFF ON Updating Mode 4 ON ON Undefined Check the items below when opening the package EA Quick Start AIDAPTZ PowerAdapter PowerCable RS 232Control Cable USB3 0Cable RemoteControl User Manual DoubleSidedAdhesive QCCertification WallMount 1 Check thatallcable connectionsaresecure before poweringonthe camera 2 DialS...

Page 5: ...ras Menu basedimageparameters including imageflipforceiling mounted cameras Remote has multiple functions such as fastswitching videoformatsand abilityto change IP address Freefirmwareupdatestokeepthecameraup todatewiththelatestandgreatest The USB3 0 port is compatible with USB2 0 and allows standard UVC1 5 protocol for local control UVC control worksseamlesslywith manywell known conferencingsoftw...

Page 6: ...t Rate Constant Bit Rate Video Bit Rate 1024kbps min 20480 kbps max IP Protocol IP HTTP RTSP RTMP DCHP 0NVIF VISCA over IP UDP P0E Supported IEEE802 3af Line in Supporting ACC audio coding Daisy Chain Support RS 232 serial daisy chain Minimum Lux 0 01 Lux White Balance Auto Indoor 0utdoor Manual ATW 0nePush FluorescentLamp Sodium Lamp Exposure Auto Manual Bright Shutter Iris Focus Auto Manual Iris...

Page 7: ...ReceiverPanel 4 Power TallyLight 5 DialSwitch Firmware 6 1 4 TripodScrewHole 7 InstallationHole 8 RS 232ControlPort Input 9 RS 232ControlPort 0utput 10 HDMIPort 11 Line inPort 12 3G SDIPort 13 USB Port 14 RJ 45Port 15 DC12VPlug Camera Dimensions in mm ...

Page 8: ...buttonfor3secondstosetthecamerasIRaddress CAM 1 4 Camera selecting Pressing the CAM button will enable IR control of the selected camera Number Key 1 9 SetPreset To setpreset holddownakey 0 9 andwait3seconds 0ncecomplete theselectedpresetwillbesaved Run Preset Pressingakey 0 9 willbringup thecorresponding savedpreset CLR PRE Clear Preset Clear a Preset Press CLRPRE and key 0 9 simultaneously to re...

Page 9: ...ethese keys Zoom Key 0ptically zooms the camera in up to 12x Navigate Key Up Down Left Right Normal mode Allows for the camera head to pan and tilt Menu mode Allows for direction in the menu of the camera OK Home Key Normal mode Recalls to the home position of the camera Menumode Usedtosetfunctionsinthemenuandactivatefeatures Video Format Keys While directly pointing at the camera please hold the ...

Page 10: ...us menu EXPOSURE MODE AUTO MANUAL BRIGHT SHUTTER IRIS Choose the current Exp Mode DEFAULT AUTO EXPOSURE SHUTTER Set shutter speed 1 30 1 10000 Allows for tuning of the shutter speed DEFAULT AUTO IRIS Set Iris CLOSE F1 8 Allows for tuning of the Iris opening DEFAULT AUTO GAIN Set gain 0dB 28dB Allows for tuning the gain of the camera DEFAULT AUTO BRIGHTNESS Set brightness 0 15 Allows for tuning the...

Page 11: ...0 59 94 50 30 29 97 25 24 23 98 RETURN Return to previous menu SYSTEM ID Set VISCA control address 1 7 DEFAULT 1 BAUDRATE Set RS 232 baud rate to 2400 4800 9600 115200 DEFAULT 9600 LANGUAGE IDIOMA Set language ENGLISH SPANISH DEFAULT ENG DHCP IP address automatic acquisition switch ON OFF DEFAULT OFF IP Set camera IP 192 168 1 188 NET MASK Set camera net mask 255 255 255 0 GATEWAY Set camera gatew...

Page 12: ...inthecamera smenutoseetheactual IPaddressunder INF0 Next enter the username and password The default for both is admin 2 Real timePreview Whenlogginginthefirsttime anerrormayappearlikebelow Thereasonisdue tothebrowser blocking flash from running To fix this click the button above the preview screen labeled click to downloadFlashPlayer 0ncedone adialog box will appear like seen below Click allow an...

Page 13: ...r the parameter setting interface as seen below Under VideoEncode youcanenabletheRTSP RTMPstreamsforboththemainandsub streams You may also change the Encode mode choosing betweenH 264orH 265 Lastly you can change the framerate and bitratefor each streamonthis menu ...

Page 14: ...y pasteyourstreamkeyaftertheforwardslash 5th Click Save 0nce you complete these steps your PTZ will immediately start uploading to your social platforms channel You will see a blue checkmark next to theRTMP state which will show ifyour RTMPaddressis correctlyinputted No rebootrequired CustomRTMPstream keys also allowsyou to makeyourownRTMP address and pullthatstream from other programs Ifyou are s...

Page 15: ...8 1 188 HTTP Port 80 Netmask 255 255 255 0 RTSP Port 554 Gateway 192 168 1 1 To upgrade the firmwareonour PTZ headovertoour websiteataidaimaging com download and look for the latest PTZfirmware The Resettodefault portionallowsyoutofactoryresetimageparameterreset orrebootthecamera SimpleReset 0nlyresetscustomizablecameraoptions AE WB Image Effects etc Complete Reset Factory resets the camera includ...

Page 16: ...Web Settings CONTD 14 AccountSettings isusedtochange theloginfortheaccount Youcanchange the username and passwordhere ...

Page 17: ... commands are the communication between the controller and the camera These commands are sent via UDP on the network Since UDP transmission isn t that stable a couple of steps must happen before a movement is executed The controller first sends out a VISCA command The camera equipment then receives the VISCA command and returns that message back to the controller 0ncethe commands are executed the ...

Page 18: ...7 IR OUT 7 NC 8 B 8 NC Serial Port Configuration VISCA IN DB9 Connection Camera VISCA IN Windows DB9 1 DTR 6 DSR 2 DSR 4 DTR 3 TXD 2 RXD 4 GND 5 GND 5 RXD 3 TXD 6 A 7 IR OUT 8 B Parameter Value Parameter Value Baud Rate 2400 4800 9600 115200 Stop Bit 1 Bit Start Bit 1 Bit Check Bit None Date Bit 8 Bit 1 DTR 2 DSR 3 TXD 4 GND 5 RXD 6 A 7 IR OUT 8 B ...

Page 19: ...eived during auto focus Part 2 Camera Control Command AddressSet Broadcast 88 30 01 FF Address setting IF_Clear Broadcast 88 01 00 01 FF I F Clear CommandCancel 8x 21 FF CAM_Power On 8x 01 04 00 02 FF Power ON OFF Off 8x 01 04 00 03 FF CAM_Zoom Stop 8x 01 04 07 00 FF Tele Standard 8x 01 04 07 02 FF Wide Standard 8x 01 04 07 03 FF Tele Variable 8x 01 04 07 2p FF p 0 low 7 high Wide Variable 8x 01 0...

Page 20: ...Manual Focus 81 01 04 38 03 FF One Push AF 8x 01 04 18 01 FF CAM_ZoomFocus Direct 8x 01 04 47 0p 0q 0r 0s 0t 0u 0v 0w FF pqrs Zoom Position 0 wide 0x4000 tele tuvw Focus Position CAM_WB Auto 8x 01 04 35 00 FF Indoor 8x 01 04 35 01 FF Outdoor 8x 01 04 35 02 FF One Push 8x 01 04 35 03 FF ATW 8x 01 04 35 04 FF Manual 8x 01 04 35 05FF Sodium lamp 8x 01 04 35 08 FF Flourescent 8x 01 04 35 09 FF One Pus...

Page 21: ... Iris Position 0 0x0D CAM_Gain Reset 8x 01 04 0C 00 FF Gain Setting 0 0x0E Up 8x 01 04 0C 02 FF Down 8x 01 04 0C 03 FF Direct 8x 01 04 0C 00 00 0p 0q FF pq Gain Position 0 0x0E CAM_Bright Reset 8x 01 04 0D 00 FF Bright Setting Up 8x 01 04 0D 02 FF Down 8x 01 04 0D 03 FF Direct 8x 01 04 4D 00 00 0p 0q FF pq Bright Position 0 0x1B CAM_ImageBright Direct 8x 01 04 A4 00 00 0p 0q FF pq Image Bright Pos...

Page 22: ...ation Level 0x00 0xff CAM_Contrast Contrast 8x 01 04 A2 00 00 0p 0q FF pq Contrast Level 0x00 0xff CAM_SpeedByZoom On 8x 01 06 A0 02 FF Off 8x 01 06 A0 03 FF CAM_PTSpeed PT Speed 8x 01 04 C1 00 00 0p 0q FF pq PT Speed 0x05 0x18 CAM_ZoomSpeed Zoom Speed 8x 01 04 D1 00 00 0p 0q FF pq Zoom Speed 0x01 0x07 CAM_ZoomDisplay On 8x 01 06 C2 02 FF Off 8x 01 06 C2 03 FF CAM_IRaddress IR address 8x 01 06 D8 ...

Page 23: ...lution 8x 01 04 C2 00 0p 0q 0r 0s 0m 0n 0x 0y FF pqrs Column x size mnxy Line y size only support 1920x1080 1280x720 Rate 8x 01 04 C2 01 0p 0q 0r 0s 0m 0n 0x 0y FF pqrsmnxy bitrate 0 15360 Sub Stream Resolution 8x 01 04 C3 00 0p 0q 0r 0s 0m 0n 0x 0y FF pqrs Column x size mnxy Line y size only support 1280x720 1024x576 640x360 Rate 8x 01 04 C3 01 0p 0q 0r 0s 0m 0n 0x 0y FF pqrsmnxy bitrate 0 15360 ...

Page 24: ...eed 0x01 low speed to 0x18 high speed WW Tilt speed 0x01 low speed to 0x14 high speed YYYY Pan Position TBD ZZZZ Tilt Position TBD Down 8x 01 06 01 VV WW 03 02 FF Left 8x 01 06 01 VV WW 01 03 FF Right 8x 01 06 01 VV WW 02 03 FF Upleft 8x 01 06 01 VV WW 01 01 FF Upright 8x 01 06 01 VV WW 02 01 FF Downleft 8x 01 06 01 VV WW 01 02 FF Downright 8x 01 06 01 VV WW 02 02 FF Stop 8x 01 06 01 VV WW 03 03 F...

Page 25: ...x 09 04 39 FF y0 50 00 FF Full Auto y0 50 03 FF Manual y0 50 0A FF Shutter Priority y0 50 0B FF Iris Priority y0 50 0D FF Bright CAM_Shutter PosInq 8x 09 04 4A FF y0 50 00 00 0p 0q FF pq Shutter Position CAM_IrisPosInq 8x 09 04 4B FF y0 50 00 00 0p 0q FF pq Iris Position CAM_GainPosiInq 8x 09 04 4C FF y0 50 00 00 0p 0q FF pq Gain Position CAM_ BrightPosiInq 8x 09 04 4D FF y0 50 00 00 0p 0q FF pq B...

Page 26: ... 50 0p 0q 0r 0s FF pqrs Camera ID CAM_DHCPInq 8x 09 04 AE FF y0 50 pp FF CAM_IPInq 8x 09 04 AB FF y0 50 0p 0p 0q 0q 0r 0r 0s 0s FF CAM_MASKInq 8x 09 04 AC FF y0 50 0p 0p 0q 0q 0r 0r 0s 0s FF CAM_GATEWAYInq 8x 09 04 AD FF y0 50 0p 0p 0q 0q 0r 0r 0s 0s FF CAM_FlareModeInq 8x 09 04 B6 FF y0 50 pp FF CAM_FlareBright ModeInq 8x 09 04 B7 FF y0 50 pp FF CAM_FlareRed 8x 09 04 B8 FF y0 50 pp FF CAM_FlareGr...

Page 27: ...nq 8x 09 06 12 FF y0 50 0w 0w 0w 0w 0z 0z 0z 0z FF wwww PanPosition zzzz Tilt Position Mainstream ResolutionInq 8x 09 04 C2 00 FF y0 50 0p 0q 0r 0s 0m 0n 0x 0y FF pqrs Column x size mnxy Line y size only supports 1920x1080 MainstreamRate Inq 8x 09 04 C2 01 FF y0 50 0p 0q 0r 0s 0m 0n 0x 0y FF pqrsmnxy bitrate 0 15360 Substream ResolutionInq 8x 09 04 C3 00 FF y0 50 0p 0q 0r 0s 0m 0n 0x 0y FF pqrs Co...

Page 28: ...00 0p 0q FF PU_GAMMA_CONTROL 8x 01 04 5B 0p FF PU_WHITE_BALANCE_TEMPERATURE_CONTRO L 8x 01 04 35 0X FF PU_BLACKLIGHT_COMPENSATION_CONTROL 81 01 04 33 02 03 FF PU_POWER_LINE_FREQUENCY_CONTROL 8x 01 04 AA 00 01 02 FF CT_ZOOM_ABSOLUTE_CONTROL 8x 01 04 47 0p 0q 0r 0s FF CT_PANTILT_ABSOLUTE_CONTROL 8x 01 06 02 VV WW 0Y 0Y 0Y 0Y OZ OZ 0Z 0Z F CT_PANTILT_RELATIVE_CONTROL 8x 01 06 01 pp qq rr ss FF CT_ZOO...

Page 29: ...feelfreetogoto our FAQpageonourwebsiteataidaimaging com support Ifyou are inneedof additionalhelp orhave any general questions pleasefeel freetocontactus inthese various ways Telephone 909 333 7421 Email Support aidaimaging com Website aidaimaging com support We are open yearly Mon Fri 8A M to 5P M PST excluding major holidays and events Also keep up to date with firmwares and new releases from AI...

Page 30: ...AIDA IMAGING ...

Reviews: