background image

Safety Instructions

Before you commence, please attentively read the following important discretions below. All 

cautions and warnings on the equipment or in the manuals should be circumspectly noted 

and reviewed.

Always ground yourself to prevent static electricity.

Always ground yourself to prevent static electricity.

請全程接地,以防止靜電。

全程接地,以防止靜電。

请全程接地,以防止静电。

全程接地,以防止静电。

Всегда заземляйте себя, чтобы избежать статического электричества.

Всегда заземляйте себя, чтобы избежать статического электричества.

Aard jezelf altijd om statische elektriciteit te voorkomen.

Aard jezelf altijd om statische elektriciteit te voorkomen.
•  Firmly ground yourself at all times when installing or assembling the internal 

components of the server. Most of electronic components in the server are highly 

sensitive to electrical static discharge. 

•  Use a solid grounding wrist strap and distintively place all electronic components in 

static-shielded devices to prevent static. Grounding wrist straps can be purchased in 

any electronic supply store.

•  Confirm that the power source is turned off and then disconnect the power cords from 

your system before performing any type of installation or manual servicing. A sudden 

surge of power could serverly damage the sensitive electronic components.

•  Do not precipitously open the system’s top cover. If you must open the cover for 

maintenance purposes, only a trained technician should be allowed to proceed this 

action. Integrated circuits on computer boards are highly sensitive to static electricity. 

Before operating a board or integrated circuit, touch an unpainted portion of the system 

unit chassis for a couple of seconds to discharge any static electricity on your body.

Place the server in a stable environment. 

Place the server in a stable environment. 

請將伺服器放置在穩定的環境中。

將伺服器放置在穩定的環境中。

请将伺服器放置在稳定的环境中。

将伺服器放置在稳定的环境中。

Поместите сервер в стабильную среду.

Поместите сервер в стабильную среду.

Plaats de server in een stabiele omgeving.

Plaats de server in een stabiele omgeving.
•  Place this equipment on a stable surface when installing. A small mild drop or fall could 

cause fatal injury to both the equipment and the person handling the equipment.

•  Please keep this equipment away from humidity to prevent vast rust and disintergration. 

•  Carefully and accurately mount the equipment into the rack. Uneven mechanical 

loading may lead to hazadous consequences.

•  This equipment is to be installed for operation in an environment with maximum 

ambient temperature below 35°C.

•  Review the environment before performing any installation or servicing. Keep the 

equipment away from hazardous and uneven grounds.

•  This server must be installed only in Restricted Acess Locations.

Handle equipment with care.

Handle equipment with care.

請謹慎操作設備。

請謹慎操作設備。
请谨慎操作设备。

请谨慎操作设备。

Обращайтесь с оборудованием осторожно.

Обращайтесь с оборудованием осторожно.

Behandel de apparatuur voorzichtig.

Behandel de apparatuur voorzichtig.
•  Do not cover the openings of the system. The openings on the system are for air 

convection, which intentionally protect the equipment from overheating. 

•  Never pour any liquid into ventilation openings of the system. This could cause 

catastrophic fire or electrical shock.

ii

Summary of Contents for RSC-1R

Page 1: ...UM_RSC 1R_v1 3_020521 RSC 1R Rackmount Chassis User s Manual...

Page 2: ...pter 2 Hardware Setup 5 2 1 Top Cover 5 2 2 Power Supply Unit Module 6 2 3 Fan Module 7 2 4 Disk Drive Module 8 2 4 1 Disk Drive 3 5 inch HDD 8 2 4 2 Disk Drive 2 5 inch SSD 9 2 5 Slide Rail 10 Chapte...

Page 3: ...ent Release History Release Date Version Update Content July 2016 1 User s Manual release to public July 2019 1 1 1 New cover 2 QIG update August 2020 1 2 logo update February 2021 1 3 Manual cover up...

Page 4: ...Copyright 2016 AIC Inc All Rights Reserved This document contains proprietary information about AIC products and is not to be disclosed or used except in accordance with applicable agreements...

Page 5: ...t is essential that only the supplied power cord be used 2 Use only shielded cables to connect I O devices to this equipment 3 You are cautioned that changes or modifications not expressly approved by...

Page 6: ...mputer boards are highly sensitive to static electricity Before operating a board or integrated circuit touch an unpainted portion of the system unit chassis for a couple of seconds to discharge any s...

Page 7: ...ty They must have a dummy cover Never open the equipment without professional assistence For safety reasons only qualified service personnel should open the equipment If one of the following situation...

Page 8: ...ayout of the product including the fundamental components of the rackmount chassis design specifications and noteworthy features Chapter 2 Hardware Setup This chapter displays an easy installation gui...

Page 9: ...nts of the carton are damaged If any damage is found do not remove the components contact the dealer where the subsystem was purchased for further instructions Before continuing first unpack the subsy...

Page 10: ...preplated SPGC cold rolled steel Color Not coated Cooling 1 x 40x28mm 4 x 40x56mm PWM easy swap fans Power Supply Options 500W single PSU 80 Platinum 600W redundant PSU 80 Gold Expansion Slot 1 full h...

Page 11: ...3 Chapter 1 Product Features Front Panel System Reset button LAN1 Power LED LAN2 Power LED System HDD Activity LED Power System LED Power On Off Button Rear Panel...

Page 12: ...er 1 Product Features Top View 4 x40x56mm PMW easy swap fan 1 x40x28mm PMW easy swap fan 2 5 inch drive tray 3 5 inch drive tray Full height riser card 500W single PSU 80 Platinum 600W redumdant PSU 8...

Page 13: ...5 Loosen the captive screw to release the top cover from the chassis Push the cover towards the rear panel Lift the cover upward to complete removal Chapter 2 Hardware Setup 2 1 Top Cover...

Page 14: ...ng the ejector while pulling the power supply unit Pull the module completely out of the chassis Install the new power supply unit by pushing it into the chassis Ensure that the module is accurately i...

Page 15: ...ed bracket Insert the new fan into the chassis Verify to align the rubber connectors with the appropriate slot in the bracket NOTE The fan should be blowing toward the rear end of the chassis If one o...

Page 16: ...DD Remove the top cover of the chassis Refer to Section 2 1 for removal Push the plunger and lift the disk drive out of the chassis Insert the new HDD into the chassis Verify that the disk drive is co...

Page 17: ...e that is closer to the front panel and then lift the other side for easier removal Insert the new SSD by aligning the SSD with the bracket holder Diagonally insert the SSD into the bracket Ensure tha...

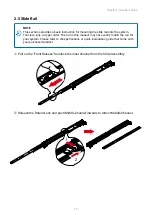
Page 18: ...er The rail in this manaul may not exactly match the rail for your system Please refer to the spefications or quick installation guide that came with your purchased product Pull on the Front Release t...

Page 19: ...11 Chapter 2 Hardware Setup Metal Spacer Optional Remove Metal Spacer for Aluminium Racks Aligning the Front Bracket with the Mounting Hole Push in to assembly the Front Bracket onto the Rack...

Page 20: ...Chapter 3 Hardware Specifications Now the bracket is fixed onto the Rack Optional M6x10L screws are to secure the rails with posts if needed Refer to Step 3 4 to assemble the End Bracket onto the Rac...

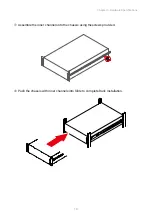
Page 21: ...13 Chapter 3 Hardware Specifications Assemble the inner channel onto the chassis using thescrews provided Push the chassis with inner channels into Slide to complete Rack Installation...

Page 22: ...ption 1 GND 2 NC 3 HDD1_ACT 4 HDD1_FAIL 5 HDD2_ACT 6 HDD2_FAIL 7 HDD3_ACT 8 HDD3_FAIL 9 HDD4_ACT 10 HDD4_FAIL Led Fail Status Header JFAIL_IN Pin Description 1 GND 2 FAIL_IN_1 3 FAIL_IN_2 4 FAIL_IN_3...

Page 23: ...4 12V 1 GND 5 12V 2 GND 6 5V 3 GND SGPIO Jumper JSGPIO_SET Pin Description 1 2 Open Disable External Access LED input Close Enable External Access LED input 3 4 Open Access LED from HDD Pin P11 Close...

Page 24: ...16 Chapter 3 Hardware Specifications 3 1 3 Drive Slot Map FIRST LEVEL HBA Card 0 1 2 3 0 1 2 3 SENCOND LEVEL HBA Card 0 1 2 3 0 1 2 3 AND SO ON FIRST LEVEL MegaRaid Card 1 2 3 4 1 2 3 4 AND SO ON...

Page 25: ...u aicipc com tw North California United States Address 48531 Warm Springs Boulvard Suite 404 Fremont CA 94539 United States Tel 1 510 573 6730 Fax 1 510 573 6729 Sales Email sales aicipc com Support E...

Reviews: