20
agria
Power Hoe 1000
3. Machine and Operating Elements
Ridging attachment
Required accessories:
1 coupling device
Item. no. ............................... 1040 411
1 ridging body
Item no. ................................ 0252 011
alternatevely:
1 pair of strake wheels
Item no. ................................ 0120 011
Assembly:
Remove any add-on tools from the hoe.
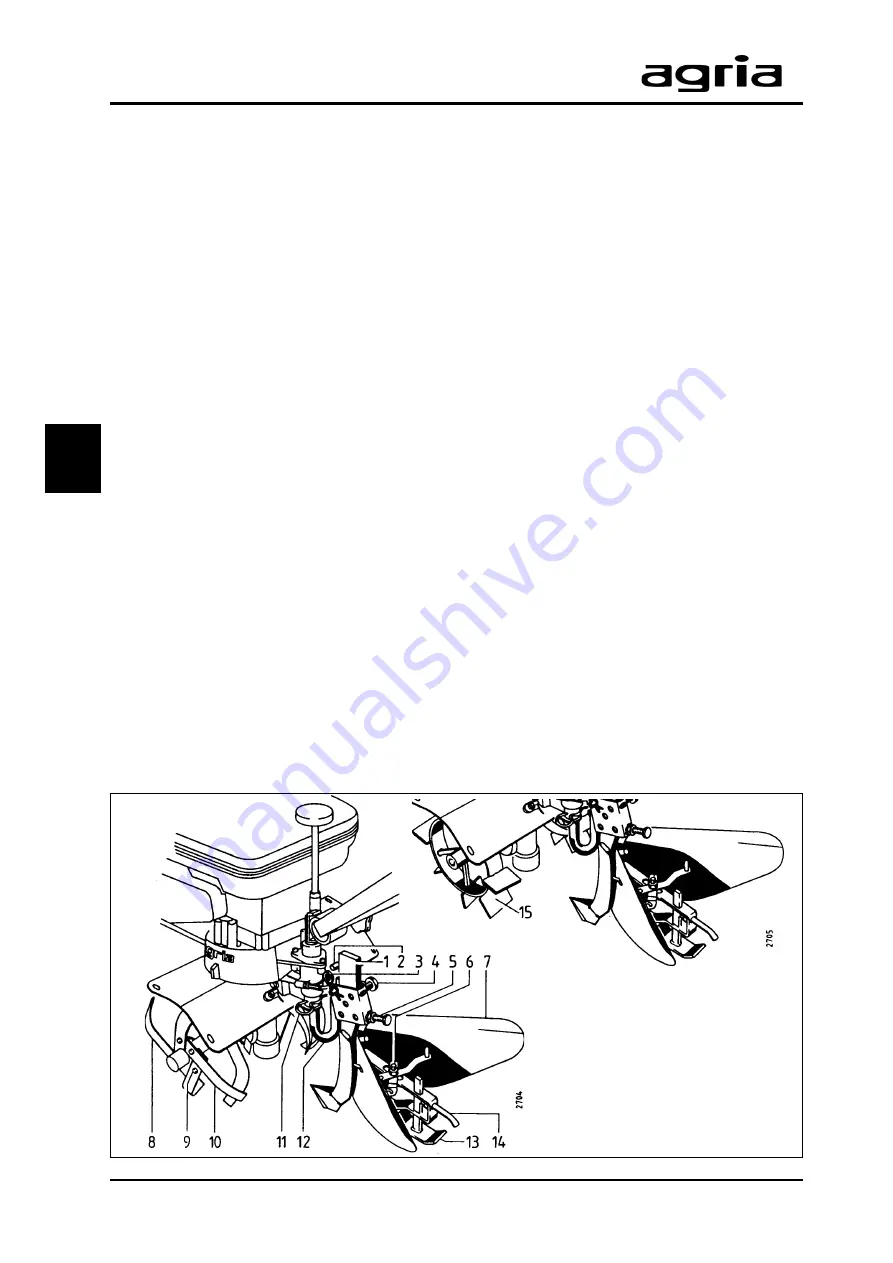
Remove the two blades (8 and 9) that
point outwards from each side of the ma-
chine. Each set of blades now changes
sides and is attached for the blades to
point inwards (as illustrated in fig.). This
gives a working width of 36 cm and there
is no need to use optional tools. Attach
the guard discs. Remove the depth bar
and fit the coupling device (12).
Insert the ridging body’s bar (1) in its
bracket, insert the locking pin (2) as illus-
trated and secure it with an R-clip (3).
Adjust the ridging body’s (7) tilt via the
hex head bolt (5). Set the body (7) to
the desired ridging depth, then tighten
the hex head bolt (4).
Strake Wheels
You can replace the hoeing tools by
strake wheels (Accessory no. 0 120 011)
(15) to improve traction or ridging per-
formance in cultivated soils. The strake
wheels are attached in the same way
as the hoeing tools: insert the hex head
bolt in the holes on the hubs and the
hoeing shaft.
Ridging
To use the power hoe for ridging, pro-
ceed as described in the paragraph on
hoeing.
l
To adjust the working depth, adjust
the tilt of the ridging body bar’s in its
bracket either by turning the adjuster
screw (K/5) or by adjusting the runner
(K/13) and the clamping screw (14).
l
To adjust the working width, adjust
the mouldboards (7) and the clamping
screw (6).
3


