18
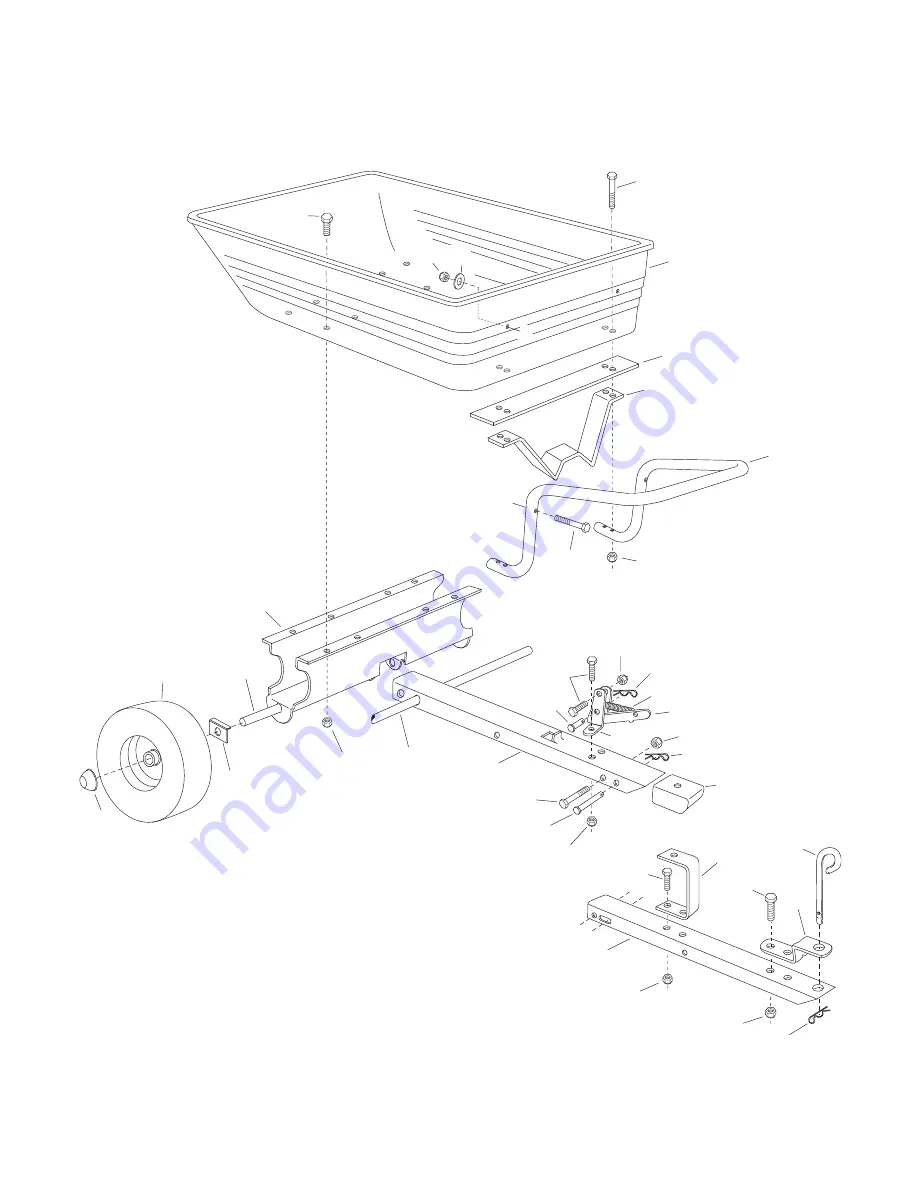
REPAIR PARTS FOR POLY CART MODEL 45-03453
A
17
19
1
24
23
6
7
9
25
21
3
2
5
32
15
13
20
14
31
28
10
27
11
26
16
30
29
8
4
12
Page 1: ...mente los Procedimientos e Instrucciones para la Operaci n Segura de la M quina Safety Assembly Operation Maintenance Parts PUSH TOW CONVERTIBLE POLY DUMP CART REMORQUE BASCULE CONVERTIBLE POUSSER REM...
Page 2: ...n FRAN AIS ESPA OL ENGLISH 1 Caja 2 Barra tubular de manejo 3 Elemento frontal de remolque 4 Elemento trasero de remolque 5 Placa para la base de la aldaba 6 Soporte para la base de la aldaba 7 Soport...
Page 3: ...Hex Bolt 1 4 20 x 1 3 4 Lg E 43661 3 Hex Bolt 1 4 20 x 1 Lg F 43182 8 Hex Bolt 5 16 18 x 3 4 Lg G 47029 1 Clevis Pin 3 8 x 4 H 45091 1 Clevis Pin 3 8 x 1 J 43088 2 Washer Flat 1 4 KEY PART NO QTY DES...
Page 4: ...ractor or cart attachment without proper instructions 6 Always begin with the transmission in first low and gradually increase speed as conditions permit 7 Tow the cart at reduced speed over rough ter...
Page 5: ...own on pages 2 and 3 3 Assemblethelatchlockbetweenthelatchmountbrackets using a 1 4 x 1 hex bolt E and a 1 4 nylock nut K Tighten so that the latch lock can still pivot Attach the extensionspring O to...
Page 6: ...andbrackettothefronttongueusing two 5 16 x 1 hex bolts C and 5 16 nylock nuts L Tighten See figure 4 FIGURE 7 13 Turn the assembled tongue wheel support and wheels overtotheuprightposition Placethelat...
Page 7: ...latch stand plate and the latch stand bracket Fasten together using four 1 4 x 1 3 4 hex bolts D and 1 4 nylock nuts K as shown in figure 9 Tighten 17 At this time tighten all bolts which were left lo...
Page 8: ...he 3 8 x 4 clevis pin and hairpin cotter d Remove the 3 8 x 1 clevis pin and hairpin cotter from the latch mount brackets Use the 3 8 x 1 clevis pin and hairpin cotter to secure the plastic cap to the...
Page 9: ...manual CAUTION DO NOT OPERATE YOUR TRACTOR AND CART ON A SLOPE IN EXCESS OF 10 DEGREES BE SURE OF YOUR TRACTOR S TOWING AND BRAKING CAPABILITIES BEFORE OPERATING ON A SLOPE AVOID ANY SUDDEN TURNS OR M...
Page 10: ...cises pr alablement ne devraient pas utiliser ces appareils 6 D marrez toujours l appareil la plus basse vitesse puis augmentez graduellement si les conditions de terrain le permettent 7 Tirez la rem...
Page 11: ...Voir figure 4 10 Placer la barre d attelage avant dans la barre arri re tel qu illustr la figure 5 Fixer les deux barres ensemble avec un boulon 6 pans A et un contre crou M Serrez tout en veillant la...
Page 12: ...ille de chape dans la serrure afin d viter un rel chement de celle ci 7 La vitesse de conduite maximale permise lors du remorquage est de 16 km heure ENTRETIEN 1 Au d but de chaque saison appliquer un...
Page 13: ...tilisation du tracteur ATTENTION NE PAS UTILISER LE TRACTEUR ET LA REMORQUE SUR UNE PENTE INCLIN E PLUS DE 10 DEGR S V RIFIEZ LA TRACTION ET LE FREINAGE DE VOTRE TRACTEUR AVANT DE CONDUIRE SUR UNE PEN...
Page 14: ...a capacidad sin antes verificar la capacidad del veh culo de tracci n para remolcar y frenar con la carretilla adjunta 9 Antes de operar el veh culo en una pendiente o colina consulte las reglas de se...
Page 15: ...lemento trasero de remolque como se muestra en la Figura 5 Conecte los dos elementos usando un perno hexagonal A y una tuerca hexagonal de cierre M Apriete la conexi n pero dejando la tuerca suficient...
Page 16: ...montaje de la aldaba Use el pasador de horquilla de 3 8 de pulg x 1 pulg y el perno de horquilla para fijar la tapa de pl stico al soporte de la base de la pata 2 Consulte el manual de usuario del veh...
Page 17: ...DE 10 VERIFIQUE LA CAPACIDAD DE SU TRACTOR PARA REMOLCAR Y FRENAR ADECUADAMENTE ANTES DE OPERAR EN UNA PENDIENTE EVITE GIROS O MANIOBRAS BRUSCAS CUANDO OPERA EN UNA PENDIENTE UN POSTE DE CORRIENTE ELE...
Page 18: ...18 REPAIR PARTS FOR POLY CART MODEL 45 03453 A A 17 19 1 24 23 6 7 24 24 17 9 25 21 25 3 2 5 32 15 13 20 14 31 28 28 10 27 11 24 26 16 2 18 18 30 29 8 4 12 28...
Page 19: ...x 4 16 45091 1 Clevis Pin 3 8 x 1 17 1509 69 6 Hex Bolt 1 4 20 x 1 3 4 Lg 18 HA21362 3 Hex Nut 3 8 16 Nylock 19 43088 2 Washer Flat 1 4 Std Wrought 20 43001 2 Hex Bolt 3 8 16 x 1 Lg 21 25910 2 Axle Cl...
Page 20: ...to the Universal Copyright Convention and the Berne convention No part of this document may be reproduced or transmitted in any form or by an means electronic or mechanical including photocopying or r...