


Installation Note E8362-90004
27
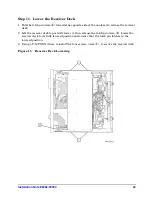
Step 15. Reinstall the Inner and Outer Covers
Reinstall the Inner Cover
1. Place the inner cover on the analyzer as shown. There are two alignment pins on the front
frame that align with holes in the front of the cover to ensure proper alignment.
2. Using a T-10 TORX driver, reinstall the eleven screws (item
①
).
Figure 19 Inner Cover Reinstallation
NOTE
The figure above shows the E8362B front panel and floppy disk drive. The
E8362C front panel has a slightly different appearance and does not
include a floppy disk drive.


