


10
Installation Note E8362-90004
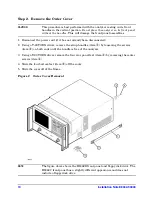
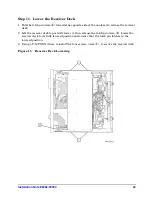
Step 2. Remove the Outer Cover
CAUTION
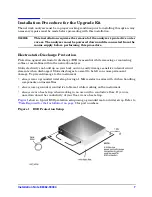
This procedure is best performed with the analyzer resting on its front
handles in the vertical position.
Do not place the analyzer on its front panel
without the handles
. This will damage the front panel assemblies.
1. Disconnect the power cord (if it has not already been disconnected).
2. Using a T-20 TORX driver, remove the strap handles (item
①
) by loosening the screws
(item
②
) on both ends until the handle is free of the analyzer.
3. Using a T-20 TORX driver, remove the four rear panel feet (item
③
) by removing the center
screws (item
④
).
4. Slide the four bottom feet (item
⑤
) off the cover.
5. Slide the cover off of the frame.
Figure 2
Outer Cover Removal
NOTE
The figure above shows the E8362B front panel and floppy disk drive. The
E8362C front panel has a slightly different appearance and does not
include a floppy disk drive.


