background image

Setting Snapshot Menu


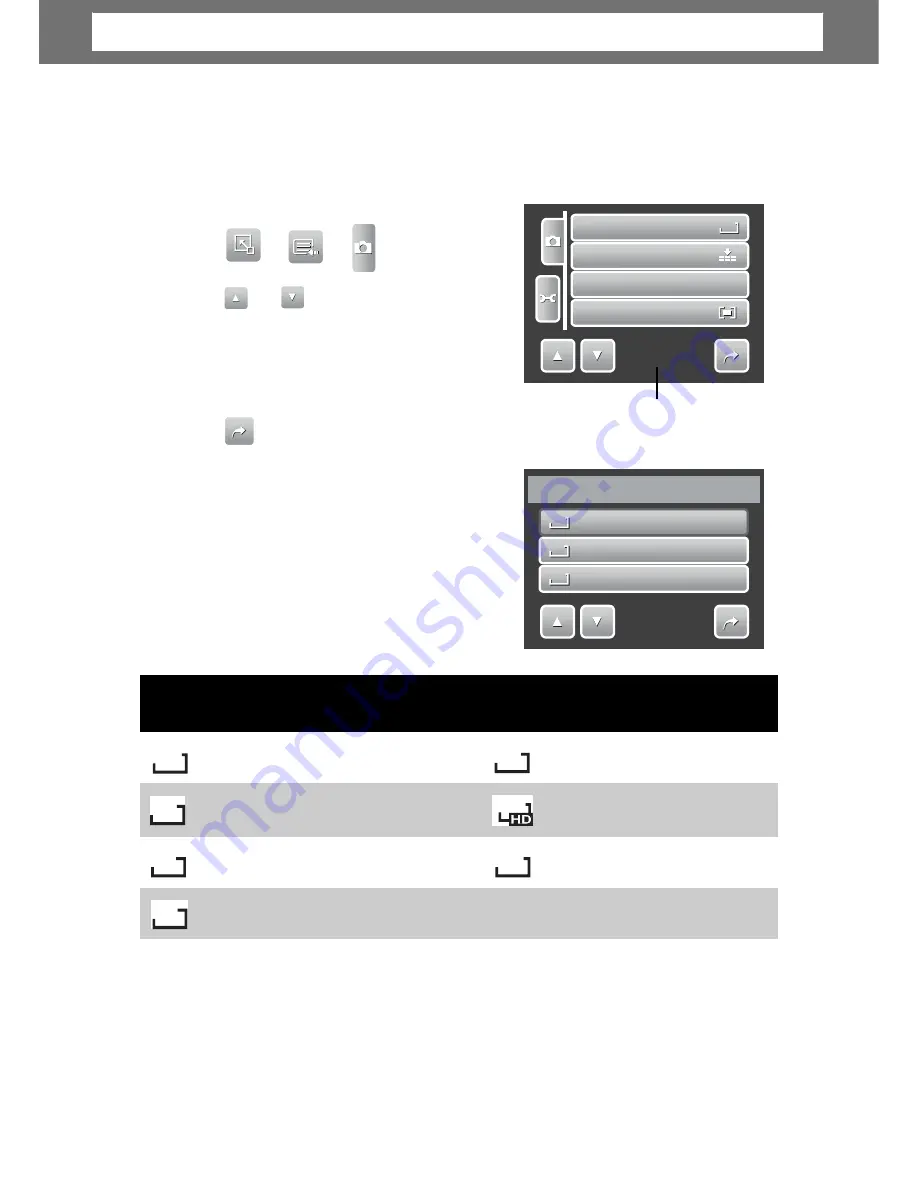
The Snapshot menu allows you to adjust other capture settings. Some menu 

functions may be disabled depending on current scene mode. 
In Snapshot mode, 

1. Tap > > 

A

A

U

U

T

T

O

O

2. Tap 

or 

to move to the next/

previous page of menu selection.

3. To select an item, tap the icon. 


4. To change the submenu settings, tap the 

icon of desired settings. 

Indicates current page no. / total

no. of menu page. 

5. Tap to 

exit submenu.

Resolution 


The Resolution function is used to set the 

resolution before you capture the image. 

Changing the resolution affects the number

of images that can be stored in your memory 

card. The higher the resolution, the more 

memory space is required. 
The table below shows the resolution values 

for still images. 

Suggestion

Suggestion

10M


3648 x 2736  A2 Size 

3M

2048 x 1536 

4” x 6” 

8M


VGA

3264 x 2448  A3 Size 

640 x 480

E-mail 

27


2592 x 1944 

A4 Size 


5M


3648 x 2432  A2 Size 

1920 x 1080  HDTV 


16:9


3:2


Icon Pixel 

Size  Print Size 

Icon Pixel 

Size  Print Size


1

1

0

0

M

3648x2736


3

3

:

:

2

3648x2432


8

8

M

3264x2448


1/3


Resolution


Resolution 

1

1

0

0

M

M


Quality


ISO 

I

I

S

S

O

O


Metering


1/5


Chapter 4: Recording Photos, Videos and Voices


Summary of Contents for OPTIMA 1338mT

Page 1: ...OPTIMA 1338mT User manual ...

Page 2: ... Memory 6 Internal memory 6 External storage 6 Getting Started 7 Attaching the Wrist Strap 7 Inserting the Battery 7 Inserting an SD SDHC Memory Card 8 Charging the Battery 8 Turning the Power On and Off 9 Initial Settings 9 Setting the Language 9 Setting the Date Time 9 Modes 10 Switching between Record mode and Playback Mode 10 Selecting the Record mode options 10 Using the LCD Screen 11 LCD Scr...

Page 3: ... Setting Focus Mode 37 Recording Voices 37 Playback 39 Viewing in Single Navigation 39 Viewing Slideshow 39 Viewing in Drag Play Mode 40 Viewing Thumbnails 40 Zooming Images 41 Trimming an Image 41 Playing Movies 42 Playing Voice Recording 42 Playing Voice Memo 43 Using My Drawing 43 Using My Drawing Toolbar 44 Adding a Memo Dialog to an Image 44 Rotating Images 45 Adding Photo Frame 45 Setting Z ...

Page 4: ...55 Setting System Sound 55 Setting Volume 55 Setting LCD Brightness 56 Setting Power Save 56 Setting Date Time 56 Setting TV Out 56 Setting Hot Key 57 Setting Startup Image 57 Resetting 58 Setting Language 58 Making Connections 59 Connecting the Camera to a TV 59 To connect your camera to a TV 59 To view photos 59 Connecting the Camera a PC 60 Connecting the Camera to a Printer 60 Setting PictBrid...

Page 5: ...nce will not occur in a particular installation If this equipment does cause harmful interference to radio or television reception which can be determined by turning the equipment off and on the user is encouraged to try to correct the interference by one or more of the following measures Reorient or relocate the receiving antenna Increase the distance between the equipment and the receiver Connec...

Page 6: ...or strong detergents to clean the product Wipe the product with a slightly damp soft cloth Battery Information Turn off the camera before installing or removing the battery Use only the provided batteries or type of battery and charger that came with your camera Using other types of battery or charger may damage the equipment and invalidate the warranty When using Li ion battery in this product en...

Page 7: ...irectX 9 0C USB port and CD ROM drive For Macintosh Power Mac G3 or later Mac OS 10 0 10 4 Memory 64MB or above HDD space 110MB or above USB port and CD ROM drive Mplayer Main Features 10 mega pixels resolution Up to 3x optical zoom and 5x digital zoom 1 2 3 inch CCD image sensor 3 inch color touch screen LCD monitor 32MB internal flash memory with optional external SD SDHC card Supports up to 4GB...

Page 8: ...se check the contents of your camera package It should contain AgfaPhoto OPTIMA 1338mT Li ion battery Battery charger Wrist strap USB cable Power cord CD ROM Quick Start Guide Camera pouch AV cable 2 Chapter 1 Introduction ...

Page 9: ...Front View Views Self timer LED Flash Zoom L Microphone Back View Zoom buttons LCD Play button DISP Display button Top View Shutter button Stabilizer button LED indicator Power button 3 Chapter 1 Introduction ...

Page 10: ...ding to light levels to com pensate for camera shake Press to set stabilizer on off Shutter Press to capture an image or start stop recording video or audio clip Playback If the camera is turned off press and hold for 3 seconds to turn on camera in Playback mode If the camera is turned on press to toggle camera to Playback or Record mode Zoom Press the zoom buttons to change zoom focus Display DIS...

Page 11: ...ecord playback Green fast blinking Camera busy or deleting copying images recording data transfer is in progress Green slow blinking Playing slideshow or recording voice or movie Amber steady Power saving sleep mode Amber very fast blinking In Record mode flash is charging or AF error In Playback mode self timer countdown error Amber fast blinking Battery low or card error Amber slow blinking Erro...

Page 12: ...DHC cards with a maximum capacity of 8GB If there is a storage card inserted in the memory slot the camera automatically saves all images videos and audio clips in the external storage card 6 Buzzer Camera Status One beep Denotes the start of an operation like recording and printing Also beeps when using menu and set properties Two beeps Denotes completion of an operation Three beeps Denotes low b...

Page 13: ...a Inserting the Battery Follow these instructions to insert the Li ion battery into the battery compartment Please read Battery Information on page v before inserting removing batteries 1 Make sure the power is off before inserting the batteries 2 Open the battery compartment at the bottom of the camera 3 Insert the battery into the compartment with the terminal facing inside the camera and the ba...

Page 14: ...front side of the camera 3 Push the SD SDHC card into the memory slot until it clicks into place 4 Close the battery compartment To remove the SD MMC card gently push the card until it pops out Pull out the card carefully Charging the Battery The battery that comes along with your package is not charged You need to charge the battery before using the camera 1 Insert the battery into the battery ch...

Page 15: ...ower button See Modes on page 10 to know more about Record and Playback mode Initial Settings When you turn on your camera for the first time you will be asked to do the initial settings of your camera When you turn the Power button on the Language Menu is displayed on the LCD screen for you to setup the display language Setting the Language 1 Tap to move through the selection 2 Tap to select lang...

Page 16: ...u are automatically turned on Record mode Switching between Record mode and Playback Mode In Record mode press the Playback button to switch to Playback mode In Playback mode press the Playback button to switch back to Record mode Selecting the Record mode options Maximize the quality and ease of use of your camera by using the different mode options The mode options allow you to capture images wi...

Page 17: ...ptions Record Mode Screen Layout 1 2 3 4 5 6 7 307 8 9 10 0 0EV 3200 11 16 15 14 13 12 11 No Item Description 1 Record Mode Indicates the current record mode settings 2 Flash Indicates flash settings 3 Focus Mode Indicates focus mode settings 4 Self timer Burst Indicates drive mode settings 5 Zoom indicator Displays zoom 6 Shots available Indicates the remaining shots available 7 Resolution Displa...

Page 18: ...ing information Displays recording information of the file 4 Quick Set Bar Tap to activate Quick Set Bar 5 Next Tap to display next file 6 Slideshow Tap to start slideshow F 3 0 1 30 0 0EV 3200 No Item Description 10 Exposure Displays exposure settings 11 Quick Set Bar Tap to activate Quick Set Bar 12 ISO Displays ISO settings 13 White Balance Displays white balance settings 14 Metering Displays m...

Page 19: ...ription 7 Previous Tap to display previous file 8 Voice memo Indicates voice memo is attached 9 DPOF Indicates the file is marked for printing 10 Protect Indicates the file is protected Chapter 3 Using the LCD Screen ...

Page 20: ...escription 1 Battery Indicates the battery level 2 File no Total no Indicates the file number over the total number of 3 Movie clip Indicates the file is a movie 4 Quick Set Bar Tap to activate Quick Set Bar 5 Next Tap to display next file 6 Slideshow Tap to activate slideshow Chapter 3 Using the LCD Screen ...

Page 21: ...ious file 8 Protect Indicates the file is protected 9 Volume Adjusts and displays volume level 10 Playback buttons Tap buttons to play pause stop fast forward 11 Playing status Displays playing status 12 Played time Indicates played time Chapter 3 Using the LCD Screen ...

Page 22: ...ry Indicates the battery level 2 File no Total no Indicates the file number over the total number of 3 Voice memo Indicates the file is an audio file 4 Quick Set Bar Tap to activate Quick Set Bar 5 Next Tap to display next file 6 Slideshow Tap to activate slideshow 00 30 00 50 27 27 Chapter 3 Using the LCD Screen ...

Page 23: ...previous file 8 Protect Indicates the file is protected 9 Volume Adjusts and displays volume level 10 Playback buttons Tap buttons to play pause stop fast forward 11 Playing status Displays playing status 12 Played time Indicates played time Chapter 3 Using the LCD Screen ...

Page 24: ... 3200 OSD on Full OSD on Guide lines on OSD off The OSD information may vary depending on the record mode type Use the Guide lines to properly set image for capture In Playback mode the LCD display can be changed into any of the following 27 27 27 27 F 3 0 1 0 0EV 3200 OSD on Full OSD on OSD off LCD display cannot be changed in the following situations Manual exposure mode Recording movie or audio...

Page 25: ...u tap the corresponding icon For example to access Flash mode submenu click Flash mode icon the submenu options pop up See illustration on the right To select option tap the desired settings icon 1 10 0M M A A I IS SO O A AU UT TO O A AF F 1 1 Tap to exit submenu 11 No Menu Item Description 1 Scene Mode Tap to select scene mode 2 Flash Tap to change flash settings 3 Focus Mode Tap to change focus ...

Page 26: ...ap the Main Menu icon 5 10 21 No Menu Item Description 1 Effect Tap to add effects to image 2 Rotate Tap to rotate image 3 Z Lighting Tap to adjust Z lighting settings 4 Protect Tap to lock image 5 Main Menu Tap to go to Main Menu 6 Add Memo Tap to add a memo dialog to the image 7 Photo Frame Tap to add photo frame to image 8 DPOF Tap to mark image for printing 9 Delete Tap to delete image 10 Clos...

Page 27: ...ly adjusts the focus and exposure When the camera is ready to take the photo the frame bracket turns green the shutter speed and aperture value are displayed 4 Fully press the Shutter button to capture image F 3 0 1 3200 When the shake warning icon appears hold the camera steadily with your arms at your side or use a tripod to stabilize the camera to prevent blurred images Using the Stabilizer The...

Page 28: ...al zoom To adjusts optical zoom Press to zoom in 1 Press the Zoom buttons to zoom in or zoom out an image 2 The zoom indicator appears on the LCD screen To adjusts digital zoom Press to zoom Zoom 1 Activate digital zoom See Recording Movies on page 35 2 Press the T button to optically zoom in to the maximum until it stops 3 Release the button 4 Press the T button again to switch to digital zoom au...

Page 29: ...osions 24 Icon Item Description Auto The simplest way to shoot basic images Settings Program The camera automatically adjusts suitable shooting Portrait The camera blurs the background to focus on the Landscape This feature is used to emphasize wide scenic views Sunset This feature enhances the red hue for recording Backlight This feature is used to capture the image of a Smile Detection This feat...

Page 30: ... high speed Party This feature is used for wedding or indoor party Candlelight This feature is used to capture warm candle light NIght Portrait This feature is used to capture portrait pictures with Soft Skin This feature enhances skin tone thus facial skin Soft Flowing Water This feature enhances smooth effects like water or Food This feature is used to capture food images The increased saturatio...

Page 31: ...h to get correct exposure This function cannot be activated in recording movies or continuous shooting 1 10 0M M A A I IS SO O A AU UT TO O A AF F 1 Tap Flash mode icon 1 1 2 Tap your desired flash mode Your camera is equipped with six flash modes Auto flash is enabled Auto flash The flash fires automatically whenever extra lighting is needed 307 Forced off The flash is turned off Forced on The fl...

Page 32: ...et the resolution before you capture the image Changing the resolution affects the number of images that can be stored in your memory card The higher the resolution the more memory space is required The table below shows the resolution values for still images Suggestion Suggestion 10M 3648 x 2736 A2 Size 3M 2048 x 1536 4 x 6 8M VGA 3264 x 2448 A3 Size 640 x 480 E mail 27 2592 x 1944 A4 Size 5M 364...

Page 33: ...in brighter conditions As you move through the selections the preview on the LCD screen changes synchronously 1 10 00 0 ISO 2 20 00 0 200 Available settings are Auto 100 200 400 800 1600 and 3200 Metering The Metering function lets you select the area of the subject or frame by which the camera measures light to record still images or movies multiple points in the subject area the center of your p...

Page 34: ...selection to view the effect on the LCD screen Tap SET to save and apply settings N N R R V V G G S S B B B BW W S SE ET T 29 Icon Item Description Normal The camera records normally N Effect Icon Item Description Auto The camera automatically adjusts the white Daylight Ideally used for bright sunny conditions Cloudy Ideally used for cloudy conditions Tungsten Ideally used for indoor photos with t...

Page 35: ...ce Tracking The camera automatically detects the position of a MF Center Wide M MF F Manual 1 2 AF Area Icon Item Description V Vivid The camera captures the image with more contrast Sepia Images are captured in sepia tones BW B W Images are captured in black and white Vivid Red Captured image becomes reddish Ideally used to record images like flowers and cars to make them G Vivid Green Captured i...

Page 36: ... of flash to capture image with a brighter or dimmer lighting effect The table below shows the available settings EV Compensation In difficult lighting condition the auto exposure function of your camera may be misled into giving the wrong readings Exposure Value EV function allows you to adjust the exposure value and correctly expose your images Available for still images only 0 0 S SE ET T 31 EV...

Page 37: ...lections to move through other frame S SE ET T Press the shutter button to capture image with selected frame Sharpness This function allows you to enhance or soften finer details of your photos The table below shows the available Sharpness settings Saturation The Saturation function lets you adjust the color saturation in your photos Use a higher saturation setting for rich colors and a lower satu...

Page 38: ...ooting when Date Stamp is enabled in AEB Burst mode If Date Stamp is enabled digital zoom is automatically turned off In vertical or rotated images the date and time on your photos still appear horizontally Available settings are Focus Mode Date Date Time Off This function allows users to define the type of focus to capture image The table below shows the available settings 33 Icon Item Descriptio...

Page 39: ...ts a 10 second delay to capture image after 2 Sec Self timer Sets a 2 second delay to capture image after pressing x2 Double Self timer Performs delay and capture twice Performs a 10 second delay then captures the image the image again Burst Performs continuous shooting when the shutter button is pressed Stops shooting when the shutter button is released AEB Automatic Exposure Bracketing AEB captu...

Page 40: ...n Sound cannot be recorded while pressing the control Digital zoom is not available in movie recording The camera will automatically stop recording when the memory capacity is full Setting Camera to Record Movies Use the Quick Set Bar to change camera video settings The Quick Set Bar contains shortcuts to the following menu items Quality Movie Size Frame Rate Stabilizer White Balance Effect and Ma...

Page 41: ...ed movie length ranges within 5 minutes although you can upload a maximum movie length of 10 minutes Therefore when you record using the YouTube mode the following standards a followed Recorded movies are set to YouTube standard resolution of 640 X 480 Recording automatically stops when the file reaches 100 MB Recorded movies in the YouTube mode are stored following the DCF rule howev movies are s...

Page 42: ...to activate Quick Set Bar Tap the focus mode icon then select option A AW WB B N N The table below shows the available settings Recording Voices 1 To select Voice Recording mode tap from Scene Mode menu The Voice Recording Quick Set Bar is displayed on the LCD screen 2 Close the Quick Set Bar to display voice recording screen layout See picture on the right 37 00 10 00 Ready to record 00 00 00 Ico...

Page 43: ...utter button to start recording 4 Tap or press the Shutter button again to stop recording Voice recording will automatically stop when the maximum memory capacity is full 38 Note Chapter 4 Recording Photos Videos and Voices ...

Page 44: ...tion on the screen please see Playback Mode Screen Layout on page 12 Still Image Movie Audio Clip 27 27 27 27 or 3 Tap to view next previous image video voice recording 4 To access Quick Set Bar tap 5 To play a video or a voice recording tap anywhere on the LCD screen See Playing Movies on page 42 and Playing Voice Recording on page 42 for more details Viewing Slideshow The Slideshow function allo...

Page 45: ... 12 image thumbnails or 2 Tap to view next previous page 3 Tap a thumbnail to view it normally Thumbnail icons When you view the thumbnails some images may contain icons These icons indicate the type of file or recording 40 Icons Type Description Voice Memo Indicates that a voice memo is attached to the image Movie Indicates a recorded movie The image displayed is the first frame of the movie clip...

Page 46: ...se zoom To trim an image based on selected zoom view tap To exit zoom function tap Trimming an Image The Trim function allows you to trim an image to another image size This function is only available for still images 1 View the image to trim 2 Press the T button to activate zoom function or 3 Press the T W button or tap to trim repeatedly until desired image view 4 Tap to trim image 41 Icons Type...

Page 47: ... the to control volume Press the T W button to increase decrease volume 00 30 00 50 or 5 Tap or the slider bar to rewind or fast forward the movie 6 Tap to pause playback Tap to resume playback 7 Tap to stop playback The LCD screen displays the movie frame image in Single navigation mode Playing Voice Recording 1 Select the voice recording file to play 2 Tap anywhere on the LCD screen to play reco...

Page 48: ... Press the T W button to increase decrease volume or 4 Tap or the slider bar to 00 30 00 50 rewind or fast forward the voice recording 5 Tap to pause playback Tap to resume playback 6 Tap to stop playback The LCD screen displays the movie frame image in Single navigation mode Using My Drawing My Drawing function lets you draw freely and add other graffiti on still images This function is not avail...

Page 49: ...g to a still image This function is not available for images captured with VGA and 16 9 HD resolution 1 View the image to add memo dialog to 2 Tap The My Drawing toolbar is displayed on the LCD screen 3 Tap to use add memo function Tap to select dialog stroke 4 Press Display button to hide the toolbar 44 Icon Description Icon Description Tap to draw freely on the photo Tap to select color Tap to s...

Page 50: ...ile 1 View the image to rotate 2 Tap 3 Tap to rotate image 90º counter or clockwise clockwise Tap the icons repeatedly until desired orientation is achieved The preview on the LCD screen changes synchronously 4 Tap SET to apply and save changes S SE ET T Adding Photo Frame For a more artistic effect you can frame your still images using the Photo Frame function This function is for still images on...

Page 51: ...vailable settings are 0 0 1 0 2 0 3 0 and 4 0 4 Tap SET to continue 5 Select whether to 0 0 0 S SE ET T Save changes Save As Save as another file No Discard changes Overwrite Save and apply changes to the current file Save As No Overwrite Setting DPOF The Digital Print Order Format DPOF function allows you to mark still images in your memory card for printing and allows you to specify the number o...

Page 52: ...ap SET to save settings D DP PO OF F Set No To set DPOF on all files 1 Tap 2 Tap All Yes 3 Confirm to set DPOF on all files 4 Set the number of copies and date stamp on off 5 Tap SET to save settings set DPOF off No Select All To Files marked for printing can be set off following the same procedures above If the camera is in thumbnail mode tapping interface displays protect multiple files You can ...

Page 53: ...viewed file tap Yes protect multiple files All To 1 Tap 2 Tap Select The LCD screen displays files in thumbnail view 3 Tap a thumbnail to mark file for protection The protect icon appears on the thumbnail 4 Tap Protect to protect marked files 5 Select Yes to confirm protect protect all files P Pr ro ot te ec ct t Protect selected To 1 Tap 2 Tap All No 3 Confirm to protect all files unprotect files...

Page 54: ...t Select 3 To delete currently viewed file tap Yes delete a voice memo 1 View the image file with voice memo attached on the LCD screen All To Voice only icon is enabled only when viewed image has a voice memo attached 2 Tap 3 To delete the voice memo only tap Voice only delete multiple files To 1 Tap 2 Tap Select The LCD screen displays files in thumbnail view 3 Tap a thumbnail to mark file for d...

Page 55: ...o smaller ones This function is only available for still images To resize an image 1 View image to resize on the LCD screen 2 From the Playback menu tap Resize 3 Tap desired size Select size among 8M 5M 8M 3M and VGA Available size settings may vary depending on original image size Unavailable settings appear as gray icons 5M 3M VGA 4 After selecting size tap to confirm whether to Save As Save the...

Page 56: ...mage with existing voice memo 1 View the image with an attached voice memo on the LCD screen 2 From the Playback menu tap Voice Memo 3 The Overwrite confirmation message appears Tap whether to Yes Record another voice memo to replace the existing one No Retain existing voice memo and exit the function 4 When you select Yes the Recording memo Yes No interface is displayed on the LCD screen Follow t...

Page 57: ...the LCD screen N N 2 From the Playback menu tap Effect The Effect icons appear 3 Tap desired settings to preview effect on the LCD screen See table for more information 4 Tap SET to continue 5 Tap whether to B BW W R R S S G G N Ne eg g B B S SE ET T Save As Save the image to a new file No Disregard changes Overwrite Apply and save changes to the existing file The succeeding table shows the availa...

Page 58: ...53 Icon Item Description Vivid Green Image is saved with greenish tint B Vivid Blue Image is saved with bluish tint G Chapter 5 Playback ...

Page 59: ...ently used memory Copy to Card Select to copy all files stored in the internal memory to the memory card If there is a memory card inserted in the memory slot the camera automatically saves a files to the memory card If there is no memory card or the internal memory is empty the Copy to Card function is disabled Setting Auto Review The Auto Review function lets you view the captured image right af...

Page 60: ... Sound menu function to enable disable sound when a button is pressed or tapped Available settings are On Off 1 From the Setting menu select System Sound 2 Tap to apply desired settings Setting Volume Use the Volume function to control sound volume produced by the camera Available settings are Volume 0 Off Volume 1 Volume 2 Volume 3 Volume 4 Volume 5 1 From the Setting menu select Volume 2 Tap to ...

Page 61: ...ie or audio file Playing a slideshow movie audio file Using the USB connector 5 5m mi in n Setting Date Time Use the Date Time function to set the date and time of your camera This function is useful in attaching date stamps on captured images Your camera uses a 24 hour time format 1 Tap value or to adjust date and time 2 Tap SET to apply changes Setting TV Out Use the TV Out function to adjusts v...

Page 62: ...hanges A AU UT TO O A AU UT TO O Setting Startup Image The Startup Image function allows you to setup a startup image when you turn on your camera 1 From the Setting menu tap Startup Image The menu selection appears 2 Tap to select option Off Disable the startup image System Use camera default image My Photo Select image Tap thumbnail then tap SET to select image and from captured images in memory...

Page 63: ... folder and file structure of your camera see About Folder and File Names on page 62 Reset Tap to reset camera to initial default settings 3 A confirmation message appears Tap Yes to reset Tap No to exit submenu Setting Language The Language function allows you to choose the language of the on screen display OSD menu 1 From the Setting menu tap Language 2 Tap to apply desired language 58 Language ...

Page 64: ...to the USB port on the bottom of your camera 4 Connect the other end of the cable to the TV s AV input port 5 The LCD screen turns black and all images and video clips are displayed on the TV view photos deo To To navigate photos use Press T button to go to previous photo and W button to go to next photo For slideshow press Playback button to start stop slideshow To display hide function keys on t...

Page 65: ...played on the LCD screen a PC You can also use a card reader to access the memory card contents of your camera Connecting the Camera to a Printer You can print your photos directly using a PictBridge compatible printer PictBridge allows you to print images captured by your camera without connecting the camera to a PC Print images with a PictBridge compatible printer directly 1 Turn on your camera ...

Page 66: ...ting photos Indicates current page no total no The table below shows the PictBridge submenu options and their available settings 61 Submenu Available Settings Quality Default Fine Normal Draft Layout Default 2 4 6 12 Full Paper Size Default Postcard Letter A4 4 x 6 Paper Type Default Plain Photo Fast Photo Date Stamp Default On Off Filename Default On Off Quality Layout Paper Size Paper Type 1 2 P...

Page 67: ...t number from 100 to 999 and followed by DICAM or _AUCT or _UTUBE Each folder holds up to 9999 files If new files are saved a new folder named in sequence will be automatically created File Naming File names begin with DSCI and followed by a 4 digit number that increases in sequence File numbering starts from 0001 when a new folder is created If the highest folder number is 999 and the highest fil...

Page 68: ...ted LCD screen displays Memory full Memory card is full Replace the memory card with a new one or delete unnecessary images LCD screen displays File locked This file is locked Unlock the file See Protecting Unprotecting Files on page 48 LCD screen displays Card locked The memory card is protected Remove the card and slide the write protect switch to its unlock position LCD screen displays Format e...

Page 69: ...0 X 480 Scene Mode Auto Program Aperture Priority Shutter Priority Manual Exposure Portrait Landscape Sunset Backlight Smile Detection Kids Night Scene Fireworks Snow Sports Party Candlelight Night Portrait Soft Skin Soft Flowing Water Food Building Text Auction Movie Voice Rec Sensitivity Auto 100 200 400 800 1600 3200 3M or lower only White Balance Manual 5 modes in manual selection Daylight Clo...

Page 70: ...Battery Li ion battery Operating Temperature 0º C 40º C Operating Humidity 0 90 Microphone Built in Speaker Built in Dimensions Normal size 95 45 X 56 45 X 18 9 mm Weight 130g 65 ...

Page 71: ...Support Hotline Germany 0900 1000 042 1 49 Euro min from a German landline only Online Service International contact Not for USA Canada support apdc plawa com Manufactured by plawa feinwerktechnik GmbH Co KG Bleichereistraße 18 73066 Uhingen Germany AgfaPhoto is used under license of Agfa Gevaert NV Co KG Agfa Gevaert NV Co KG does not manufacture this product or provide any product warranty or su...

Reviews: