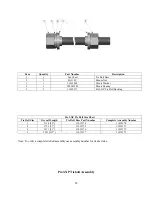
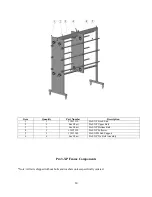
AGC ProFlow Pro3-XP Operation And Maintenance Manual Download Page 11

Figure 8 

Tightening Location and Sequence 

Measure top and bottom as well as front and back.  The heat exchanger is designed operate at its 

top efficiency when it is closed to a metal to metal condition.  This means the rubber plate gaskets are fully 
compressed and the plates contact points are fully engaged with each adjacent plate.  In this condition, the 
plate  gap  is  uniform  and  the  plate  is  fully  supported.  To  maintain  this  condition  all  tiebolts  should  be 
tightened equally and in sequence.  Following the sequence shown in figure 8, tighten each tiebolt in small 
increments so the follower remains parallel to the fixed end.  As the press approaches the start dimension 
smaller increments at each bolt will make for easier closing.   

After the press is closed and all connections are made to the heat exchanger the unit is ready to be 

pressure  checked.    Consult  the  onsite  plant  engineer  or  project  manager  for  the  correct  procedure  on 
pressure testing the press.  

Opening the Heat Exchanger: 

Before  opening  this  or  any  other  heat  exchanger  you  must  verify  the  temperature  in  the  unit  is 

below 90° F and that the unit has been relieved of all internal pressure.  Failure to follow this safety warning 
could result in serious injury to the operator or damage to the plates and gaskets.  All pipes/connections 
should be disconnected from the heat exchanger before the tiebolts are loosened.  

Prior to opening the press, inspect the tiebolts to ensure they are free from dirt or excessive dust 

and  that  lubrication  is  present  on  each.      Opening  or  closing  the  tiebolts  without  lubrication  may  cause 
permanent damage to the tiebolt.  Small increments on each bolt will make the process easier and prevent 

Summary of Contents for ProFlow Pro3-XP

Page 1: ...AGC Model Pro3 XP Operation and Maintenance Manual...

Page 2: ......

Page 3: ...ro3 XP Rail Size Chart 11 Pro3 XP Tiebolt Assembly 12 Pro3 XP Terminal Assembly 13 Pro3 Plate and Frame Gaskets 14 www agcheattransfer com Western 3109 NE 230th Avenue Fairview OR 97024 1 503 774 7342...

Page 4: ......

Page 5: ...recommendations could result in injury to the operator or cause damage to the heat exchanger Receiving and Inspection Each AGC heat exchanger is assembled and fully tested at the factory prior to shi...

Page 6: ...should be kept on file in a safe place in the event the production copy is lost or damaged The streaming diagram also referred to as the drawing describes all the characteristics of the heat exchange...

Page 7: ...y lift the press off the skid The top rail can be used as a lifting point Never lift the press by the tiebolts These bolts are in slots and are not designed to support the weight of the frame for lift...

Page 8: ...ng the ball feet to establish a slope from end to end Figure 5 shows a press adjusted to drain forward to the fixed end Figure 5 Frame Adjusted to Drain to Fixed End Consult your onsite Plant Engineer...

Page 9: ...ion include enough breaks in the piping so service and maintenance can be completed easily The piping connected to the follower should be configured with joints that are easy to remove so the follower...

Page 10: ...shipped in a separate crate refer to the ProFlow manual for instructions on installing them Figure 7 Tightening Instructions Most new plate packs will seal at the start dimension As the plates and gas...

Page 11: ...press is closed and all connections are made to the heat exchanger the unit is ready to be pressure checked Consult the onsite plant engineer or project manager for the correct procedure on pressure t...

Page 12: ...Heat Transfer heat exchangers are designed to require minimal operator maintenance As long as the unit is operated within the pressure and temperature limits the only maintenance required is routine...

Page 13: ...s Most of the field replaceable parts are listed in this manual If the part you need is not listed on the following pages contact your local AGC distributor or the AGC Heat Transfer Factory Contact in...

Page 14: ...hers unless specifically ordered Item Quantity Part Number Description 1 1 11012310 Pro3 XP Fixed End 2 1 See Chart Pro3 XP Upper Rail 3 1 See Chart Pro3 XP Bottom Rail 4 1 11012330 Pro3 XP Follower 5...

Page 15: ...ail Size Rail Length Upper Rail Part Number Lower Rail Part Number 1 1118 44 11012365 11014700 2 1701 67 11012366 11014703 3 2311 92 11012367 11014704 4 2921 115 11012368 11014705 Pro3 XP Rail Size Ch...

Page 16: ...2377 Pro3 XP Tie Bolt Bushing Pro3 XP Tie Bolt Size Chart Tie Bolt Size Overall Length Tie Bolt Base Part Number Complete Assembly Number 1 1118 44 11012374 11012370 2 1701 67 11012375 11012371 3 2311...

Page 17: ...335 Pro3 Port Boss V Configuration 11018516 Pro3 Port Boss X Configuration 11018515 Pro3 Port Boss with 2 Pressure Switch 11018518 Pro3 Port Boss Blank 11018520 Pro3 Port Boss Thru 11018513 Note Port...

Page 18: ...14 Pro3 Plate and Frame Gaskets...

Page 19: ......

Page 20: ...packs gaskets and spares that fit other brands Frames available are tie bolt twin spindle and hydraulic automatic closure AGC offers Platecheck TM Field Leak Testing of plate heat exchangers that meet...

Reviews: