background image

12

Essential Information

Before thorough cleaning, turn off the circuit breaker. Allow 

the range to cool.
After cleaning, remember to switch on the circuit breaker 

before re-using the range.

n

Never use paint solvents, caustic cleaners, biological 

powders, bleach, chlorine based bleach cleaners, 

coarse abrasives or salt. 

n

Do not mix different cleaning products – they may 

react together with hazardous results.

Daily Care

Cleaning the range must be done to maintain efficiency and 

appearance. Remember it is better to wipe up any spills as 

they occur, this will prevent them burning on and becoming 

more difficult to remove later.

n

Make sure the flow of combustion and ventilation air 

to the range is unobstructed – for example by build-

up of fats or grease.

Cleaning for Spills

For spills and boil-overs that occur while cooking, as soon as 

possible turn off the burner and allow it to cool. Do not clean 

until the area is completely cooled down. Wipe up spills as 

soon as possible.
Do not allow surplus water to seep into the range.

Cooktop Burners

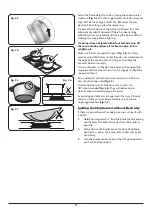
The burner heads and caps can be removed for cleaning. 

Make sure they are absolutely dry before replacing 

(Fig. 5.1)

.

n

DO NOT put the burner heads in a dishwasher.

When replacing the cooktop burner parts, ensure each part 

locates properly 

(Fig. 5.2)

.

If you look at the base of the parts you will see locating pins, 

or notches, to aid their correct replacement.
If the flame is distorted, check that the burner head is 

correctly placed over the burner base.
Check burner ports are not blocked. If blockage occurs, 

remove stubborn particles using a piece of fuse wire.
If the flame burns with a long white tip you should call for 

service.

Pan Supports

Pan supports should be cleaned in hot soapy water.

n

DO NOT put the pan supports in a dishwasher.

5.  Cleaning Your Range

Fig. 5.1 

Fig. 5.2 

ArtNo.311-0030 - Burner head fitting

Burner Cap

Burner Cap

Inner 

Burner Base

Outer 

Burner Head

Outer

Burner Head

Outer

Burner Base

Burner

Base Cup

Outer 

Burner Base

Igniter

Thermocouple

ArtNo.311-0028 - Flame

Summary of Contents for PRO+ APRO36DFSS

Page 1: ...APRO36DFSS 36 Dual Fuel User Guide Installation Service Instructions U110596 01...

Page 2: ...om a neighbor s phone Follow the gas supplier s instructions If you cannot reach your gas supplier call the fire department Installation and service must be performed by a qualified installer service...

Page 3: ...12 Cooktop Burners 12 Pan Supports 12 Control Panel and Oven Door 13 6 Troubleshooting 14 7 Installation 16 Regulations 16 For Your Safety 16 Installation Safety Instructions 16 Converting to Propane...

Page 4: ...iv...

Page 5: ...n an oven pan smother by closing oven door Open doors and windows or if a hood is installed turn it on to remove smoke and odor To Prevent Fire or Smoke Damage Before using the range make sure all the...

Page 6: ...a burner flame or hot surface and may cause severe burns Use Only Dry Potholders or Oven Gloves Moist or damp potholders on hot surfaces may result in burns from steam Never let a potholder touch hot...

Page 7: ...electric shock or fire and will damage the enamel finish Never allow aluminum foil to contact the heating elements n n DO NOT use cooktop protectors foil or cooktop covers of any description These ma...

Page 8: ...uild up in fats and other food stuff could result in a fire Always keep combustible wall coverings or curtains etc a safe distance away from your range n n DO NOT spray aerosols in the vicinity of the...

Page 9: ...s When a cooktop control knob is pressed in sparks will be made at every burner this is normal Do not attempt to disassemble or clean around any burner while another burner is on otherwise an electric...

Page 10: ...the edge of the range or another burner whilst it is on Large pans should be spaced well apart Pans and kettles with concave bases or down turned base rims should not be used Fig 2 5 Simmering aids s...

Page 11: ...2 10 then preheat the broiler for a couple of minutes Once preheated slide the broiler pan and grid with the food in place back into the oven Brown one side of the food and turn to brown the other sid...

Page 12: ...king and is a good all round function It may be necessary to reduce the temperature by approximately 20 F 10 C for recipes previously cooked in a conventional oven Thaw Mode This function operates the...

Page 13: ...ntil the back of the rack is stopped by the rack stop Lift the front of the rack so the stops clear the supports and then pull forward To refit the rack line up the rack with a slot in the side ladder...

Page 14: ...very hot Use all oven modes with the door closed Never use aluminium foil to cover the oven shelves or to line the base of the oven The trapped heat may damage the enamel and cause a fire Always leave...

Page 15: ...the cooking time 50 60 minutes 25 30 minutes interchange after 15 minutes 25 30 minutes interchange after 15 minutes 10 15 minutes interchange after 15 minutes 40 60 minutes 20 30 minutes Temperature...

Page 16: ...rea is completely cooled down Wipe up spills as soon as possible Do not allow surplus water to seep into the range Cooktop Burners The burner heads and caps can be removed for cleaning Make sure they...

Page 17: ...t soapy water Removing the Oven Door The oven door can be removed for ease of cleaning Open the oven door fully and release the saddle brackets situated either side Fig 5 3 Ensure that the saddle brac...

Page 18: ...e correcting work carried out by your original installer It is in your interest to track down your original installer Food is cooking too slowly too quickly or burning Cooking times may differ from yo...

Page 19: ...urn off the power at the circuit breaker Before removing the existing bulb turn off the power supply and make sure that the oven is cool Open the oven door and remove the oven shelves Gently prize off...

Page 20: ...e must be electrically grounded in accordance with local codes or in the absence of local codes in accordance with the National Electrical Code ANSI NFPA 70 latest edition Before installing your range...

Page 21: ...f wood or metal cabinet is protected by not less than 1 4 thick flame retardant millboard covered with not less than No 28 MSG sheet steel 0 015 thick stainless steel 0 024 thick aluminum or 0 020 thi...

Page 22: ...brackets are securely installed and engaged on both sides of the range Fig 7 4 Engage the range to the anti tip device The stability pins must locate beneath the brackets when the range is in positio...

Page 23: ...e as noted on the rating plate Wiring must conform to National Electric Codes If the electric service provided does not meet the above specifications have a licensed electrician install an approved ou...

Page 24: ...move the screws that secure the rear access cover and remove the access plate to expose the range terminal connection block Fig 7 1 2 Remove the screws to loosen the cable clamp Fig 7 2 and pass throu...

Page 25: ...valve before disconnecting the old range and leave it off until the new hookup has been completed Don t forget to relight the pilot on other gas appliances when you turn the gas back on Because hard...

Page 26: ...ow these procedures to remove appliance for servicing Shut off the gas supply and turn off the circuit breaker Disconnect gas supply tubing to the appliance and unplug the electrical supply cord Note...

Page 27: ...LLATION Check the appliance is electrically safe and gas sound when you have finished 23 To Fit and Remove the Oven Shelf To remove the oven shelf To fit the oven shelf DocAUS 020 0004 Overview 110DF...

Page 28: ...nce is to be converted this must be done before installation The conversion must be performed by a qualified LP gas installer After conversion the installation must comply with the relevant regulation...

Page 29: ...e is gas sound The gas pressure can be measured at the pressure test point on the appliance at the right hand rear cooktop burner Remove the burner cap base and head n n Disconnect from the electricit...

Page 30: ...ht switch 19 21 23 35 18 38 54 57 17 55 12 53 20 43 50 47 45 49 13 14 44 52 48 51 46 15 16 41 40 92 91 91 90 39 42 27 29 31 10 34 37 36 25 2 1 9 8 7 6 56 5 4 3 Oven thermostat BR BA C 22 24 26 28 30 3...

Page 31: ...27 Notes...

Page 32: ...www aga ranges com AGA Marvel 1260 E VanDeinse St Greenville MI 48838 Business 616 754 5601 Fax 616 754 9690 Toll Free Telephone 800 223 3900...

Reviews: