


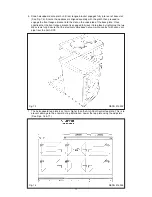
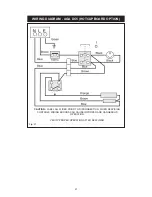


Fig. 15
DESN 516552
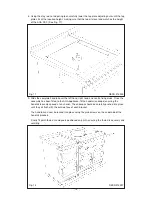
7. The hotcupboard top plate is set 5mm higher than the AGA Dual Control top plate. This is to
prevent damage to the enamel during installation. Lower the top plate using the adjusters
(See Figs. 16 & 17).
Fig. 16
DESN 516554
17
6. Slide hotcupboard onto plinth until rear tongue bracket engages fully into rear of base slot,
(See Fig. 15). Ensure the appliance is aligned squarely with the plinth then proceed to
engage the front tongue bracket into the slot on the underside of the base plate. Once
satisfied that the front tongue bracket is engaged fully lock it into place by tightening the two
M6 screws fully. Ensure that the electrical cable does not come into contact with oven vent
pipe from the AGA DC3.
Summary of Contents for DC3
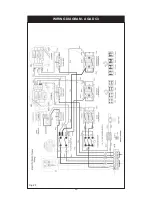
Page 20: ...WIRING DIAGRAM AGA DC3 20 Fig 20 ...
Page 23: ...23 ...


