background image

36

SPECIFICATIONS

AG Neovo

Company Address: 5F-1, No. 3-1, Park Street, Nangang District, Taipei, 11503, Taiwan.

Copyright © 2022 AG Neovo. All rights reserved.

PM-3202 Eprel Registration Number: 1090654                                                                                        PM3220_UM_V010

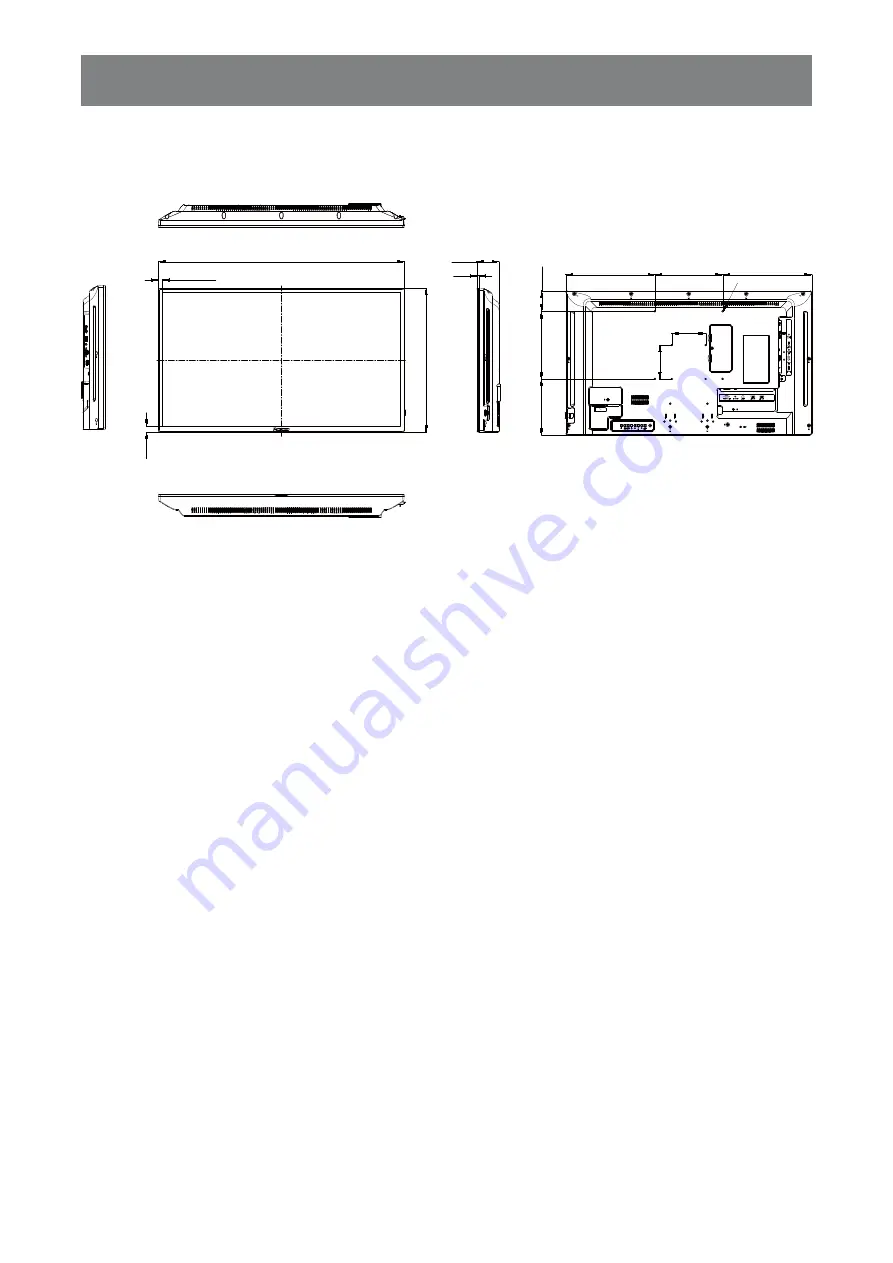
7.2 Display Dimensions

PM-3202

(263.2)

M4xL10 

726.5 (Outline dimension)

425.4 (Outline dimension)

5.3

65.1

17.2

11.9 (T/L/R)

(263.2)

200.0

60.0

200.0

165.3

100.0

100.0

Summary of Contents for PM-3202

Page 1: ...PM 3202 LCD Display User Manual www agneovo com ...

Page 2: ...Panel 9 1 5 2 Using the Remote Sensor and Power Status Indicator 10 1 5 3 Input Output Terminals 10 1 6 Remote Control 11 1 6 1 General Functions 11 1 6 2 ID Remote Control 12 1 6 3 Inserting the Batteries in the Remote Control 13 1 6 4 Handling the Remote Control 13 1 6 5 Operating Range of the Remote Control 13 CHAPTER 2 MAKING CONNECTIONS 14 CHAPTER 3 ON SCREEN DISPLAY MENU 15 3 1 Using the OSD...

Page 3: ... TABLE OF CONTENTS CHAPTER 6 APPENDIX 30 6 1 Warning Messages 30 6 2 Input Mode 31 6 3 Cleaning 33 6 4 Troubleshooting 34 CHAPTER 7 SPECIFICATIONS 35 7 1 Display Specifications 35 7 2 Display Dimensions 36 ...

Page 4: ... is likely to cause harmful interference in which case the user will be required to correct the interference at his own expense Changes or modifications not expressly approved by the party responsible for compliance could void the user s authority to operate the equipment Use only an RF shielded cable that was supplied with the display when connecting this display to a computer device To prevent d...

Page 5: ...is recycled in a manner that protects human health and the environment we would like to bring your attention to the following The crossed out dustbin on the device or outer packaging indicates the product is compliant with European WEEE Waste Electrical and Electronic Equipment Directive Always dispose of the old devices separately from household waste Batteries should be removed beforehand and di...

Page 6: ...umer do not remove any stickers from the LCD display Doing so may affect the determination of the warranty period Cautions When Setting Up Do not place the LCD display near heat sources such as a heater exhaust vent or in direct sunlight Do not cover or block the ventilation holes in the housing Place the LCD display on a stable area Do not place the LCD display where it may subject to vibration o...

Page 7: ... wet hands When turning off the display by detaching the power cord wait 6 seconds before re attaching the power cord for normal operation Do not knock or drop the display during operation or transportation Cleaning and Maintenance To protect your display from possible damage do not put excessive pressure on the LCD panel When moving your display grasp the frame to lift do not lift the display by ...

Page 8: ...ay for extended periods of time It can be several hours or several days Use a screen saver and run it for extended periods of time Use a black and white image and run it for extended periods of time There are millions of micro transistors inside the LCD display It is normal for a few transistors to be damaged and to produce spots This is acceptable and is not considered a failure IMPORTANT Always ...

Page 9: ...fety regulations of the particular country Type H05VV F 3G 0 75mm2 should be used You might like to save the package box and packing material for shipping the display The pictures are for reference only Actual items may vary upon shipment CHAPTER 1 PRODUCT DESCRIPTION 1 1 Unpacking This product is packed in a packaging box which contains standard accessories Any other optional accessories will be ...

Page 10: ...ty so as not to shorten the service life of the electronic components The product can normally operate only under 3000m in altitude In installations at altitudes above 3000m some abnormalities may be experienced Warning Do not press too hard on the LCD panel or edge of the frame as this may cause the device to malfunction Note Avoid the wall mounting kit to block the ventilation holes on the back ...

Page 11: ...cket To lessen the probability of injury and damage resulting from fall of the display in case of earthquake or other natural disaster be sure to consult the bracket manufacturer for installation location Note For the wall mounting kit use M4 mounting screws having a length 10 mm longer than the thickness of the mounting bracket and tighten them securely 1 4 2 Ventilation Requirements for Enclosur...

Page 12: ... option 7 Down Move the highlight bar down to select an option 8 MENU Activate the OSD menu when OSD menu is off Hide the OSD menu while OSD menu is on 9 Remote control sensor and power status indicator Receive command signals from the remote control Indicate the operating status of the display Power Status Indicator Display State Lighting State State During operation Amber lighting Normal status ...

Page 13: ...ack 9 USB 2 0 Connect USB 2 0 for service and media playback 10 AUDIO OUT Connect audio signals output RCA Stereo Audio Jack 11 SECURITY LOCK Used for security and theft prevention If you want to obtain a better reception of remote control function please adjust the indicator location to easily check the power status indicator If you want to mount the display to the wall please push the indicator ...

Page 14: ... menus and select items 7 OK Confirm an entry or selection 8 ADJUST Automatically optimize the display for VGA input only 9 BRIGHTNESS Adjust the brightness 10 COLOR No function 11 Number ID SET ENTER Enter text for network setting Set the display ID See 1 6 2 ID Remote Control for more detail 12 FORMAT Change the picture size 13 BACK Return to the previous menu or exit from the previous function ...

Page 15: ...ect the display you want to control For example Display ID 1 press 0 1 Display ID 11 press 1 1 The numbers available are from 01 255 Not pressing any button within 10 seconds will exit the ID mode If an error pressing of buttons other than the digits occurred wait 1 second after the red LED lights off and then lights up again then press the correct digits again 4 Press the button to confirm The re...

Page 16: ...When using the remote control the distance from the remote control to the sensor on the display should be less than 8m 26ft and the horizontal and vertical angles should be less than 30 8m Caution The incorrect use of batteries can result in leaks or bursting Be sure to follow these instructions Place AAA batteries matching the and signs on each battery to the and signs of the battery compartment ...

Page 17: ...14 CHAPTER 2 MAKING CONNECTIONS HDMI 2 RS 232C IN HDMI 3 IR OUT LAN USB MEMORY HDMI 1 AUDIO IN AUDIO OUT D sub IN ...

Page 18: ...T BLACK LEVEL CONTRAST COLORS TINT SHARPNESS 40 50 50 50 50 35 HIGH ILLUMINANCE Press the button to enter the menu screen Press the or button to enter the menu screen 3 Select the submenu PICTURE HIGH ILLUMINANCE 40 50 50 50 50 35 COLOR MODE ADVANCED BRIGHT BLACK LEVEL CONTRAST COLORS TINT SHARPNESS The highlighted item green indicates the active submenu Press the or button to select the menu item...

Page 19: ...e setting 5 Exit the submenu Press the MUTE button to return to the main menu screen Press the button to return to the previous menu 6 Close the OSD window Press the MENU button Press the button or the button several times When settings are modified all changes are saved when the user does the following Proceeds to the another menu Exits the OSD menu Waits for the OSD menu to disappear Note Availa...

Page 20: ... 20 3 SETUP LANGUAGE DATE TIME SETTING SCHEDULE ALINK COMMUNICATION SETTING SCREEN OPERATION MODE POWER SAVE MODE OFF IF NO OPERATION STANDBY NO SIGNAL AUTO INPUT SEL AUTO PLAY MONITOR BUTTONS LOCK REMOTE CONTROL LOCK THERMAL SENSOR SETTING LED INFORMATION ROTATE 180 ANTI BURN IN ALL RESET See page 21 PICTURE COLOR MODE ADVANCED BRIGHT BLACK LEVEL CONTRAST COLORS TINT SHARPNESS 40 50 50 50 50 35 H...

Page 21: ...OOM NORMAL Dot by Dot WHITE BALANCE Select the color temperature Note This menu item is not available if the COLOR MODE is set to sRGB PRESET USER PRESET Select the color temperature when the WHITE BALANCE is set to PRESET Note This menu item is not available if the COLOR MODE is set to sRGB WARM NORMAL COOL USER Adjust the bright toned of the red green blue component when the WHITE BALANCE is set...

Page 22: ...the RGB input signal range Note This menu item is only available support RGB color space for HDMI input AUTO FULL LIMITED BRIGHT Adjust the luminance of the screen image 0 to 50 BLACK LEVEL Adjust the black level of the screen image Low brightness setting makes black colour darker 0 to 100 CONTRAST Adjust the difference between the black level and the white level Note This menu item is not availab...

Page 23: ...decrease the lower pitched sounds 0 to 31 BALANCE Adjust to emphasize the left or right audio output balance 50 to 50 SPEAKER Turn the speaker on off OFF ON AUDIO OUTPUT Set the volume of sound output from the audio output terminals VARIABLE Be able to change the volume with internal speakers and audio output terminals FIXED Fix volume of audio output terminal If change volume of the display but i...

Page 24: ...H FRANÇAIS ITALIANO ESPAÑOL РУССКИЙ 繁體中文 DATE TIME SETTING DATE TIME SETTING YEAR MONTH DAY TIME AM PM TIME FORMAT 2022 01 14 19 59 24 HOUR TIME YEAR Set the year 2021 to 2099 MONTH Set the month 01 to 12 DAY Set the day 01 to 28 29 30 31 TIME Set the time 24 HOURS 00 00 to 23 59 12 HOURS 00 00 to 11 59 AM PM Set the time format Note This option is not available if the TIME FORMAT is set to 24 HOU...

Page 25: ...IME SETTING menu before using this function After changing the DATE TIME SETTING option in the SETUP menu you need to set this Schedule again SCHEDULE1 ON OFF ON TIME OFF TIME REPEAT MODES INPUT ON _ _ _ _ _ _ _ _ HDMI1 ON OFF Enable or disable the schedule ON OFF ON TIME Specify the time to turn on the display 24 HOURS 00 00 to 23 59 12 HOURS 00 00 AM to 11 59 PM OFF TIME Specify the time to turn...

Page 26: ...N SELECT is set to LAN VIEW NETWORK SETTINGS View the current network configurations DHCP CLIENT Select ON to allow the system to assign an IP address automatically Otherwise select OFF to manually configure the network settings IP ADDRESS Assign an IP address SUBNET MASK Specify the subnet mask DEFAULT GATEWAY Specify the default gateway SET Save and apply the settings N A SCREEN Note This option...

Page 27: ...mode becomes longer If set to ON certain RS 232C commands and LAN control cannot be used in standby mode Note This menu item is not available if the OPERATION MODE is set to MODE1 OFF ON OFF IF NO OPERATION Set whether or not the display automatically enters standby mode when there is no operation for 4 hours Note This menu item is not available if the OPERATION MODE is set to MODE1 OFF ON STANDBY...

Page 28: ...trol press OPTIONS UP DOWN LEFT and RIGHT buttons UNLOCKED LOCK ALL LOCK EXCEPT VOLUME LOCK EXCEPT POWER THERMAL SENSOR SETTING Set it correctly according to the installation direction of the monitor LANDSCAPE FACE UP LED Set the display LED indicator on or off OFF ON INFORMATION View the information about your LCD display N A ROTATE 180 Set whether or not the video OSD menu can be rotated to 180 ...

Page 29: ...are as follows USB Multimedia Codec Formats Type Format Video Codec Audio Codec Movie mp4 H 264 MPEG 1 Layer2 MPEG 1 Layer3 MPEG 2 Layer3 AC3 LPCM ADPCM AAC DD HE AAC ts MPEG2 H 264 mpg MPEG 1 MPEG 2 Audio mp3 MPEG 1 Layer2 MPEG 1 Layer3 MPEG 2 Layer3 Photo jpg jpeg When the monitor is reading data from a USB device please observe the following The above file formats may not play properly Some res...

Page 30: ... music while playing photo Auto Play Start to play automatically if meet conditions when turn on the main power or the monitor X Automatically play defined name files in autoplay folder Add values of USB1 and USB2 for input selection for schedule setting If schedule function invoke autoplay with USB1 automatical play defined name files in autoplay1 folder If schedule function invoke autoplay with ...

Page 31: ...FB FB2X FB4X FB8X FB16X FB32X X FB32X is for only MOVIE FF FF2X FF4X FF8X FF16X FF32X X FB32X is for only MOVIE Prev Next Stop Repeat None 1File All Invalid and fixed to All with Auto Play Repeat during A B X Invalid with Auto Play Random Repeat On Off Invalid with Auto Play Music On Off On Off X X Slideshow time Short 5sec Medium 10sec Long 15sec X X Playlist Info Rotate 90 degrees Clockwise X X ...

Page 32: ...g or mp4 jpg or mp4 A number of target files Max 30 files Max 30 files Max 30 files Combination with Photo and Movie Impossible Impossible Impossible Rule of target file name ex 001 jpg 002 jpg 003 jpg 030 jpg ex 001 jpg 002 jpg 003 jpg 030 jpg ex 001 jpg 002 jpg 003 jpg 030 jpg Setting of AutoPlay OFF PHOTO MOVIE OFF PHOTO MOVIE OFF PHOTO MOVIE 5 8 Setting of Schedule Enabling AutoPlay With below...

Page 33: ...e input source is turned ON Check if the signal cable is properly connected Check if any pin inside the cable connector is twisted or broken MONITOR BUTTONS LOCK The operation using the control panel buttons has been locked by the user Disable the keyboard lock function in SETUP MONITOR BUTTONS LOCK menu See page 24 REMOTE CONTROL LOCK The operation using the remote control buttons has been locked...

Page 34: ...848x480 31 60 33 75 X 1024 768 48 4 60 65 1289x800 49 7 60 83 5 1280x960 60 60 108 1280 1024 64 60 108 80 75 135 1360 768 47 7 60 85 5 X 1440 1050 65 3 60 121 75 X 1440 900 55 9 60 106 5 1680 1050 65 3 60 146 25 Wide 1280 720 44 7 60 74 4 1920 1080 67 5 60 148 5 3840 2160 54 24 297 X 56 25 25 297 X 67 5 30 297 X 112 5 50 594 X 135 60 594 X US TEXT 720 400 31 5 70 28 3 ...

Page 35: ...and your particular version of Windows Check your PC instruction book for information about connecting your PC to a display If a vertical and horizontal frequency select mode exists select 60Hz vertical and 31 5KHz horizontal In some cases abnormal signals such as stripes might appear on the screen when the PC power is turned off or if the PC is disconnected If so press the SOURCE button to enter ...

Page 36: ...If the surface becomes dirty soak a soft lint free cloth in a mild detergent solution Wring the cloth to remove excess liquid Wipe the surface of the display to remove dirt Then use a dry cloth of the same type to dry Do not scratch or hit the surface of the panel with fingers or hard objects of any kind Do not use volatile substances such as insert sprays solvents and thinners Cabinet Cleaning In...

Page 37: ... doesn t fill up the full size of the screen The picture size is not set correctly Press the FORMAT button and select a suitable picture size Can hear sound but no picture Improperly connected source signal cable Make sure that both video inputs and sound inputs are correctly connected Can see picture but no sound is heard Improperly connected source signal cable Volume is turned all the way down ...

Page 38: ...1 Other connectivity USB 2 0 x 1 Service Port Media Playback Audio Audio In Stereo Audio Jack 3 5 mm Audio Out Stereo Audio Jack RCA Internal speaker 10W x 2 Power Power Supply Internal Power Requirements AC 100 240V 50 60 Hz On Mode 42W On Standby Mode 0 5W Off Mode 0 3W Operating Conditions Temperature 0 C 40 C 32 F 104 F Humidity 20 80 non condensing Storage Conditions Temperature 20 C 60 C 4 F...

Page 39: ...ict Taipei 11503 Taiwan Copyright 2022 AG Neovo All rights reserved PM 3202 Eprel Registration Number 1090654 PM3220_UM_V010 7 2 Display Dimensions PM 3202 263 2 M4xL10 726 5 Outline dimension 425 4 Outline dimension 5 3 65 1 17 2 11 9 T L R 263 2 200 0 60 0 200 0 165 3 100 0 100 0 ...

Reviews: