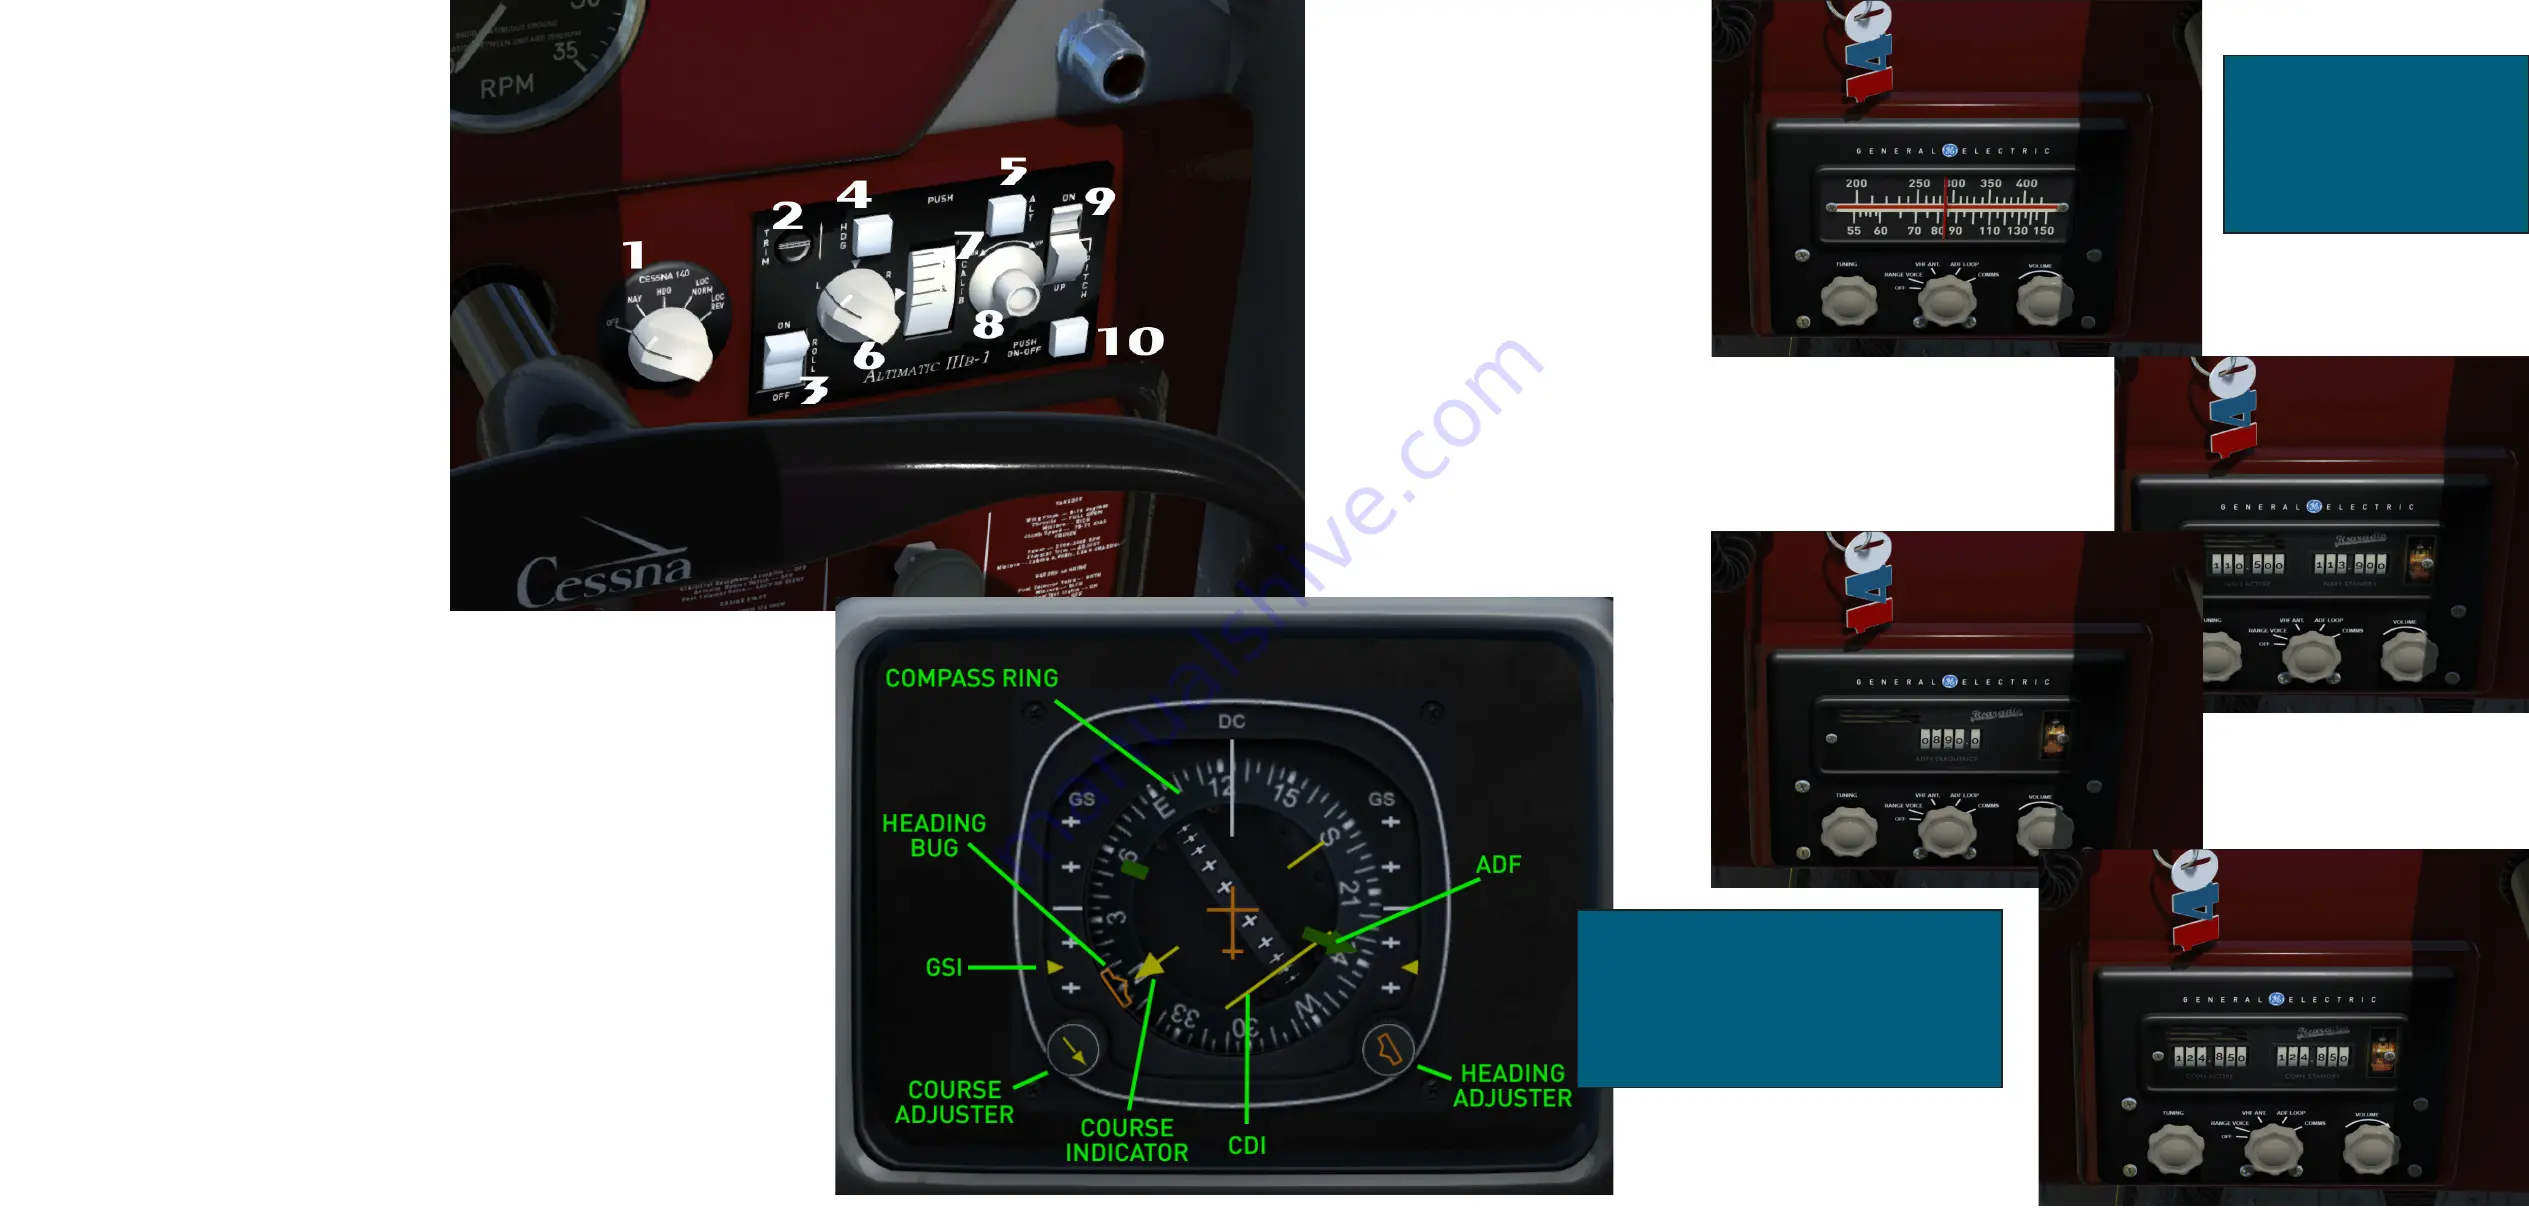
Instructions for use of the
Altimatic IIIB AutoPilot
Turn on the unit by the Master Power
Switch (10) The main function control (1)
allows you to set the Altimatic to obey in-
puts from a variety of sources. From left to
right, these functions are: OFF, NAV(hold
mode) when radio frequencies are set and
the NAV1 radial is acquired, in this mode,
the Altimatic will steer the aircraft to that
radial. HDG (heading hold mode) in this
mode the Altimatic will hold the aircraft on
the heading set by the HSI. LOC/NORM
(ILS approach mode) when an airfield local-
iser is acquired this mode will steer and hold
the aircraft on the correct lateral approach,
of course vertical attitude on the glideslope
must be adjusted manually – this is not a
“land-me” system! LOC/REV (Back course
mode) is used when the radial has been
overflown or you are moving away from the
radial.
Using the Roll switch (3) activates the
wing leveler system. Whenever NAV,LOC or
HDG modes are used, this switch MUST be
OFF. In HDG (heading hold) mode, the
Altimatic will obey commands from the
Heading selector /adjust knob on the HSI
and fly the aircraft on that heading.
Adjustments can be made in this
mode by using the Turn Knob (6).
Altitude can be set and held in the
Altimatic by setting the desired altitude
using the Altitude Selector Knob (8) and the
rotational scale (7) Once desired altitude is
set, push the Altitude Hold knob (5) to ac-
tivate the autopilot Alt/Hold function. Ad-
justments can be made to the vertical speed
whilst in Alt/Hold mode, by using the Pitch
Trim Knob(9).
Operating the HSI
First click on the locker lid cover to
rotate it and reveal the HSI unit. This is
modeled on a modern unit found in much
later Cessnas. It consists of a compass rose
with a lubber line, a CDI (Course Deviation
Indicator) and a GSI (GlideSlope Indicator).
The two knobs allow for course and
heading settings to be made with an orange
heading “bug” and a yellow course indicator.
Our HSI has a white NAV1 and a
green ADF needle added (there’s no RMI).
There are many useful publications
available on the web which cover the use of
an HSI in detail. They are quite easy to use
despite their complex appearance.
Used in conjunction with the
Altimatic IIIb, you now have a fairly
sophisticated navigation setup - especially
for a Cessna140!
Using the Radio Set.
There are three large knobs mounted
on the radio panel. The centre one selects
the type of radio you wish to use - COMMS,
NAV1 or ADF1. It also turns on the radios,
switching out from the blank “false” panel to
the working panels. To turn on the radio set,
RIGHT CLICK the centreknob. You need to
do this TWICE as it will cycle to the “Range
Voice” segment first. Right click again and
you’ll bring up the NAV1 Radio. Again and
you’ll have the ADF Radio and finally, the
COMMS Radio. The NAV and COMMS
radios have two windows, the left is the
ACTIVE and the right, STANDBY
frequencies. The right hand knob will switch
between the two. The ADF has just one
window as there is no standby frequency.
To tune frquencies, use the left knob,
using a combination of left and right click
and wheel. Do the same for the ADF frquen-
cy. Please note: The simulator is built to use
separate knobs one knob is a little tricky but
you’ll soon get the hang of it. Once properly
tuned, the frequencies will interact with your
HSI so you can set up for IFR navigation.
Red “flags” will appear, occasionally, in the
window of the HSI. These are warning flags
to tell you that the NAV radio is off or off
frequency or that HEADING HOLD is un-
available. These flags also appear when the
AVIONICS ARE OFF
ALWAYS REMEMBER TO
HAVE YOUR BATTERY
SWITCHED ON AND THE
AVIONICS MASTER SWITCH
KEY PRESSED (24) BEFORE
USING THE RADIO.
Summary of Contents for Cessna 140
Page 1: ......


