Aeotec 7 Pro ZWA012 User Manual Download Page 5

SmartStart Inclusion.

You can use this method of inclusion only if your Z-Wave gateway/controller/hub supports SmartStart.

1. 

Open up your Z-Wave gateway/controller/app.

2. 

Select SmartStart inclusion.

3. 

Scan the QR code located on the Door/Window Sensor 7.

4. 

Within 10 minutes after powering your Door/Window Sensor 7, it will automatically get included in your Z-Wave

gateway/controller/hub.

Classic Inclusion

1. 

Set your Z-Wave controller into pairing mode.

2. 

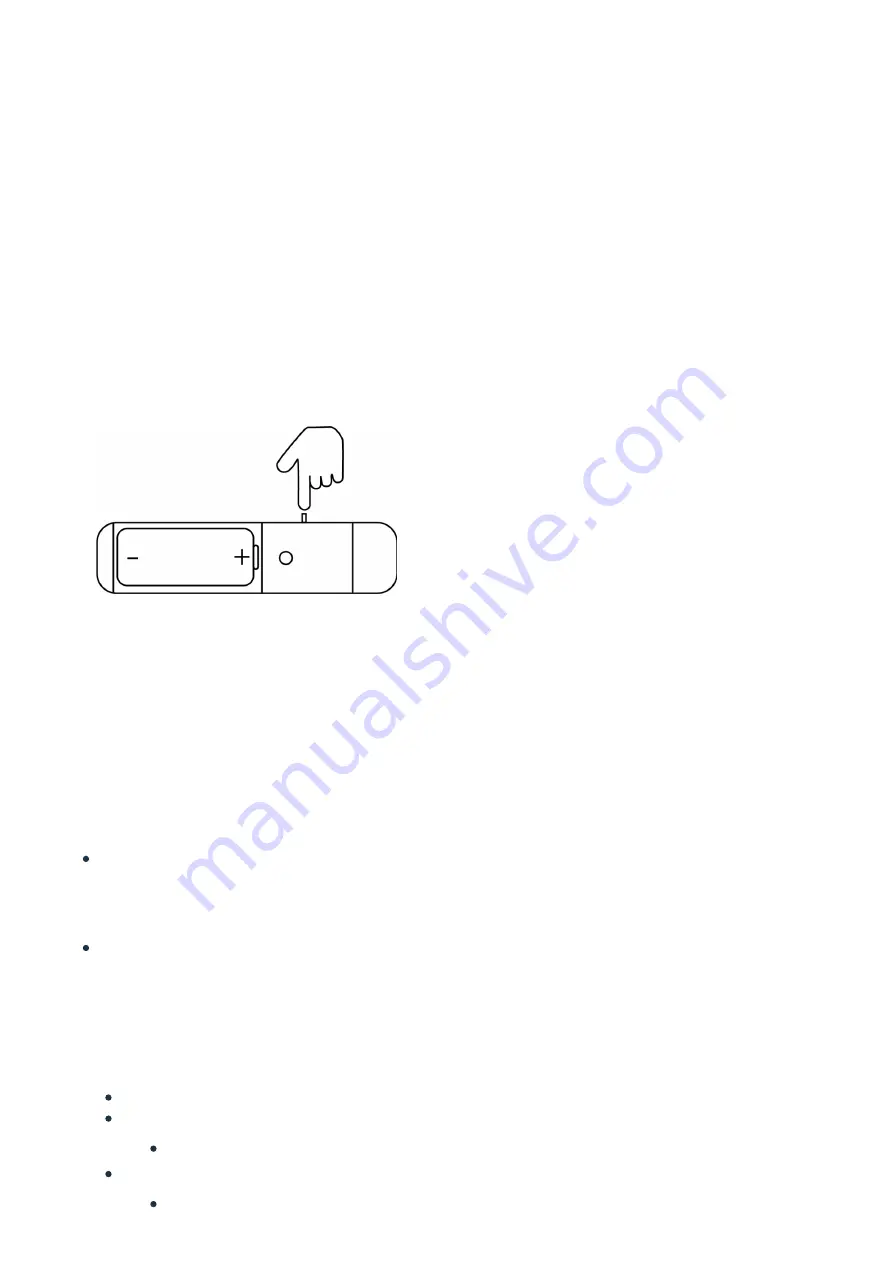
Triple-click the tamper switch on Door / Window Sensor 7 - this begins to blink green/red.

3. 

After completion of the inclusion, Close the cover.

Note: Closing the cover is important! If the housing is not closed, the sensor is permanently awake. Only when the

cover is closed does the sensor change to the idle state.

Functions of Door / Window Sensor 7.

Magnetic or Dry Contact Sensor

Once installed, the sensor will report open or close via the Notification command class to indicate a change in state to
the Z-Wave controller that it is paired to. By default the magnetic sensor is used instead of the Dry Contact Sensor. If

the unit was changed to a dry contact sensor, the internal magnetic sensor will stop performing reports.

Open/Close utilizes Notification Report.

Tamper

Tamper utilizes Notification Report.

Tilt detection

The tilt detection allows reporting the way a window is opened. This is accomplished using the command class "binary

sensor - tilt-type". In case the window is closed or opened without tilting the tilt sensor will report "Off". In case the

window is tilted an "On" is reported. The angle of inclination of the window must be at least 5°.

Tilt Sensor uses Binary Sensor Report.

Tilt Sensor reports Open when the window is opened, moving, and tilted at the same time.

Binary Sensor Report = 0xFF

When Window is closed, both Tilt Sensor and Window access will report CLOSED.

Binary Sensor Report = 0x00

Aeotec Door/Windows Sensor 7 Pro User guide : Aeotec Help Desk

https://aeotec.freshdesk.com/support/solutions/articles/6000230465

5 z 14

23. 2. 2021, 19:15

Summary of Contents for 7 Pro ZWA012

Page 1: ...be compatible with your Z Wave system or not please reference our Z Wave gateway comparison http aeotec com z wave gateways listing The https aeotec freshdesk com a solutions articles 6000218908 door...

Page 2: ...lames and extreme heat Avoid direct sunlight or heat exposure Always remove all batteries from products that are being stored and not used Batteries may damage the appliance if they leak Do not use re...

Page 3: ...Mounting can be accomplished either using the tape by peeling off the protection foil or using two screws with the holes inside the battery compartment If the tilt detection on a window only normal w...

Page 4: ...e windows where the window sits on top of the window frame mounting on the side of the window is highly recommended The sensor can be placed on any position of the door or the window Installation of t...

Page 5: ...n command class to indicate a change in state to the Z Wave controller that it is paired to By default the magnetic sensor is used instead of the Dry Contact Sensor If the unit was changed to a dry co...

Page 6: ...Aeotec Door Windows Sensor 7 Pro User guide Aeotec Help Desk https aeotec freshdesk com support solutions articles 6000230465 6 z 14 23 2 2021 19 15...

Page 7: ...ed to any type of sensor utilizing NO Normally Open dry contact sensors This can be used to detect water magnet positions tilt doorbells etc You can wire any dry contact sensor output to Terminal 2 an...

Page 8: ...Contact Pressed 2 time 3 Contact Pressed 3 time 4 Contact Pressed 4 time 5 Contact Pressed 5 time 6 Contact held down 7 Contact released Firmware Update over the Air This device is capable of receivin...

Page 9: ...and hold tamper switch for 5 seconds until the red LED blinks 3 Release the tamper switch 4 Immediately press and hold the tamper switch again a green LED will confirm reset Association Groups Associa...

Page 10: ...state will allow state of sensor to toggle OPEN CLOSE based on ON toOFF signal Parameter 3 Door Window State This parameter allows setting Door Window Sensor 7 state when the magnet is close to the se...

Page 11: ...Parameter 8 Values of ON command frame sent to Group 2 Association The value of 0 turns OFF the device 255 turns it On In the case of associating the Dimmer or Roller Shutter module values Size 1 Byt...

Page 12: ...Size 1 Byte Default Value 1 Setting Description 0 do not send tamper cancellation report 1 send tamper cancellation report Parameter 14 Central Scene Event Functionality This parameter enables disabl...

Page 13: ...1 Byte Default Value 2 Setting Description 0 On 1 Off 2 On and Off Parameter 19 BASIC command value sent to 5th Association Group on On event This is the BASIC command value sent in case of On event S...

Page 14: ...Setting Description 0 100 Time in seconds Parameter 255 Factory reset This parameter helps reset configuration parameters and the device to factory defaults Size 1 Byte Default Value 0 Setting Descrip...

Reviews: