background image

12 

Power Quality Analyzer PowerPad

®

 IV Model 8345 Quick Start Guide

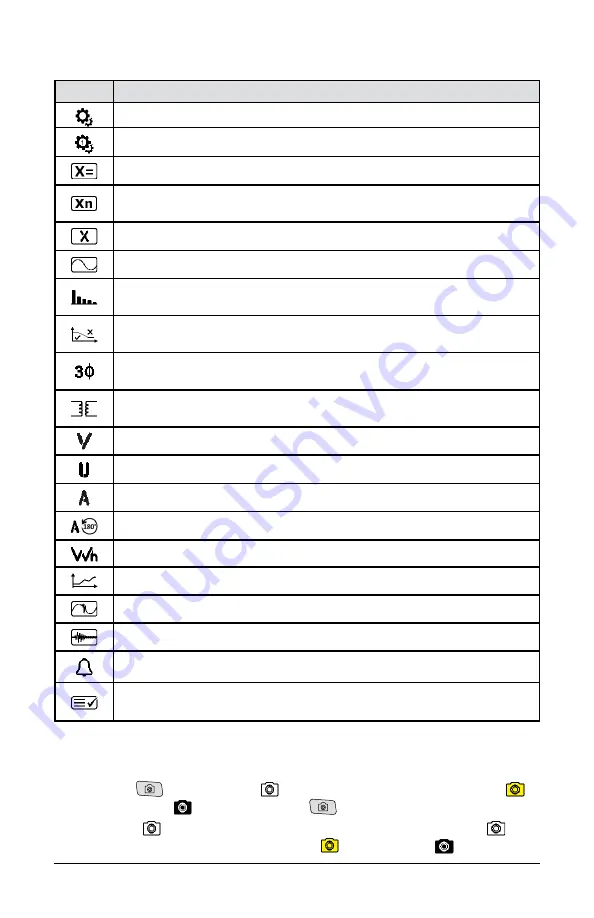
Measurement Configuration Buttons

Button Purpose

to access the configuration screen
to access the measurement configuration options

to specify the calculation methods
to specify the nominal frequency (50 Hz or 60 Hz), nominal voltage 

(with neutral), and nominal voltage between phases
to choose the real-time values to display

to specify the waveform mode
to specify the reference of levels of harmonics and mains signalling 

voltage
to specify the curve of maximum MSV voltages as a function of 

frequency. There are 5 preset points that you can modify
to choose the connection of the instrument according to the 

distribution network
to specify the voltage ratios, the current sensor ratios, and the range 

of the sensor
to choose the ratios of phase-to-neutral voltages (with neutral)

to choose the ratios of phase-to-phase voltages (without neutral)

to choose the ratios and range of current sensors

to reverse the current sensors

to configure the Energy mode
to configure the Trend mode (choice of values to record)

to configure the Transient mode (choice of triggering levels)

to configure the Inrush Current mode (choice of triggering levels)

to configure the alarms (choice of thresholds)
to enter the Monitoring mode, which is configured using the 

application software

Taking Screenshots

You have two ways to take a screenshot:




Hold the 

 button until the   symbol in the status bar turns yellow   

and then black  . Then, release the 

 button




Press the   symbol in the status bar at the top of the display. The   

symbol in the status bar will turn yellow   and then black 

Summary of Contents for 8345

Page 1: ...PowerPad IV Model 8345 Quick Start Guide ENGLISH POWER QUALITY ANALYZER WITH AEMC INSTRUMENTS Class A POWERP D IV POWERP D IV...

Page 2: ...rtificate may be requested at the time of purchase or obtained by returning the instrument to our repair and calibration facility for a nominal charge The recommended calibration interval for this ins...

Page 3: ...2140 43 1 5 ft USB Cable Cat 2140 46 1 5 8 A h 64 W h Li ion Battery Pack Cat 2960 47 1 1000 V PA32ER Power Supply Includes Power Plug Adapter Cat 5100 15 PowerPad IV Model 8345 12 Color coded ID Mark...

Page 4: ...Color coded ID Markers Cat 2140 45 Also included 1 Quick Start Guide 1 SD Card 1 USB Drive with user manual and application software 1 Carrying Bag Cat 2133 76 5 10 ft 3 m Black Leads with Alligator...

Page 5: ...ortant information to acknowledge SD card This product has been declared recyclable following an analysis of the life cycle in accordance with standard ISO 14040 This product complies with the Low Vol...

Page 6: ...instrument s specifications for voltage or category Do not use the instrument if it seems to be damaged incomplete or improperly closed Do not use the instrument without its battery Before each use c...

Page 7: ...he power cord into an outlet 4 Open the elastomer cover that protects the power socket 5 Connect the power supply s 4 point connector to the instrument The ON OFF button will blink while charging and...

Page 8: ...nergy mode Recording Modes Trend mode Transient mode Inrush Current mode Alarm mode Monitoring mode N L1 L2 L3 N L1 L2 L3 Measurement terminals Touch screen Function buttons Yellow buttons Configurati...

Page 9: ...tors for voltage terminals The same color as the terminal Strap attachment point Theft proofing device for securing the instrument with a Kensington lock RJ45 connector for Ethernet connection USB typ...

Page 10: ...ent sensors all 3 sensors 3A or only 2 A1 and A2 or A2 and A3 or A3 and A1 For three phase 4 and 5 wire networks you must indicate the connected voltages all 3 voltages 3V or only 2 V1 and V2 or V2 an...

Page 11: ...curves to adjust the display s brightness and auto off to manage the contents of the external memory to configure the network communication of the instrument to configure the Ethernet link to configur...

Page 12: ...fy the voltage ratios the current sensor ratios and the range of the sensor to choose the ratios of phase to neutral voltages with neutral to choose the ratios of phase to phase voltages without neutr...

Page 13: ...ts except harmonics powers and energies Harmonic Mode Press the button to enter Harmonics mode The Harmonics mode displays a bargraph that represents the harmonics of the voltage current and mains sig...

Page 14: ...ergy Mode Press the button to enter Energy mode The Energy mode is used to meter generated and consumed energy over a period and indicate the corresponding price Recording Modes Trend Mode Press the b...

Page 15: ...aves which are very high voltages for a very short time Inrush Current Mode Press the button and select a recording from the list to view the associated Inrush Current measurements The Inrush Current...

Page 16: ...to check the voltage s conformity for a specified duration Use the application software to configure the Monitoring mode The Monitoring mode monitors electrical networks per standard EN 50160 In this...

Page 17: ...n functions and symbols Application Software The application software is available on the provided USB drive or on our website at www aemc com dataview software Go to the Support tab and search for th...

Page 18: ...ibration certificate plus recorded calibration data Ship To Chauvin Arnoux Inc d b a AEMC Instruments 15 Faraday Drive Dover NH 03820 USA Phone 800 945 2362 Ext 360 603 749 6434 Ext 360 Fax 603 742 23...

Page 19: ...you must do to return an Instrument for Warranty Repair First send an email to repair aemc com requesting a Customer Service Authorization Number CSA from our Service Department You will be provided...

Page 20: ...AEMC Instruments 15 Faraday Drive Dover NH 03820 USA Phone 603 749 6434 800 343 1391 Fax 603 742 2346 www aemc com 11 22 99 MAN 100564 v0 Chauvin Arnoux Inc d b a AEMC Instruments All Rights Reserved...

Reviews: