background image

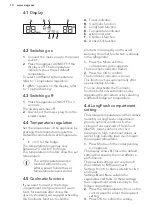
4.1 

Display

Off

min

A

B C

D

E

F

G

A.

Timer indicator

B.

Coolmatic function

C.

LongFresh function

D.

Temperature indicator

E.

Alarm indicator

F.

ChildLock function

G.

DrinksChill function

4.2 

Switching on

1.

Connect the mains plug to the power

socket.

2.

Press the appliance ON/OFF if the

display is off. The temperature

indicators show the set default

temperature.

To select a different set temperature

refer to "Temperature regulation".
If "dEMo" appears on the display, refer

to "Troubleshooting" .

4.3 

Switching off

1.

Press the appliance ON/OFF for 3

seconds.

The display switches off.

2.

Disconnect the mains plug from the

power socket.

4.4 

Temperature regulation

Set the temperature of the appliance by

pressing the temperature regulators.

Default recommended set temperature

is:

• +4°C for the fridge

The temperature range may vary

between 2°C and 8°C for fridge.

The temperature indicators show the set

temperature.

The set temperature will be

reached within 24 hours.

After a power failure the set

temperature remains stored.

4.5 

Coolmatic function

If you need to insert in the fridge

compartment a large amount of warm

food, for example after doing the

grocery shopping, we suggest activating

the Coolmatic function to chill the

products more rapidly and to avoid

warming the other food which is already

in the refrigerator.

1.

Press the Mode until the

corresponding icon appears.

The Coolmatic indicator flashes.

2.

Press the OK to confirm.

The Coolmatic indicator is shown.

This function stops automatically after

approximately 6 hours.
You can deactivate the Coolmatic

function before its automatic end by

repeating the procedure or by selecting

a different fridge set temperature.

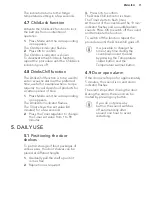
4.6 

LongFresh compartment

setting

The storage temperature and the relative

humidity in LongFresh compartment

provide optimal conditions for the

storage of various kinds of fresh food

(like fish, meat, seafood, etc.) as it

preserves its high nutritional values, as

well as high humidity level much longer

than regular refrigerator.

1.

Press Mode until the corresponding

icon appears.

The display shows 

3

. This is the default

setting that ensures the most effective

performance.

The possible settings can vary from 

1

(the coldest) to 

5

 (the warmest).

Settings from 

1

 to

 3

 are suitable for fish

and meat.

Settings 

4

 and 

5

 are suitable for

vegetables and fruits. In these settings

the compartment works similarly to the

fridge compartment.

2.

Press the temperature buttons on the

control panel to select the required

setting.

3.

Press OK to confirm the setting.

www.aeg.com

10

Summary of Contents for SKK818E9ZC

Page 1: ...USER MANUAL EN User Manual Refrigerator SKK818E9ZC ...

Page 2: ...le shooter service and repair information www aeg com support Register your product for better service www registeraeg com Buy Accessories Consumables and Original spare parts for your appliance www aeg com shop CUSTOMER CARE AND SERVICE Always use original spare parts When contacting our Authorised Service Centre ensure that you have the following data available Model PNC Serial Number The inform...

Page 3: ...ies provided that they have been properly instructed Children of less than 3 years of age should be kept away from the appliance unless continuously supervised Do not let children play with the appliance Children shall not carry out cleaning and user maintenance of the appliance without supervision Keep all packaging away from children and dispose of it appropriately 1 2 General Safety This applia...

Page 4: ...t off defrost clean dry and leave the door open to prevent mould from developing within the appliance Do not store explosive substances such as aerosol cans with a flammable propellant in this appliance If the supply cord is damaged it must be replaced by the manufacturer its Authorised Service Centre or similarly qualified persons in order to avoid a hazard 2 SAFETY INSTRUCTIONS 2 1 Installation ...

Page 5: ...le must stay below the level of the mains plug Connect the mains plug to the mains socket only at the end of the installation Make sure that there is access to the mains plug after the installation Do not pull the mains cable to disconnect the appliance Always pull the mains plug 2 3 Use WARNING Risk of injury burns electric shock or fire The appliance contains flammable gas isobutane R600a a natu...

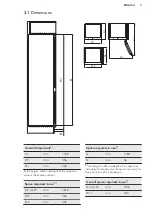
Page 6: ...e note that some of these spare parts are only available to professional repairers and that not all spare parts are relevant for all models Door gaskets will be available for 10 years after the model has been discontinued 2 7 Disposal WARNING Risk of injury or suffocation Disconnect the appliance from the mains supply Cut off the mains cable and discard it Remove the door to prevent children and p...

Page 7: ...iance without the handle and feet Space required in use1 H 2 A B mm 1816 W 2 mm 560 D 2 mm 552 Space required in use1 A mm 1780 B mm 36 1 the height width and depth of the appliance including the handle plus the space necessary for free circulation of the cooling air Overall space required in use1 H 3 A B mm 1816 W 3 mm 780 ENGLISH 7 ...

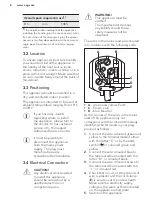
Page 8: ...accessible after installation 3 4 Electrical Connection CAUTION Any electrical work required to install this appliance should be carried out by a qualified electrician or competent person WARNING This appliance must be earthed The manufacturer declines any liability should these safety measures not be observed The wires in the mains lead are coloured in accordance with the following code A B C D E...

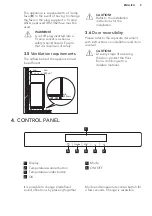
Page 9: ...00 cm2 min 200 cm2 CAUTION Refer to the installation instructions for the installation 3 6 Door reversibility Please refer to the separate document with instructions on installation and door reversal CAUTION At every stage of reversing the door protect the floor from scratching with a durable material 4 CONTROL PANEL 5 6 4 3 2 1 1 Display 2 Temperature warmer button 3 Temperature colder button 4 O...

Page 10: ...uggest activating the Coolmatic function to chill the products more rapidly and to avoid warming the other food which is already in the refrigerator 1 Press the Mode until the corresponding icon appears The Coolmatic indicator flashes 2 Press the OK to confirm The Coolmatic indicator is shown This function stops automatically after approximately 6 hours You can deactivate the Coolmatic function be...

Page 11: ...nutes 3 Press OK to confirm The DrinksChill indicator is shown The Timer starts to flash min At the end of the countdown the 0 min indicator flashes and an audible alarm sounds Press OK to switch off the sound and terminate the function To switch off the function repeat the procedure until the DrinksChill goes off It is possible to change the time at any time during the countdown and at the end by...

Page 12: ...s in the LongFresh compartment please refer to the LongFresh compartment setting section LongFresh compartment is suitable for the storage of a variety of fresh food like fish meat seafood etc as it preserves its high nutritional values as well as high humidity level much longer in comparison to the regular refrigerator 5 4 Humidity control The LongFresh compartment has stops that prevent the draw...

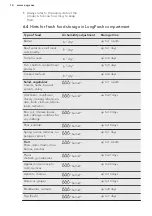
Page 13: ...ess than or equal to 4 C Higher temperature setting inside the appliance may lead to shorter shelf life of food Cover the food with packaging to preserve its freshness and aroma Always use closed containers for liquids and for food to avoid flavours or odours in the compartment To avoid the cross contamination between cooked and raw food cover the cooked food and separate it from the raw one It is...

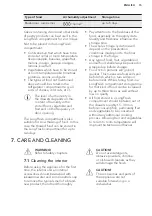
Page 14: ...humid up to 1 month Artichokes cauliflower chicory iceberg lettuce en dive lamb s lettuce lettuce leeks radicchio humid up to 21 days Broccoli Chinese leaves kale cabbage radishes Sa voy cabbage humid up to 14 days Peas kohlrabi humid up to 10 days Spring onions radishes as paragus spinach humid up to 7 days Fruit Pears dates fresh straw berries peaches humid up to 1 month Plums rhubarb gooseberri...

Page 15: ...ycle time will depend on the preservation conditions made prior to the final storage in the fridge Any type of food fruit vegetable or animal food shall always be packed or wrapped up before storage Food rich in proteins will go bad quicker This means seafood will spoil before fish which in turn will spoil before meat While storing food in a LongFresh compartment storage time for that kind of food...

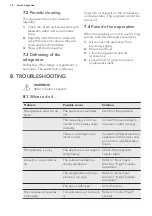
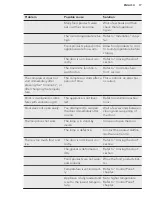
Page 16: ...sant smells 8 TROUBLESHOOTING WARNING Refer to Safety chapters 8 1 What to do if Problem Possible cause Solution The appliance does not op erate The appliance is switched off Switch on the appliance The mains plug is not con nected to the mains socket correctly Connect the mains plug to the mains socket correctly There is no voltage in the mains socket Connect a different electrical appliance to t...

Page 17: ...oor is misaligned or inter feres with ventilation grill The appliance is not level led Refer to installation instruc tions Door does not open easily You attempted to re open the door immediately after closing Wait a few seconds between closing and re opening of the door The lamp does not work The lamp is in stand by mode Close and open the door The lamp is defective Contact the nearest Author ized...

Page 18: ...onnected to the evapo rative tray above the com pressor Attach the melting water outlet to the evaporative tray Temperature cannot be set The Coolmatic function is switched on Switch off Coolmatic func tion manually or wait until the function deactivates au tomatically to set the tem perature Refer to Coolmat ic function section The temperature in the ap pliance is too low too high The temperature...

Page 19: ...d of numbers on the temperature display Temperature sensor prob lem Contact the nearest Author ized Service Centre the cooling system will continue to keep food products cold but temperature adjustment will not be possible If the advice does not lead to the desired result call the nearest Authorized Service Centre 8 2 Replacing the lamp The appliance is equipped with a longlife LED interior light ...

Page 20: ...and all other documents provided with this appliance It is also possible to find the same information in EPREL using the link https eprel ec europa eu and the model name and product number that you find on the rating plate of the appliance 11 INFORMATION FOR TEST INSTITUTES Installation and preparation of the appliance for any EcoDesign verification shall be compliant with EN 62552 Ventilation req...

Page 21: ...iners to recycle it Help protect the environment and human health by recycling waste of electrical and electronic appliances Do not dispose of appliances marked with the symbol with the household waste Return the product to your local recycling facility or contact your municipal office ENGLISH 21 ...

Page 22: ...www aeg com 22 ...

Page 23: ...ENGLISH 23 ...

Page 24: ...www aeg com shop 222377497 A 512019 ...

Reviews: