background image

Problem

Possible cause

Solution


The gasket is deformed or

dirty.

Refer to "Closing the door"

section.


Food products are not wrap‐

ped properly.

Wrap the food products bet‐

ter.


Temperature is set incorrect‐

ly.

Refer to "Control panel"

chapter.


Appliance is fully loaded and

is set to the lowest tempera‐

ture.

Set a higher temperature.

Refer to "Control panel"

chapter.


Temperature set in the appli‐

ance is too low and the am‐

bient temperature is too

high.

Set a higher temperature.

Refer to "Control panel"

chapter.

Water flows on the rear plate

of the refrigerator.

During the automatic de‐

frosting process, frost melts

on the rear plate.

This is correct.

There is too much con‐

densed water on the rear

wall of the refrigerator.

Door was opened too fre‐

quently.

Open the door only when

necessary.


Door was not closed com‐

pletely.

Make sure the door is closed

completely.


Stored food was not wrap‐

ped.

Wrap food in suitable pack‐

aging before storing it in the

appliance.

Water flows on the floor.

The melting water outlet is

not connected to the evapo‐

rative tray above the com‐

pressor.

Attach the melting water out‐

let to the evaporative tray.

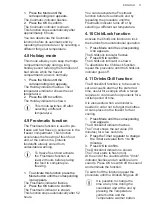
Temperature cannot be set. The Frostmatic function or

Coolmatic function is switch‐

ed on.

Switch off Frostmatic func‐

tion or Coolmatic function

manually, or wait until the

function deactivates auto‐

matically to set the tempera‐

ture. Refer to "Frostmatic

function" or "Coolmatic func‐

tion" section.

The temperature in the appli‐

ance is too low/too high.

The temperature is not set

correctly.

Set a higher/lower tempera‐

ture.


The door is not closed cor‐

rectly.

Refer to "Closing the door"

section.

ENGLISH

21

Summary of Contents for SCE818E8MF

Page 1: ...USER MANUAL EN User Manual Fridge Freezer SCE818E8MF ...

Page 2: ...usage advice brochures trouble shooter service and repair information www aeg com support Register your product for better service www registeraeg com Buy Accessories Consumables and Original spare parts for your appliance www aeg com shop CUSTOMER CARE AND SERVICE Always use original spare parts When contacting our Authorised Service Centre ensure that you have the following data available Model ...

Page 3: ...ies provided that they have been properly instructed Children of less than 3 years of age should be kept away from the appliance unless continuously supervised Children should be supervised to ensure that they do not play with the appliance Children shall not carry out cleaning and user maintenance of the appliance without supervision Keep all packaging away from children and dispose of it appropr...

Page 4: ...gents Do not use abrasive products abrasive cleaning pads solvents or metal objects When the appliance is empty for long period switch it off defrost clean dry and leave the door open to prevent mould from developing within the appliance Do not store explosive substances such as aerosol cans with a flammable propellant in this appliance If the supply cord is damaged it must be replaced by the manu...

Page 5: ...mponents The mains cable must stay below the level of the mains plug Connect the mains plug to the mains socket only at the end of the installation Make sure that there is access to the mains plug after the installation Do not pull the mains cable to disconnect the appliance Always pull the mains plug 2 3 Use WARNING Risk of injury burns electric shock or fire The appliance contains flammable gas ...

Page 6: ... of the appliance 2 6 Service To repair the appliance contact the Authorised Service Centre Use original spare parts only Please note that self repair or non professional repair can have safety consequences and might void the guarantee The following spare parts will be available for 7 years after the model has been discontinued thermostats temperature sensors printed circuit boards light sources d...

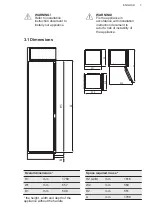
Page 7: ... with installation instruction document to avoid a risk of instability of the appliance 3 1 Dimensions B A H1 W1 D1 W2 D2 W3 D3 Overall dimensions H1 mm 1769 W1 mm 557 D1 mm 549 the height width and depth of the appliance without the handle Space required in use H2 A B mm 1816 W2 mm 560 D2 mm 551 A mm 1780 ENGLISH 7 ...

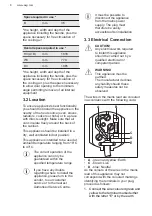
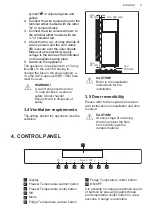
Page 8: ...rrect operation of the appliance can only be guaranteed within the specified temperature range If you have any doubts regarding where to install the appliance please turn to the vendor to our customer service or to the nearest Authorised Service Centre It must be possible to disconnect the appliance from the mains power supply The plug must therefore be easily accessible after installation 3 3 Ele...

Page 9: ... a 13 amp socket is a serious safety shock hazard Ensure that it is disposed of safely 3 4 Ventilation requirements The airflow behind the appliance must be sufficient min 200 cm2 min 200 cm2 min 38 mm min 38 mm CAUTION Refer to the installation instructions for the installation 3 5 Door reversibility Please refer to the separate document with instructions on installation and door reversal CAUTION...

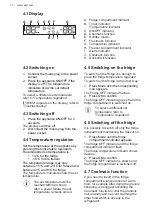
Page 10: ...icators show the set temperature The set temperature will be reached within 24 hours After a power failure the set temperature remains stored 4 5 Switching on the fridge To switch on the fridge it is enough to press the fridge temperature regulator To switch on the fridge in the other way 1 Press Mode until the corresponding icon appears The Fridge OFF indicator flashes 2 Press OK to confirm The f...

Page 11: ... automatically after 52 hours You can deactivate the Frostmatic function before its automatic end by repeating the procedure until the Frostmatic indicator turns off or by selecting a different set temperature 4 10 ChildLock function Activate the ChildLock function to lock the buttons from unintentional operation 1 Press Mode until the corresponding icon appears The ChildLock indicator flashes 2 P...

Page 12: ...ored If you do not press any button the sound switches off automatically after around one hour to avoid disturbing 4 13 Door open alarm If the fridge door is left open for approximately 5 minutes the sound is on and alarm indicator flashes The alarm stops after closing the door During the alarm the sound can be muted by pressing any button If you do not press any button the sound switches off auto...

Page 13: ...glass shelf above the vegetable drawer to ensure correct air circulation 5 3 GreenZone drawer There is a pull out drawer in the bottom part of the refrigerator compartment The glass shelf of the GreenZone is fitted with a device that regulates its sealing and can be used to manage the humidity inside the drawer 5 4 Removing GreenZone drawer It is recommended to empty the drawer before removing it ...

Page 14: ...lots closed recommended for low quantities of fruit and vegetables It provides for longer preservation of the natural moisture content in fruit and vegetables Slots opened recommended for larger quantities of fruit and vegetables It provides for more air circulation resulting in lower air moisture To remove the humidity control device open the drawer below the glass shelf and pull out the cover De...

Page 15: ...ding other fresh food during 24 hours is specified on the rating plate a label located inside the appliance When the freezing process is complete the appliance automatically returns to the previous temperature setting see Frostmatic function For more information refer to Hints for freezing 5 8 Storage of frozen food When activating an appliance for the first time or after a period out of use befor...

Page 16: ...and to save energy this way Ensure a good ventilation Do not cover the ventilation grilles or holes Make sure that food products inside the appliance allow air circulation through dedicated holes in the rear interior of the appliance 6 2 Hints for freezing Activate Frostmatic function at least 24 hours before placing the food inside the freezer compartment Before freezing wrap and seal fresh food ...

Page 17: ...could be deteriorated If the package is swollen or wet it might have not been stored in the optimal conditions and defrosting may have already started To limit the defrosting process buy frozen goods at the end of your grocery shopping and transport them in a thermal and insulated cool bag Place the frozen foods immediately in the freezer after coming back from the shop If food has defrosted even ...

Page 18: ...one 6 7 Hints for food refrigeration Fresh food compartment is the one marked on the rating plate with Meat all types wrap in a suitable packaging and place it on the glass shelf above the vegetable drawer Store meat for at most 1 2 days Fruit and vegetables clean thoroughly eliminate the soil and place in a special drawer vegetable drawer It is advisable not to keep the exotic fruits like bananas...

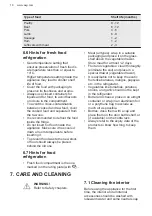
Page 19: ...t cannot be removed 7 4 Defrosting of the freezer The freezer compartment is frost free This means that there is no build up of frost when it is in operation neither on the internal walls nor on the foods 7 5 Period of non operation When the appliance is not in use for long period take the following precautions 1 Disconnect the appliance from electricity supply 2 Remove all food 3 Clean the applia...

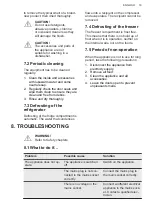
Page 20: ...re storing The door is not closed cor rectly Refer to Closing the door section The Frostmatic function is switched on Refer to Frostmatic func tion section The Coolmatic function is switched on Refer to Coolmatic function section The compressor does not start immediately after pressing the Frostmatic or Coolmatic or after chang ing the temperature The compressor starts after a period of time This ...

Page 21: ...tor Door was opened too fre quently Open the door only when necessary Door was not closed com pletely Make sure the door is closed completely Stored food was not wrap ped Wrap food in suitable pack aging before storing it in the appliance Water flows on the floor The melting water outlet is not connected to the evapo rative tray above the com pressor Attach the melting water out let to the evapora...

Page 22: ...he demonstration mode press and hold the OK button for approximately 10 seconds until you hear a long sound and the display turns off for a short time A or or symbol is shown instead of numbers on the temperature display Temperature sensor prob lem Contact the nearest Author ized Service Centre the cooling system will continue to keep food products cold but temperature adjustment will not be possi...

Page 23: ...aration of the appliance for any EcoDesign verification shall be compliant with BS EN 62552 Ventilation requirements recess dimensions and minimum rear clearances shall be as stated in this User Manual at Chapter 3 Please contact the manufacturer for any other further information including loading plans 12 ENVIRONMENTAL CONCERNS Recycle materials with the symbol Put the packaging in relevant conta...

Page 24: ...www aeg com shop 222380376 A 192022 ...

Reviews: