background image

• When you heat up water, use only the

amount you need.

• If it is possible, always put the lids on

the cookware.

• Before you activate the cooking zone

put the cookware on it.

• The cookware bottom should have

the same diameter as the cooking

zone.

• Put the smaller cookware on the

smaller cooking zones.

• Put the cookware directly in the

centre of the cooking zone.

• Use the residual heat to keep the

food warm or to melt it.

13.3 

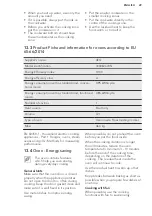
Product Fiche and information for ovens according to EU

65-66/2014

Supplier's name

AEG

Model identification

30006VL-WN

Energy Efficiency Index

100.0

Energy efficiency class

A

Energy consumption with a standard load, conven-
tional mode

0.95 kWh/cycle

Energy consumption with a standard load, fan-forced
mode

0.85 kWh/cycle

Number of cavities

1

Heat source

Electricity

Volume

72 l

Type of oven

Oven inside Freestanding Cooker

Mass

46.4 kg

EN 60350-1 - Household electric cooking

appliances - Part 1: Ranges, ovens, steam

ovens and grills - Methods for measuring

performance.

13.4 

Oven - Energy saving

The oven contains features

which help you save energy

during everyday cooking.

General hints

Make sure that the oven door is closed

properly when the appliance operates.

Do not open the door too often during

cooking. Keep the door gasket clean and

make sure it is well fixed in its position.
Use metal dishes to improve energy

saving.

When possible, do not preheat the oven

before you put the food inside.
When the cooking duration is longer

than 30 minutes, reduce the oven

temperature to minimum 3 - 10 minutes

before the end of the cooking time,

depending on the duration of the

cooking. The residual heat inside the

oven will continue to cook.
Use the residual heat to warm up other

dishes.
Keep breaks between baking as short as

possible when you prepare few dishes at

one time.

Cooking with fan

When possible, use the cooking

functions with fan to save energy.

ENGLISH

29

Summary of Contents for 30006VL-WN

Page 1: ...USER MANUAL EN User Manual Cooker 30006VL WN ...

Page 2: ...ading to get the very best from it Visit our website for Get usage advice brochures trouble shooter service information www aeg com webselfservice Register your product for better service www registeraeg com Buy Accessories Consumables and Original spare parts for your appliance www aeg com shop CUSTOMER CARE AND SERVICE Always use original spare parts When contacting our Authorised Service Centre...

Page 3: ... let children play with the appliance Keep all packaging away from children and dispose of it appropriately Keep children and pets away from the appliance when it operates or when it cools down Accessible parts are hot Children shall not carry out cleaning and user maintenance of the appliance without supervision 1 2 General Safety Only a qualified person must install this appliance and replace th...

Page 4: ...which may result in shattering of the glass Metallic objects such as knives forks spoons and lids should not be placed on the hob surface since they can get hot If the glass ceramic surface glass surface is cracked switch off the appliance to avoid the possibility of electric shock WARNING The appliance and its accessible parts become hot during use Care should be taken to avoid touching heating e...

Page 5: ...ensions Keep the minimum distance from the other appliances and units Make sure that the appliance is installed below and adjacent safe structures Parts of the appliance carry current Close the appliance with furniture to prevent touching the dangerous parts The sides of the appliance must stay adjacent to appliances or to units with the same height Do not install the appliance adjacent to a door ...

Page 6: ... oils when you cook with them The vapours that very hot oil releases can cause spontaneous combustion Used oil that can contain food remnants can cause fire at a lower temperature than oil used for the first time Do not put flammable products or items that are wet with flammable products in near or on the appliance Do not let sparks or open flames to come in contact with the appliance when you ope...

Page 7: ... appliance for 10 minutes before cooking Clean the appliance with a moist soft cloth Only use neutral detergents Do not use any abrasive products abrasive cleaning pads solvents or metal objects If you use an oven spray obey the safety instructions on the packaging Do not clean the catalytic enamel if applicable with any kind of detergent 2 5 Internal light The type of light bulb or halogen lamp u...

Page 8: ...eam outlet number and position depend on the model 3 Cooking zone 1800 W 4 Cooking zone 1200 W 5 Residual heat indicator 6 Cooking zone 2300 W 3 3 Accessories Wire shelf For cookware cake tins roasts Baking tray For cakes and biscuits Grill Roasting pan To bake and roast or as pan to collect fat Storage drawer The storage drawer is below the oven cavity 4 BEFORE FIRST USE WARNING Refer to Safety c...

Page 9: ...bols Function Off position Keep warm 1 9 Heat settings Use the residual heat to decrease energy consumption Deactivate the cooking zone approximately 5 10 minutes before the cooking process is completed Turn the knob for the selected cooking zone to a necessary heat setting To complete the cooking process turn the knob to the off position 5 2 Residual heat indicator WARNING There is a risk of burn...

Page 10: ...ns loin steaks steaks 5 15 Turn halfway through 9 Boil water cook pasta sear meat goulash pot roast deep fry chips 7 HOB CARE AND CLEANING WARNING Refer to Safety chapters 7 1 General information Clean the hob after each use Always use cookware with clean bottom Scratches or dark stains on the surface have no effect on how the hob operates Use a special cleaner applicable for the surface of the ho...

Page 11: ...hout flavour transference Conventional Cook ing To bake and roast food on one shelf position Bottom heat To bake cakes with crispy bottom and to preserve food Defrost This function can be used for defrosting frozen foods such as vegetables and fruits The defrosting time depends on the amount and size of the frozen food Grilling To grill flat food and to toast bread Light Cooking To bake in tins an...

Page 12: ... the oven the cooling fan can continue to operate until the oven cools down 8 4 Inserting the oven accessories Deep pan Push the deep pan between the guide bars of the shelf support Wire shelf and the deep pan together Push the deep pan between the guide bars of the shelf support and the wire shelf on the guide bars above All accessories have small indentations at the top of the right and left sid...

Page 13: ... next time you bake set a slightly lower oven temper ature The cake sinks and becomes soggy lumpy or streaky The baking time is too short Set a longer baking time You cannot decrease bak ing times by setting higher temperatures The cake sinks and becomes soggy lumpy or streaky There is too much liquid in the mixture Use less liquid Be careful with mixing times especially if you use a mixing machin...

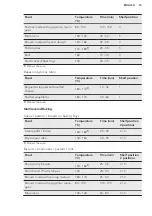
Page 14: ...short pastry 170 180 10 25 2 Flan base sponge mixture 150 170 20 25 2 Apple pie 2tins Ø20cm diagonally off set 160 60 90 2 3 1 Preheat the oven Cakes pastries breads on baking trays Food Temperature C Time min Shelf position Cake with crumble topping dry 150 160 20 40 3 Fruit flans made with yeast dough sponge mixture 1 150 35 55 3 Fruit flans made with short pastry 160 170 40 80 3 1 Use deep pan ...

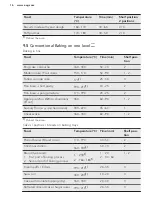
Page 15: ...5 30 1 Stuffed vegetables 160 170 30 60 1 1 Preheat the oven Multileveled Baking Cakes pastries breads on baking trays Food Temperature C Time min Shelf position 2 positions Cream puffs Eclairs 160 1801 25 45 2 4 Dry streusel cake 150 160 30 45 2 4 1 Preheat the oven Biscuits small cakes pastries rolls Food Temperature C Time min Shelf position 2 positions Short pastry biscuits 150 1601 20 40 2 4 ...

Page 16: ...ixture 170 190 20 25 2 Apple pie 2tins Ø20cm diagonally off set 180 60 90 1 2 Savoury flan e g quiche lorraine 180 220 35 60 1 Cheesecake 160 180 60 90 1 2 1 Preheat the oven Cakes pastries breads on baking trays Food Temperature C Time min Shelf posi tion Plaited bread Bread crown 170 190 40 50 2 Christmas stollen 160 1801 50 70 2 Bread rye bread 1 First part of baking process 2 Second part of ba...

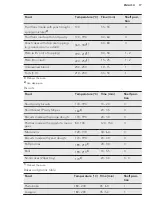
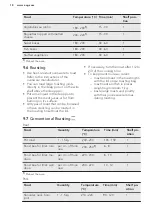
Page 17: ...reheat the oven 2 Use deep pan Biscuits Food Temperature C Time min Shelf posi tion Short pastry biscuits 170 190 10 20 3 Short bread Pastry Stripes 1601 20 35 3 Biscuits made with sponge dough 170 190 20 30 3 Pastries made with egg white merin gues 80 100 120 150 3 Macaroons 120 130 30 60 3 Biscuits made with yeast dough 170 190 20 40 3 Puff pastries 190 2101 20 30 3 Rolls 190 2101 10 55 3 Small ...

Page 18: ...can be roasted in the roasting tin without the lid If necessary turn the roast after 1 2 to 2 3 of the cooking time To keep meat more succulent roast lean meat in the roasting tin with the lid or use roasting bag roast meat and fish in pieces weighting minimum 1 kg baste large roasts and poultry with their juices several times during roasting 9 7 Conventional Roasting Beef Food Quantity Temperatur...

Page 19: ... of lamb roast lamb 1 1 5 kg 210 220 90 120 1 Saddle of lamb 1 1 5 kg 210 220 40 60 1 Game Food Quantity Temperature C Time min Shelf posi tion Saddle of hare leg of hare up to 1 kg 220 2401 30 40 1 Saddle of venison 1 5 2 kg 210 220 35 40 1 Haunch of venison 1 5 2 kg 200 210 90 120 1 1 Preheat the oven Poultry Food Quantity Temperature C Time min Shelf posi tion Poultry portions 200 250 g each 22...

Page 20: ...90 6 8 1 Roast beef or fillet well done per cm of thick ness 170 180 8 10 1 1 Preheat the oven Pork Food Quantity Temperature C Time min Shelf posi tion Shoulder neck ham joint 1 1 5 kg 160 180 90 120 1 Chop spare rib 1 1 5 kg 170 180 60 90 1 Meat loaf 750 g 1 kg 160 170 50 60 1 Pork knuckle pre cooked 750 g 1 kg 150 170 90 120 1 Veal Food Quantity Temperature C Time min Shelf posi tion Roast veal...

Page 21: ...ARNING Always grill with the oven door closed Always grill with the maximum temperature setting Set the shelf into the shelf position as recommended in the grilling table Always set the deep pan to collect the fat into the first shelf position Grill only flat pieces of meat or fish The grilling area is set in centre of the shelf 9 10 Grilling Food Temperature C Time min Shelf position 1st side 2nd...

Page 22: ...e to 100 C see the table Soft fruit Preserve Temperature C Cooking time until simmering min Continue to cook at 100 C min Strawberries blue berries raspberries ripe gooseberries 160 170 35 45 Stone fruit Preserve Temperature C Cooking time until simmering min Continue to cook at 100 C min Pears quinces plums 160 170 35 45 10 15 Vegetables Preserve Temperature C Cooking time until simmering min Con...

Page 23: ...t Clean the appliance interior after each use Fat accumulation or other food remains may result in a fire The risk is higher for the grill pan Clean stubborn dirt with a special oven cleaner Clean all accessories after each use and let them dry Use a soft cloth with warm water and a cleaning agent If you have nonstick accessories do not clean them using aggressive agents sharp edged objects or a d...

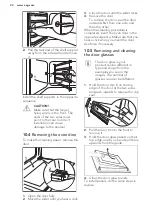
Page 24: ...t from one side and then the other When the cleaning procedure is completed insert the oven door in the opposite sequence Make sure that you hear a click when you insert the door Use force if necessary 10 5 Removing and cleaning the door glasses The door glass in your product can be different in type and shape from the examples you see in the images The number of glasses can also be different 1 Ho...

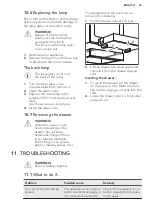
Page 25: ...awer WARNING When the oven is in use heat can build up in the drawer Do not keep flammable things in there e g cleaning materials plastic bags oven gloves paper cleaning sprays etc The drawer below the oven can be removed for cleaning 1 Pull the drawer out until it stops 1 2 2 Lift the drawer at a small angle and remove it from the drawer support rails Inserting the drawer 1 To insert the drawer s...

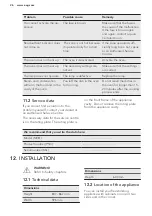
Page 26: ...ttle on the food and in the cavity of the oven You left the dish in the oven for too long Do not leave the dishes in the oven for longer than 15 20 minutes after the cooking process ends 11 2 Service data If you cannot find a solution to the problem yourself contact your dealer or an Authorised Service Centre The necessary data for the service centre is on the rating plate The rating plate is on t...

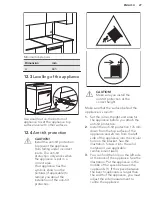
Page 27: ...otection at the correct height Make sure that the surface behind the appliance is smooth 1 Set the correct height and area for the appliance before you attach the anti tilt protection 2 Install the anti tilt protection 176 mm down from the top surface of the appliance and 24 mm from the left side of the appliance into the circular hole on the bracket See the illustration Screw it into the solid ma...

Page 28: ...ing to EU 66 2014 Model identification 30006VL WN Type of hob Hob inside Freestanding Cooker Number of cooking zones 4 Heating technology Radiant Heater Diameter of circular cooking zones Ø Left front Left rear Right front Right rear 21 0 cm 14 5 cm 14 5 cm 18 0 cm Energy consumption per cooking zone EC electric cooking Left front Left rear Right front Right rear 182 3 Wh kg 181 8 Wh kg 181 8 Wh k...

Page 29: ...Cooker Mass 46 4 kg EN 60350 1 Household electric cooking appliances Part 1 Ranges ovens steam ovens and grills Methods for measuring performance 13 4 Oven Energy saving The oven contains features which help you save energy during everyday cooking General hints Make sure that the oven door is closed properly when the appliance operates Do not open the door too often during cooking Keep the door ga...

Page 30: ...ith the symbol Put the packaging in relevant containers to recycle it Help protect the environment and human health by recycling waste of electrical and electronic appliances Do not dispose of appliances marked with the symbol with the household waste Return the product to your local recycling facility or contact your municipal office www aeg com 30 ...

Page 31: ...ENGLISH 31 ...
Page 32: ...www aeg com shop 867319985 A 282017 ...

Reviews: