


23
:: Tuning Tips
Tips for Beginners:
Before making any changes to the standard setup, make sure you can get around the track without crashing. Changes
to your vehicle will not be beneficial if you can’t stay on the track. Your goal is consistent laps.
Once you can get around the track consistently, start tuning your vehicle. Make only ONE adjustment at a time, testing
it before making another change. If the result of your adjustment is a faster lap, mark the change on the included setup
sheet (make adddtional copies of the sheet before writing on it). If your adjustment results in a slower lap, revert back to
the previous setup and try another change.
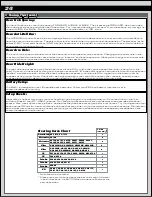
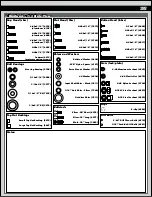
When you are satisfied with your vehicle, fill in the setup sheet thoroughly and file it away. Use this as a guide for future
track days or conditions.
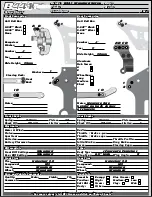
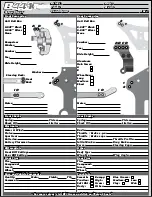
Front Arm Hole:
The kit silver springs and outside front arm hole will work best in most cases. Moving the shock to the inside hole on the
front arm requires you to add another down travel limiter to the front shocks, so there should be two down travel limit-
ers in each shock. You should also change to a stiffer spring to account for the difference in leverage on the shock.
Front Ride Height:
The standard front ride height setting is 21mm. Check the ride height by lifting up the entire car about 8-12 inches
off the bench and drop it. After the suspension “settles” into place, raise or lower the shock collars as necessary until
there is 21 mm gap from the bottom of the chassis to the ground.
Anti-Squat:
Anti-squat denotes the angle of the rear arms relative to the ground. Zero anti-squat means that the rear arms are
flat, parallel with the ground. The kit setting is 2 degrees, and can be reduced to 1 degree by removing the included #4
washer underneath the arm mount. You can add another #4 washer so that there is two washers underneath the arm
mount to get 3 degrees of anti-squat. Adding anti-squat tends to make the car “rotate” more in corners, but doesn’t
handle as well through the bumps. 1 degree will be better in bumpy sections.
Rear Camber Link Length & # of Washers under Ballstud:
Changing the length of the camber link is considered a bigger step than adjusting the ballstud height on the rear chassis
brace. Typically shortening the camber link (or lowering the ballstud) will give the rear end less roll and the car will tend
to accelerate or “square up” better. Lengthening the camber link (or raising the ballstud) will give the rear more roll and
more cornering grip. To raise the ballstud, remove washers from in-between the ballstud and upper deck. You should
normally use the kit setting and only adjust the ballstud height
Differential:
Adjust the differential (AKA ‘diff’ for short) as noted in the assembly instructions. Adjusting the rear diff is not meant to
be a tuning option. If you can hear the diff making a “barking” or “chirping” sound on jump landings or under acceleration,
either your diff is set too loose or your slipper clutch is set too tight. The front diff can go out 1/16” turn to get more
steering.
Slipper Clutch:
The assembly instructions give you a base setting for your clutch. To preserve the differentials, always start with the
slipper on the loose side and slowly tighten the adjustment nut until it is set. To adjust the slipper, remove the body and
insert a 2mm (or 5/64”) hex wrench through the center of the top deck (or through the bottom slot in the chassis).
Then, grab both of the rear wheels and rotate forwards to tighten and backwards to loosen. As you spin the wheels,
you’ll feel the motor click every ¼ of a wheel revolution. At the track, tighten or loosen the nut in 2 click increments until
you hear only a faint slipping sound for 1-2 feet on takeoffs.
Front Camber Link Length & Number of Washers Under Ballstud:
Changing the length of the camber link is considered a bigger step than adjusting the ballstud height. Typically
shortening the camber link (orlowering the ballstud) will give the front end less roll and quicken steering response.
Lengthening the camber link (or raising the ballstud) will give the front more roll and slower steering response. To raise
the ballstud, remove washers from between the ballstud and upper deck.
Front Camber:
A good starting camber setting is –1 degrees. Use the included #1719 camber gage to set your camber.
Positive camber, where the top of the tire is leaning out, is typically not recommended.
Front Toe-In:
Zero degree toe-in (tires pointing straight forward) is the setting that should be used in almost all track conditions.
Occasionally you can increase turn in by adding a little toe-out (front of tires point slightly out). Front toe in is not a typical
tuning adjustment used by The Team.
Summary of Contents for B44.1
Page 1: ...9 10 ...
Page 34: ...34 Notes ...


