background image

TPC-1051WP1551WP Series User Manual

18

3.1

Features in Windows Embedded 

TPC product supports the embedded Windows platform. This section outlines the
important features (EWF, FBWF and HORM), that are provided in WES7, and UWF
provided in Win EMB 8.1 Industry Pro.

3.2

Enhanced Write Filter (EWF) 

Enhanced Write Filter (EWF) and File-Based Write Filter (FBWF) redirect all writes
targeted at protected volumes to a RAM or disk cache, called an overlay. The overlay
stores changes made to the operating system, but is removed when the device is
restarted, restoring the device to its original state. Note that there is no disk-based
overlay support for Windows Embedded Standard 7.
EWF works at the sector level on protected disks and allows you to commit changes
so that they persist when the device is restarted. EWF is useful for thin clients that do
not need to store cached information or receive frequent updates. Changes made to
a system protected by EWF are stored in one or more layers that represent snap-
shots in time. Applying changes to an image applies all changes made to the operat-
ing system during a specific period of time.
Advantech provide utility to operate EWF. Refer below steps if you want to enable.

1.

Click 

Start Menu

->

All Programs

->

Advantech

->

AdvWF

 and click 

EWF Utility

Summary of Contents for TPC-1051WP Series

Page 1: ...User Manual TPC 1051WP 1551WP Series Industrial Touch Panel Computers with Intel Atom Processors...

Page 2: ...ten permission of Advantech Co Ltd Information provided in this manual is intended to be accurate and reliable How ever Advantech Co Ltd assumes no responsibility for its use nor for any infringe ment...

Page 3: ...to the cost of replacement materials service time and freight Please consult your dealer for more details If you think you have a defective product follow these steps 1 Collect all the information ab...

Page 4: ...rgy and if not installed and used in accordance with the instruction manual may cause harmful interference to radio communications Opera tion of this equipment in a residential area is likely to cause...

Page 5: ...Never pour any liquid into an opening This may cause fire or electrical shock 13 Never open the equipment For safety reasons the equipment should be opened only by qualified service personnel 14 If on...

Page 6: ...uivalent type recommended by the manufacturer Dis pose of used batteries according to the manufacturer s instructions Attention Danger d explosion si la pile est remplac e de fa on incor recte Remplac...

Page 7: ...Figure 2 4 Power Receptor Button Pin Assignment 12 2 1 1 Installing the Drivers 12 2 2 Transport and Unpacking 13 2 3 Panel Mounting 13 2 4 Cabinet Installation and Earth Grounding setup 14 2 5 Power...

Page 8: ...llation 39 B 4 Intel Trusted Execution Engine Driver Installation 42 B 5 Windows 7 USB 3 0 Driver Installation 46 B 6 Advantech EC Driver Installation 49 B 7 Advantech EC Brightness Control Tool Insta...

Page 9: ...Chapter 1 1 General Information...

Page 10: ...ide operating temperature solution to provide flexibility in harsh environments Bright Display The TFT LED LCD display suits industrial demands for clear interfaces Wide Operating Temperature Isolatio...

Page 11: ...sing Vibration With CFast 2 Grms 5 500 Hz With HDD 1 Grms 5 500 Hz Operating random vibration 1 3 LCD Specifications TPC 1051WP Series TPC 1551WP Series Display Type TFT LED LCD TFT LED LCD Size 10 1...

Page 12: ...ured by BYK Gardner Controller USB Interface 1 5 Power Input Voltage 24VDC 20 the fuse will become an open circuit if the input level exceeds 32 VDC Typical 24 VDC 1 5Amp for TPC 1051WP 2 0Amp for TPC...

Page 13: ...ory box Hook the clamps to the holes around the four sides of the bezel Insert the screws into every clamp and fasten them These screws will push the mounting panel and fix the unit 4 The suggested mo...

Page 14: ...TPC 1051WP1551WP Series User Manual 6 Figure 1 2 TPC 1051WP Dimensions...

Page 15: ...7 TPC 1051WP1551WP Series User Manual Chapter 1 General Information Figure 1 3 TPC 1551WP Dimensions...

Page 16: ...TPC 1051WP1551WP Series User Manual 8...

Page 17: ...Chapter 2 2 System Setup...

Page 18: ...l 10 2 1 System Setup You can easily get TPC started by following the below steps 1 Unpack the TPC package Check the packing list at the beginning of this manual to make sure all items have been inclu...

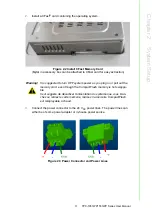
Page 19: ...ctor to the 24 VDC power lines The power lines can either be of some power adapter or in house power source Figure 2 3 Power Connector and Power Lines Warning It is suggested to turn OFF system power...

Page 20: ...ROM disc entitled TPC 1051WP TPC 1551WP which can be found in your accessory box The various drivers in the CD ROM disc have their own text files which help users install the drivers and understand th...

Page 21: ...damaged packaging indicates that ambient conditions have already had a massive impact on the device Therefore please use the original packaging during transportation and storage If the TPC is transpo...

Page 22: ...nected to earth ground Under this circumstance TPC xx51WP series could have the best performance such as EMI immunity ESD immunity Surge immunity and also system isolation If TPC xx51WP series is embe...

Page 23: ...onnect the I O to the controller if needed Step F Connect the V and V of power supply to TPC xx51WP series While completing step A to F step by step you can supply power to TPC xx51WP series now Note...

Page 24: ...ted a LAN connection will not impact the isolation design For general USB devices to solve EMI and ESD issues they are designed as a chassis and digital short But the TPC prevents damage to USB device...

Page 25: ...Chapter 3 3 Features in Windows Embedded...

Page 26: ...ed restoring the device to its original state Note that there is no disk based overlay support for Windows Embedded Standard 7 EWF works at the sector level on protected disks and allows you to commit...

Page 27: ...19 TPC 1051WP1551WP Series User Manual Chapter 3 Features in Windows Embedded 2 Click EWF tab and click Enable button 3 After the system is rebooted automatically EWF enable...

Page 28: ...to specific files and folders Writes to folders with write through exceptions will be persisted when the device restarts Advantech provide utility to operate FBWF Refer below steps if you want to enab...

Page 29: ...the command prompt and type powercfg h on 3 Run power options in control panel and then select Enable Hibernation in hibernation pane Enable EWF 1 Run OSLock and then system reboot automatically 2 Op...

Page 30: ...TPC 1051WP1551WP Series User Manual 22...

Page 31: ...Appendix A A Serial Port Settings...

Page 32: ...TPC 1051WP 1551WP Series User Manual 24 A 1 Jumper Dip switch and Connector location A 1 1 Top A 1 2 Bottom...

Page 33: ...tion This jumper is used to select CMOS Clear Enable Disable Default 1 2 2 3 Enable Clear CMOS 1 2 Disable 1 2 Disable 2 3 Enable Clear CMOS COM2 RS232 422 485 mode setting Description This switch is...

Page 34: ...85 Mode Bit 1 2 3 4 5 8 9 OFF Bit 6 7 10 ON Termination Resistor Select Description This switch is used to select Termination Resistor 120 ohm for long distance transmission or device matching Default...

Page 35: ...2 was GND 42 NC NC 41 3 3Vaux 40 GND 39 3 3Vaux 38 USB_D USB serial data interface compliant to the USB 2 0 specification 37 GND 36 USB_D 35 GND 34 GND 33 PETp0 PCI Express differential transmit pair...

Page 36: ...B Signal Pair B RX Receive S6 SATA B S7 SATA SGND Ground for signal integrity Key Key PC1 PWR CTL CDI NC PC2 PWR CTL GND GND PC3 PWR CTL TBD NC PC4 PWR CTL TBD NC PC5 PWR CTL TBD NC PC6 PWR CTL TBD NC...

Page 37: ...figuration MDI 0 is used for the receive pair 2 MDI0 3 MDI1 In BASE T Media Dependent Interface 1 1000BASE T In MDI configuration MDI 1 corre sponds to BI_DB and in MDI X configuration MDI 1 correspon...

Page 38: ...90D M DIP 070241MR009S200ZU Pin Signal Description 1 10 USB VBUS USB Power output USB2 0 5V 0 5A and USB3 0 5V 0 9A 2 11 USB_P USB2 0 date 3 12 USB_P USB2 0 date 4 13 GND Ground for Power return 5 SS...

Page 39: ...Appendix A Serial Port Settings A 4 9 COM2 RS232 422 485 connector CN16 1654000056 D SUB Conn 9P 90D M DIP 070241MR009S200ZU Pin RS232 RS422 RS485 1 DCD TX D 2 RX TX D 3 TX RX 4 DTR RX 5 GND GND GND 6...

Page 40: ...TPC 1051WP 1551WP Series User Manual 32...

Page 41: ...Appendix B B Driver Installation and Configuration...

Page 42: ...oftware Installation Utility Installation Follow the steps below to install the Intel Chipset Software Installation Utility 1 Launch Driver Root Path Intel Chipset Software Installation Util ity Setup...

Page 43: ...35 TPC 1051WP 1551WP Series User Manual Appendix B Driver Installation and Configuration 4 Click Accept 5 Click Install 6 Click Finish...

Page 44: ...ies User Manual 36 B 2 Intel Graphics Driver Installation Follow the steps below to install the Intel Graphics driver 1 Launch folder Driver Root Path Graphics Driver Intel EMGD win7 XX bit 2 Install...

Page 45: ...37 TPC 1051WP 1551WP Series User Manual Appendix B Driver Installation and Configuration 4 Click Yes 5 Click Next 6 Click Install...

Page 46: ...TPC 1051WP 1551WP Series User Manual 38 7 Click Next 8 Choose Yes then click Finish to restart...

Page 47: ...User Manual Appendix B Driver Installation and Configuration B 3 LAN Driver Installation Follow the steps below to install the LAN driver 1 Launch folder Driver Root Path LAN Win7 Install_Win7_XXX_XX...

Page 48: ...TPC 1051WP 1551WP Series User Manual 40 3 Click Next 4 Click Install...

Page 49: ...41 TPC 1051WP 1551WP Series User Manual Appendix B Driver Installation and Configuration 5 Click Finish...

Page 50: ...B 4 Intel Trusted Execution Engine Driver Installation Follow the steps below to install the Intel Trusted Execution Engine driver 1 Launch folder Driver Root Path TXE Intel TXE Firmware Win7 2 Instal...

Page 51: ...P 1551WP Series User Manual Appendix B Driver Installation and Configuration 4 Click Restart Now then the system will restart 5 Launch folder Driver Root Path TXE TXE_Win7_X_X X_X X X XXXX 6 Install S...

Page 52: ...TPC 1051WP 1551WP Series User Manual 44 7 Click Next 8 Click Next 9 Click Next...

Page 53: ...45 TPC 1051WP 1551WP Series User Manual Appendix B Driver Installation and Configuration 10 Choose Yes then click Finish to restart...

Page 54: ...ries User Manual 46 B 5 Windows 7 USB 3 0 Driver Installation Follow the steps below to install the Windows 7 USB 3 0 driver 1 Launch folder Driver Root Path USB3 Win7 SetupUSB3_X X X XX 2 Install Set...

Page 55: ...47 TPC 1051WP 1551WP Series User Manual Appendix B Driver Installation and Configuration 4 Click Yes 5 Click Next 6 Click Next...

Page 56: ...TPC 1051WP 1551WP Series User Manual 48 7 Choose Yes then click Finish to restart...

Page 57: ...Manual Appendix B Driver Installation and Configuration B 6 Advantech EC Driver Installation Follow the steps below to install the EC drivers 1 Launch folder Driver Root Path EC Vx xx xxxx 2 Install A...

Page 58: ...TPC 1051WP 1551WP Series User Manual 50 4 Click Install 5 Click Finish 6 Choose Yes then click OK to restart...

Page 59: ...on B 7 Advantech EC Brightness Control Tool Installation Follow the steps below to install the EC brightness control tool 1 Launch folder Driver Root Path EC Brightness Vx xx xxxx 2 Install AdvECBrigh...

Page 60: ...TPC 1051WP 1551WP Series User Manual 52 4 Click Install 5 Click Finish 6 Choose Yes then click OK to restart...

Page 61: ...llation and Configuration B 8 Advantech EC Watchdog Timer Driver Installation Follow the steps below to install the EC Watchdog Timer driver 1 Launch folder Driver Root Path WDT Vx xx xxxx 2 Install A...

Page 62: ...TPC 1051WP 1551WP Series User Manual 54 3 Click Next 4 Choose Advantech EC WDT then click Next...

Page 63: ...55 TPC 1051WP 1551WP Series User Manual Appendix B Driver Installation and Configuration 5 Click Install 6 Click Finish...

Page 64: ...TPC 1051WP 1551WP Series User Manual 56 7 Choose Yes then click OK to restart...

Page 65: ...stall the LMsensor driver 1 Launch folder Driver Root Path Lmsensor Vx xx xxxx 2 Install AdvLmsensor_EC_Vx xx xxxx exe 3 Next 4 Restart Note The drivers and utilities used for the panel PCs are subjec...

Page 66: ...TPC 1051WP 1551WP Series User Manual 58...

Page 67: ...Appendix C C BIOS Setup...

Page 68: ...This information is stored in flash ROM so it retains the Setup information when the power is turned off C 1 Entering Setup Turn on the computer and check for the patch code If there is a number assig...

Page 69: ...ot be configured options in blue can The right frame displays the key legend Above the key legend is an area reserved for a text message When an option is selected in the left frame it is highlighted...

Page 70: ...s can select any item in the left frame of the screen such as CPU Con figuration to go to the sub menu for that item Users can display an Advanced BIOS Setup option by highlighting it using the Arrow...

Page 71: ...S ACPI auto configuration Enable Hibernation This item allows users to enable or disable System ability to hibernate OS S4 sleep State This option may be not effective with some OS ACPI Sleep State Th...

Page 72: ...t 2 Configuration Set Parameters of Serial Port 2 COMB C 1 2 3 Embedded Controller Configuration EC Hardware Monitor This page display all information about system Temperature Voltage Current iManager...

Page 73: ...alarm event Select FixedTime system will wake on the hr min sec specified C 1 2 5 Serial Port Console Redirection Console Redirection This item allows users to enable or disable console redirection f...

Page 74: ...ertain classes of malicious buffer overflow attacks when combined with a supporting OS Windows server 2003 SP1 Windows XP SP2 RedHat Enter prise 3 update 3 Intel Virtualization Technology This item al...

Page 75: ...guration Critical Trip Point This value controls the temperature of the ACPI critical Trip Point in which the OS will shut the system off Passive Trip Point This value controls the temperature of the...

Page 76: ...he SATA controller can support SATA ODD Port SATA ODD is Port0 or Port1 SATA Mode This item allows users to select SATA mode selection Determines how SATA con troller s operate Serial ATA Port 0 Port1...

Page 77: ...Miscellaneous Configuration OS Selection OS Selection to choose Windows 8 X Windows 7 C 1 2 10LAN Controller LAN A Controller Enable or disable onboard NIC LAN B Controller Enable or disable onboard N...

Page 78: ...any RT code is executed above 1 MB Option ROM Messages Set display mode for Option ROM Boot option filter This option controls Legacy UEFI ROMs priority Network Controls the execution of UEFI and Lega...

Page 79: ...should claim by XHCI driver EHCI Hand Off This is a workaround for OSes without EHCI hand off support The EHCI ownership change should claim by EHCI driver USB Mass Storage Driver Support This item al...

Page 80: ...51WP Series User Manual 72 C 1 3 Chipset Configuration Intel IGD Configuration Configure Intel IGD Settings C 1 3 1 Intel IGD Configuration GOP Driver Enable GOP Driver will unload VBIOS Disable it wi...

Page 81: ...from the main BIOS setup menu All Security Setup options such as password protection and virus protection are described in this section To access the sub menu for the following items select the item...

Page 82: ...indicates that firmware will wait for user input before booting This means the default boot selection is not automatically started by the firmware Bootup NumLock State Select the keyboard NumLock sta...

Page 83: ...e Changes This item allows you to save changes done so far to any of the options Discard Changes This item allows you to discard changes done so far to any of the options Restore Defaults This item al...

Page 84: ...tions are subject to change without notice No part of this publication may be reproduced in any form or by any means electronic photocopying recording or otherwise without prior written permis sion of...

Reviews: