background image

PPC-315W/321W-TGL  User Manual

36

4.2.6

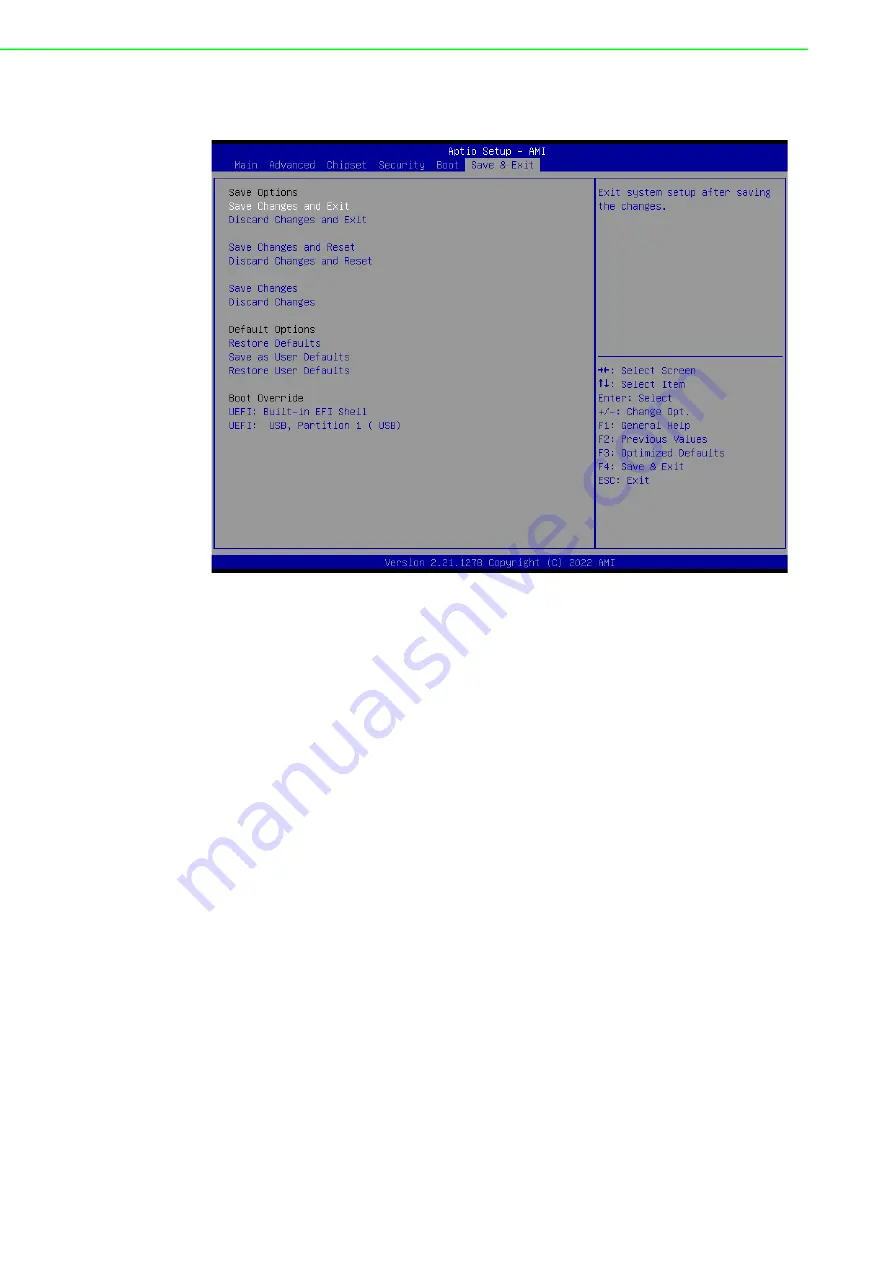
Save and Exit

Save Charges and Exit

This item allows users to exit the system setup after saving changes.

Discard Changes and Exit

This item allows users to exit the system setup without saving changes.

Save Changes and Reset

This item allows users to reset the system after saving changes.

Discard Changes and Reset

This item allows users to reset the system without saving changes.

Save Changes

This item allows users to save any changes to the setup options.

Discard Changes

This item allows users to discard any changes to the setup options.

Restore Defaults

This item allows users to restore/load default values for all setup options.

Save as User Defaults

This item allows users to save all current settings as user defaults.

Restore User Defaults

This item allows users to restore all setup options to the user default values.

Summary of Contents for PPC-315W TGL

Page 1: ...User Manual PPC 315W 321W TGL 15 6 21 5 Panel PC with TFT LED and 11th Gen Intel Core i Processor ...

Page 2: ...ntech assumes no liability under the terms of this warranty as a consequence of such events Because of Advantech s high quality control standards and rigorous testing most customers never need to use our repair service However if an Advantech product is defective it will be repaired or replaced free of charge during the warranty period For out of warranty repairs customers are billed according to ...

Page 3: ...ttentivement ce manuel d instructions de sécurité 2 Retain this startup manual for future reference Veuillez conserver ce manuel d instructions pour référence ultérieure 3 Disconnect the equipment from power outlets before cleaning Use only a damp cloth for cleaning Do not use liquid or spray detergents Débranchez l appareil de toutes les prises de courant avant le nettoyage Net toyez le uniquemen...

Page 4: ...e of the following occurs have the equipment checked by service person nel Si l un des cas suivants se produit demandez aide à un technicien qualifié The power cord or plug is damaged Le cordon d alimentation ou la fiche est endommagé Liquid has penetrated the equipment Le liquide a pénétré dans l appareil The equipment has been exposed to moisture L appareil a été exposé à l humidité The equipmen...

Page 5: ...SEMENT Ces instructions sont fournies conformément aux normes IEC 704 1 Advantech decline toute responsabilité quant à la précision de toute déclaration contenue dans le présent document 20 Do not expose the equipment to direct sunlight or install the equipment in an environment with direct sunlight as this may cause damage Safety Precautions Static Electricity Follow the simple precautions detail...

Page 6: ... type Replace only with the same or equivalent type recommended by the manufacturer Dispose of used batteries according to the manu facturer s instructions Par exemple Si la batterie est remplacée par un modèle inapproprié il y a un risque d explosion Remplacer les produits identiques ou équiva lents recommandés par le fabricant Traitement des piles usagées selon les instructions du fabricant Note...

Page 7: ... 2 7 Retention Screws on HDD Bracket 11 Figure 2 8 HDD Module Bracket 11 Figure 2 9 SATA Cable Connected to SATA HDD 11 Figure 2 10Secure SATA HDD with Screws 12 Figure 2 11SATA HDD Connected to the Motherboard 12 2 2 3 Install M 2 Devices 12 Figure 2 12M 2 Installation 12 Figure 2 13Stick Thermal Pad on M 2 13 2 2 4 Install WiFi module 13 Figure 2 14 Assemble Bracket with Antenna Cable 13 Figure ...

Page 8: ...net 24 Chapter 3 Jumper Settings 25 3 1 Motherboard Jumpers and Connectors 26 Figure 3 1 Motherboard 26 3 1 1 COM1 Pin 9 Power Select 26 3 1 2 RTC Select 27 3 1 3 ATX AT Select 27 3 1 4 Touch Power Select 27 3 2 External COM Ports and Pin Definitions 28 Figure 3 2 Location of COM1 and COM2 Ports 28 Chapter 4 Software Setup 29 4 1 Driver Installation 30 4 2 BIOS Setup Utility 30 4 2 1 Main Setup 30...

Page 9: ...Chapter 1 1 General Information This chapter details general infor mation regarding PPC 315W 321W TGL Introduction Specifications Dimensions ...

Page 10: ...LCD Ultra thin fanless design with solid aluminum alloy enclosure Intel 11th Gen Core i CPU with fanless design Dual channel memory slots max 64G Supports dual displays 1 x external HDMI 1 x M 2 bay 2242 2280 NVME or SATA Interface for storage and support SATA RAID 0 1 1 x 2500BASE T Ethernet Supports Time Sensitive Network TSN technology Support TPM2 0 hardware security Supports Type C USB only 1...

Page 11: ...emonstrated below VESA mount screws 4 x M4 screws Screw depth 12 mm max Figure 1 2 Rear Panel 1 5 Panel Bottoms The system s I O located on the bottom of the device Figures 1 3 are listed below 1 x Power input connector 1 x Power switch 1 x RS 232 connector COM1 1 x RS 232 422 485 connector COM2 2 x RJ45 GbE 3 x USB 3 2 1 x USB 2 0 1 x Type C USB only 1 x HDMI 1 x Line out Figure 1 3 Panel PC Bott...

Page 12: ...PPC 315W 321W TGL User Manual 4 1 6 Dimensions Figure 1 4 PPC 315W TGL Dimensions Figure 1 5 PPC 321W TGL Dimensions ...

Page 13: ... 1 x M 2 2280 bay Co lay SATA for storage only support RAID 0 1 support NVME Network LAN 1 x Intel I219LM controller Speed 10M 100M 1000M 1 x Intel I225LM controller Speed 10M 100M 1000M 2500M I O Ports 1 x RS 232 1 x RS 232 422 485 adjustable through BIOS 3 x USB 3 2 1 x USB 2 0 1 x Type C USB3 only output 5V 3A 1 x HDMI1 4 1 x Line out Expansion 1 x M 2 2230 E key for wireless card Watchdog Time...

Page 14: ... above were as follows Memory 16 GB DDR4 3200 HDD 64 GB SSD OS Windows 10 64 bit Software Burn In Test 8 1 Part Number Description Image PPC 315W PB50A PPC 315W PB30A PPC 315W PB70A PPC 321W PB50A PPC 321W PB30A PPC 321W PB70A Panel PC with Intel 11th Core i proces sor 96PSA A150W19P2 4 Power adapter 100 240VDC 150W 19V PPC WLAN C1E PPC WLAN D2 Wi Fi module with antenna PPC ARM A03 Arm mount VESA ...

Page 15: ...Chapter 2 2 System Installation and Setup Quick System Tour Memory Card Installation HDD Installation M 2 Installation Wireless LAN Card Installation Mounting the System ...

Page 16: ... and ports as shown in Figure 2 3 When placed upright the PPC 315W 321W TGL front panel should appear as shown in Figure 2 1 Since PPC 315W 321W TGL are series models the following photos in the manual are PPC 315W examples Figure 2 1 Panel PC Front View 1 Power status LED Off S5 Orange Sleep S3 Orange On S0 Blue Figure 2 2 Panel PC Rear View 1 Speaker 2 GND screw ...

Page 17: ...SB3 2 G 1 x Type C H COM1 RS 232 I DC in J Power button 2 2 Installation Procedures When installing system hardware adhere to the following order 1 Install the memory card 2 Install SATA HDD or M 2 storage devices 3 Install peripheral devices 4 Mount the panel PC 5 Configure the system 2 2 1 Memory Card Installation 1 Remove the 10 screws from rear cover Figure 2 4 Retention Screws on Rear Cover ...

Page 18: ...tect film before use the thermal pad Figure 2 5 Memory Card Installation b Remember to stick CPU thermal pad Figure 2 6 Stick Thermal Pad Warning Ensure that the thermal pad provided in the accessory box is placed on top of the CPU memory card as shown in Figure 2 6 Assurez vous que le tampon thermique fourni dans la boîte d acces soires est placé sur la carte mémoire comme illustré à la Figure 2 ...

Page 19: ...up 2 2 2 Install SSD 1 Remove the screw of rear cover 2 Remove 4 screws of HDD bracket Figure 2 7 Retention Screws on HDD Bracket 3 Take out screws and cable from accessory box Figure 2 8 HDD Module Bracket 4 Insert cable to SSD Figure 2 9 SATA Cable Connected to SATA HDD ...

Page 20: ...SSD on the bracket Figure 2 10 Secure SATA HDD with Screws 6 Install the SSD kit to machine Figure 2 11 SATA HDD Connected to the Motherboard 2 2 3 Install M 2 Devices 1 Remove rear cover 2 Assemble M 2 on motherboard Figure 2 12 M 2 Installation ...

Page 21: ...allation and Setup 3 Take out the thermal pad from accessory box and stick on M 2 Figure 2 13 Stick Thermal Pad on M 2 2 2 4 Install WiFi module 1 Remove rear cover 2 Assemble antenna bracket on antenna cable Figure 2 14 Assemble Bracket with Antenna Cable ...

Page 22: ...PPC 315W 321W TGL User Manual 14 3 Assemble WiFi card Figure 2 15 Assemble WiFi Card 4 Assemble the rear cover and install antenna Figure 2 16 Assemble WiFi Antenna ...

Page 23: ...g the power lines into the system power receptor DC power source shall be complied with ES1 requirements output rating is 12 30Vdc 8 4A with minimum operating temperature 50 C and has to be evaluated according to IEC UL 60950 1 and or IEC UL 62368 1 Figure 2 17 Terminal block The terminal block is suitable for 16 AWG min Torque value 4 5 lb in min User cop per conductors only Must be installed by ...

Page 24: ...ns of the two plate screws holes on the wall 3 Drill two pilot holes at the marked locations on the wall 4 Align the wall mount plate screw holes with the pilot holes 5 Secure the mount plate to the wall by inserting screws into the two pilot holes and tightening them Figure 2 18 Wall Mount Plate Warning When mounting the panel PC more than one person should perform the installation to prevent acc...

Page 25: ...mount the panel PC on the wall align the wall mount bracket attached to the panel PC with the wall mount plate on the wall and slide the panel PC down wards to hang the bracket on the mount plate Figure 2 20 Mounting the Panel PC on a Wall Warning Ensure that the thread depth of the screws on the rear panel does not exceed 4 mm 0 15 in Assurez vous que la profondeur du filetage des vis sur le pann...

Page 26: ...cording to the Panel PC dimensions Panel cutout dimensions PPC 321W XBXX 550 30 x 341 80 mm 21 67 x 13 46 in PPC 315W XBXX 413 x 262 mm 16 26 x 10 31 in 2 Insert the panel PC into the cutout Retrieve the hook brackets and M6 x 21L screws from the accessory box 10 for PPC 315W TGL 12 for PPC 321W TGL Veuillez installer le panneau PC dans la découpe Récupérez les crochets et les vis M6 x 21L de la b...

Page 27: ...s into the holes following the direction of the arrows shown in Figure 2 25 and hang the panel PC Figure 2 23 Hook Brackets Location 4 Tighten the screws to secure the panel PC in place Figure 2 26 Figure 2 24 Fasten the Hook Bracket Figure 2 25 Panel Mount Rear View Take PPC 315W drawing as example ...

Page 28: ...e mounting arm to correctly mount the arm onto the surface as a base 2 Align the retention screw holes on the mounting arm interface with VESA holes in the panel PC and secure the panel PC with the four M4 retention screws Figure 2 26 Arm Mount for Panel PC 2 3 4 Stand Mounting Before stand mounting check that the product was shipped with the following items Warning Ensure that the thread depth of...

Page 29: ...e steps below 1 Use four M4 x 8L screws to affix the VESA bracket to the panel PC Users can choose 100 x 100 mm 3 93 x 3 93 in VESA mount according to their require ments Figure 2 27 VESA Mount Screw Holes 2 Use the four M4 x 8L screws to secure the base plate to the mount stand Figure 2 28 Securing the VESA Mount Base ...

Page 30: ... 3 Use four M4 x 6L screws to secure the mount stand to the VESA mount bracket Figure 2 29 Securing the VESA Mount Bracket 4 Use one M4 x 5L screw to secure the stand mount hinge cover Figure 2 30 Securing the Stand Mount Hinge Cover ...

Page 31: ...earth ground PPC system should give the best performance for EMI optimum EMI immunity ESD immunity surge immunity and system isolation If the PPC system is embedded in the cabinet the PPC system s ground cabinet s ground and earth ground should be connected together 1 Install the PPC system into the cabinet Figure 2 32 Install PPC into Cabinet Step A Connect the cabinet to the earth ground Step B ...

Page 32: ...t the ground pin of PPC system to the cabinet Step E Connect the I O to the controller if needed Step F Connect the V and V of power supply to PPC system Note The wire of the protective earthing conductor shall be green and yellow xx AWG 0 75mm2 and connecting to earth of building Ensure that the voltage of the power source is correct before connecting the equipment to a power outlet By means of a...

Page 33: ...Chapter 3 3 Jumper Settings Jumpers and Connectors External COM Ports and Pin Definitions ...

Page 34: ...f the chassis Figure 3 1 Motherboard The internal jumpers and connectors on the motherboard and their pinouts are listed in the table below 3 1 1 COM1 Pin 9 Power Select Connector Function CN34 M 2 M Key 2280 or 2242 CN67 M 2 E Key 2230 JP1 RTC Select JP4 Resistance Touch Power Select JP7 COM1 Pin 9 Power Select JP8 ATX AT Select JP7 Function 1 2pin COM1 RI Default 2 3pin COM1 Pin 9 5V 4 5pin COM1...

Page 35: ...ATX AT Select 3 1 4 Touch Power Select Note Resistive touch model JP3 need add jumper projected capacitive touch model JP3 need pull off jumper JP1 Function 1 2pin Normal Default 2 3pin Clear CMOS JP8 Function 2 3pin ATX power Default 1 2pin AT power JP4 Function Open PCT Closed RES ...

Page 36: ...as RI by default This setting can be changed to 5V or 12V output using a jumper COM2 RS 232 422 485 Note COM2 does not support ring function Pin COM1 COM2 RS 232 RS 232 RS 422 RS 485 1 DCD DCD TX DATA 2 RXD RXD TX DATA 3 TXD TXD RX NC 4 DTR DTR RX NC 5 GND GND GND GND 6 DSR DSR NC NC 7 RTS RTS NC NC 8 CTS CTS NC NC 9 Ring or 5V 12V output RING NC NC ...

Page 37: ...Chapter 4 4 Software Setup Driver Installation BIOS Setup Program ...

Page 38: ... ensure full functionality All drivers can be downloaded from the Advantech website http www advantech com 4 2 BIOS Setup Utility 4 2 1 Main Setup You can enter BIOS setup utility by pressing Delete You should always press F4 to save the settings you have made and exit the setup utility otherwise those settings will not be saved in BIOS ...

Page 39: ...er Manual Chapter 4 Software Setup 4 2 2 Advanced BIOS Features Setup Following is COM2 Mode Selection RS232 RS422 RS485 1 Select NCT6126D Super IO Configuration in the Advanced tab 2 Select Serial Port 2 Configuration option ...

Page 40: ...W 321W TGL User Manual 32 3 Select Serial Port 2 Mode option to set the COM2 operation mode as RS232 RS422 or RS485 4 If COM2 mode is set as RS485 the RS485 Auto Flow control option can be Enabled or Disabled ...

Page 41: ... PPC 315W 321W TGL User Manual Chapter 4 Software Setup 4 2 3 Chipset Configuration Following is Wake on LAN 1 Select PCH IO Configuration option in the Chipset tab 2 Set the Wake On By option to Enabled ...

Page 42: ...PPC 315W 321W TGL User Manual 34 4 2 4 Security Set Administrator Password ...

Page 43: ...item allows users to set the number of seconds to wait for setup activation key 65535 oxFFFF means indefinite waiting Bootup NumLock State This item allows users to select the keyboard NumLock state Quiet Boot This item allows users to enable disable quiet boot option Boot Option 1 Boot Option 2 ...

Page 44: ...ard Changes and Reset This item allows users to reset the system without saving changes Save Changes This item allows users to save any changes to the setup options Discard Changes This item allows users to discard any changes to the setup options Restore Defaults This item allows users to restore load default values for all setup options Save as User Defaults This item allows users to save all cu...

Page 45: ...Appendix A A BSMI RoHS ...

Page 46: ...mium Cr 6 多溴聯苯 Polybrominated biphenyls PBB 多溴二苯醚 Polybrominated diphenyl ethers PBDE 液晶面板 電路板 配件 電源 供應器 其它固定組件 螺絲 內外殼 外 殼 按鍵 支 架 等 備考 1 超出 0 1 wt 及 超出 0 01 wt 係指限用物質之百分比含量超出百分比含 量基準值 Note 1 Exceeding 0 1 wt and exceeding 0 01 wt indicate that the percentage content of the restricted substance exceeds the reference percentage value of presence condition 備考 2 係指該項限用物質之百分比含量未超出百分比含量基準值 Note 2 indica...

Page 47: ...Appendix B B BSMI Series Models ...

Page 48: ...5 T PPC315WPB2706 T PPC315WPB2801 T PPC315WPB2802 T PPC315WPB2803 T PPC315WPB2804 T PPC315WPB2805 T PPC315WPB2806 T PPC 321W PB 產品附錄型號 PPC 321W PB50A PPC 321W PB50AU PPC 321W PB30A PPC 321W PB30AU PPC 321W PB70A PPC 321W PB70AU PPC 321W PB50B PPC 321W PB30B PPC 321W PB70B PPC 321W PB50BU PPC 321W PB30BU PPC 321W PB70BU PPC 321W PB50C PPC 321W PB30C PPC 321W PB70C PPC 321W PB50CU PPC 321W PB30CU PP...

Page 49: ...41 PPC 315W 321W TGL User Manual Appendix B BSMI Series Models ...

Page 50: ...re subject to change without notice No part of this publication may be reproduced in any form or by any means such as electronically by photocopying recording or otherwise without prior written permission from the publisher All brand and product names are trademarks or registered trademarks of their respective companies Advantech Co Ltd 2023 ...

Reviews: