background image

   IPC-6520   User's Manual   9

Chapter 3  Touchscreen Installation

The IPC-6520 is ideally suited for installing a touchscreen into its front
panel. A touchscreen is an interface that allows you to access informa-
tion about your application directly from your monitor's screen instead
of having to use your computer’s keyboard. This section will assist you
in installing your touchscreen (if you have one) into the IPC-6520.  For
information about connecting your touchscreen to your PC, refer to your
touchscreen's user’s manual.

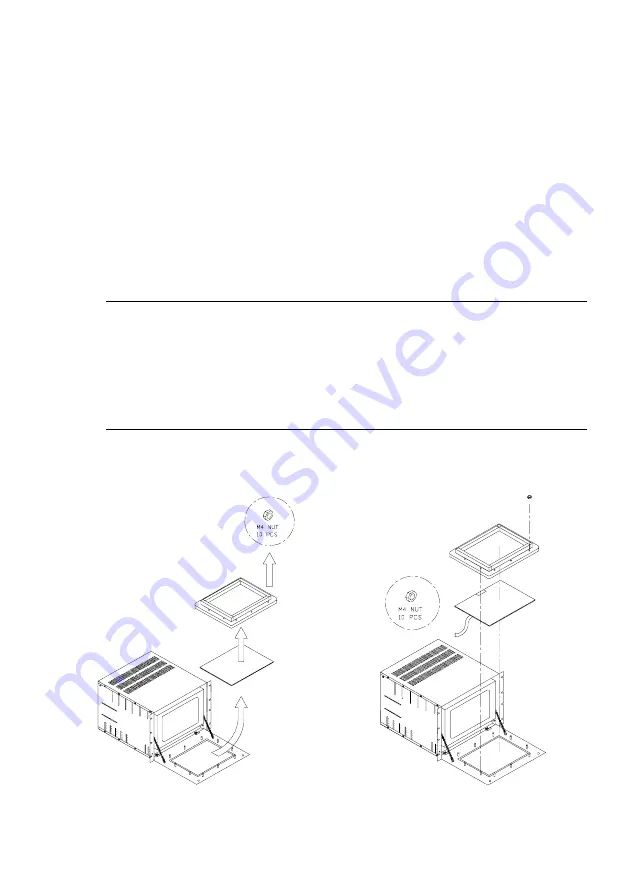
3.1. Removing the IPC-6520’s screen

Before installing your touchscreen, you must first remove the
IPC-6520’s Lexan screen from its front panel.  Figure 3-1 shows how
this is done. After removing the screen, store it in a safe place to avoid
damage.

3.2. Installing the touchscreen

After you have read through your touchscreen manual and have con-
nected the interface, replace the IPC-6520’s Lexan screen with your
new touchscreen. Figure 3-2 (below) shows how this is done.

Figure 3-2: Installing the IPC-6520's screen

Figure 3-1: Removing the IPC-6520's screen

Summary of Contents for IPC-6520

Page 1: ...IPC 6520 Universal Rackmount Monitor Kit...

Page 2: ...Co Ltd Information provided in this manual is intended to be accurate and reliable However Advantech Co Ltd assumes no responsibility for its use nor for any infringements upon the rights of third par...

Page 3: ...en 3 2 2 Hinge assembly 3 2 4 Support braces 4 2 3 Left and right panel assembly 4 2 5 Attaching the front panel screen 5 2 6 Attaching the mounting brackets 5 2 7 Attaching the monitor s retainers 6...

Page 4: ...4 Figure 2 5 Attaching the front panel screen assembly 5 Figure 2 6 Attaching the mounting brackets 5 Figure 2 7 Attaching the monitor s retainers 6 Figure 2 8 Locating the monitor s retainers 6 Figu...

Page 5: ...gainst the shock and vibration found in industrial environments Combine this flexible rackmount monitor kit with the PCA 6570 Touchscreen Kit and IPC 610 Industrial PC Chassis and you ll have a high p...

Page 6: ...2 IPC 6520 User s Manual 1 4 Dimensions Figure 1 1 IPC 6520 s dimensions Unit mm...

Page 7: ...e diagram below Figure 2 1 Front panel screen assembly 2 2 Hinge assembly The IPC 6520 s front panel screen can be opened and closed using two hinges that are attached to the base of the enclosure The...

Page 8: ...base of the enclosure The illustration below shows all the necessary hardware and illustrates how to attach these panels Figure 2 3 Left and right panel assembly 2 4 Support braces The illustration b...

Page 9: ...o the right and left sides of the enclosure Be sure to attach the chains from the front panel assembly to the sides of the unit as shown below The following diagram illustrates where and how to mount...

Page 10: ...rst illustration Figure 2 7 shows the position of the two bottom retainers and Figure 2 8 shows the position of the other retainers We suggest you attach these last two retainers after you have instal...

Page 11: ...e 2 9 Attaching the top panel 2 9 The final assembly After completing all of the above procedures your IPC 6520 rackmount monitor should look exactly like the one shown in the following illus tration...

Page 12: ...8 IPC 6520 User s Manual...

Page 13: ...out connecting your touchscreen to your PC refer to your touchscreen s user s manual 3 1 Removing the IPC 6520 s screen Before installing your touchscreen you must first remove the IPC 6520 s Lexan sc...

Page 14: ...10 IPC 6520 User s Manual...

Page 15: ...Parts List This appendix shows and describes each of the IPC 6520 s components If you need extra or spare parts for this kit refer to this appendix and contact your local dealer for ordering assistan...

Page 16: ...12 IPC 6520 User s Manual...

Reviews: