background image

73

EKI-1526(TI) | 1528(TI) User Manual


7.1

Overview

The purpose of the Console Configuration is to help you manage your device in con-
sole mode. One of the main functions of the console mode is to change the web con-
figuration login password. You can use terminal software like Hyper Terminal, Telix
and other related terminal software.

7.2

Telnet Console

7.2.1

Create a new connection

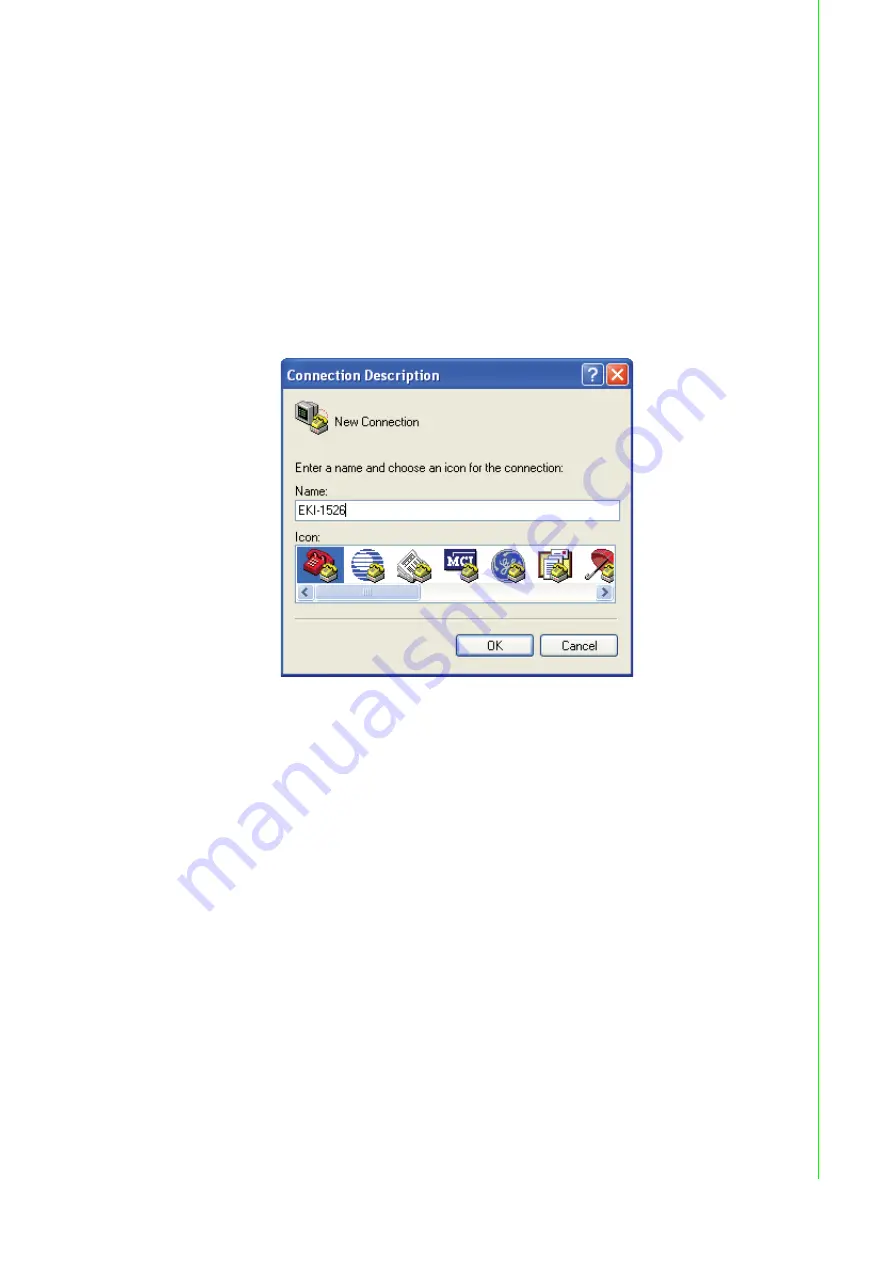
You can create a new Telnet connection and assign a connection name for the con-
sole configuration.

Figure 7.1 Creating a Telnet Connection

Summary of Contents for EKI-1526

Page 1: ...User Manual EKI 1526 I TI EKI 1528 I TI 8 16 port RS 232 422 485 Serial Device Server Rackmount...

Page 2: ...lation Advantech assumes no liability under the terms of this warranty as a consequence of such events Because of Advantech s high quality control standards and rigorous testing most of our customers...

Page 3: ...able protection against harmful interference when the equipment is operated in a commercial environment This equipment generates uses and can radiate radio frequency energy and if not installed and us...

Page 4: ...16 port serial device server EKI 1500 driver utility and documentation CD Rack mount kits including two L shape metal plates and 12 screws Warning Warnings indicate conditions which if not observed ca...

Page 5: ...e equipment is not used for a long time disconnect it from the power source to avoid damage by transient overvoltage 12 Never pour any liquid into an opening This may cause fire or electrical shock 13...

Page 6: ...install a card may damage sensitive elec tronic components Technical Support and Assistance 1 Visit the Advantech web site at www advantech com support where you can find the latest information about...

Page 7: ...r manual is intended to guide professional installers in installing and config uring the Serial Device Server It includes technical specifications software utility introduction as well as procedures f...

Page 8: ...lity Settings 21 3 4 2 Discovering Your Device Server 23 3 4 3 Network Settings 25 3 5 Administrator Settings 28 3 5 1 Locate the Serial Device Server 28 3 5 2 Securing the Serial Device Server 29 3 5...

Page 9: ...hernet Configuration 54 6 5 Port Configuration 55 6 5 1 Basic 55 6 5 2 Operation 56 6 5 3 Advanced 58 6 6 Monitor 59 6 6 1 Setting 60 6 6 2 Statistic 61 6 6 3 Connected IP 62 6 7 Alert 63 6 7 1 Settin...

Page 10: ...9 7 4 5 mctrl 79 7 4 6 mdata 79 7 4 7 net 80 7 4 8 password 80 7 4 9 alarm 80 7 4 10 monitor 81 7 4 11 time 81 7 4 12 service 81 7 4 13 mrfc2217 81 7 4 14 apply 81 7 4 15 exit 81 7 4 16 help 81 7 4 17...

Page 11: ...onfiguration Utility 23 Figure 3 10 Selecting a Group 24 Figure 3 11 Selecting a Device 24 Figure 3 12 Viewing Basic Settings 25 Figure 3 13 Network Settings Overview 26 Figure 3 14 Reset Device 27 Fi...

Page 12: ...gure 6 9 Monitor Connected IP 62 Figure 6 10 Alarm Setting 63 Figure 6 11 Alarm Event 65 Figure 6 12 Syslogd Syslogd Setting 66 Figure 6 13 Syslogd Syslogd Message 67 Figure 6 14 Tools Ping 68 Figure...

Page 13: ...Chapter 1 1Overview...

Page 14: ...point to point direct serial connections within the plant throughout the fac tory the facility the office building or across the global enterprise The EKI 1526 TI 1528 TI are industrial grade network...

Page 15: ...tive Humidity 10 95 non condensing Ethernet Communications Compatibility IEEE 802 3 IEEE 802 3u IEEE 802 3ab Speed 10 100 1000 Mbps auto MDI MDIX Port Connector 8 pin RJ45 Ports 2 x RJ45 Protection Bu...

Page 16: ...Operation Modes COM port redirection mode Virtual COM TCP UDP server polling mode TCP UDP client event handling mode Pair connection peer to peer mode RFC2217 mode Configuration Windows utility Telne...

Page 17: ...Chapter 2 2Getting Started...

Page 18: ...r further details No Item Description 1 Reset button Button allows for system soft reset 3 sec 2 Serial port DB9 pinout console port female 3 System LED panel See LED Indicators on page 8 for further...

Page 19: ...Screw terminal used to ground chassis No Item Description 1 Power button Turn the device off and on 2 AC power in Supports 100 240 VAC 50 60 Hz 3 Serial port DB9 pinout supports RS 232 422 485 4 ETH...

Page 20: ...dy 1cycle sec OFF System is not working 5 Speed AMBER ON 1000 Mbps speed OFF 10 100 Mbps speed 6 TX AMBER ON Data being transmitted OFF No data being transmitted No LED Name LED Color Status Descripti...

Page 21: ...EKI 1526 EKI 1526I Figure 2 9 EKI 1526 EKI 1526I Dimensions 6 TX AMBER ON Data being transmitted OFF No data being transmitted No LED Name LED Color Status Description LAN1 LAN2 5 1 6 2 7 3 8 4 13 9...

Page 22: ...EKI 1526 TI 1528 TI User Manual 10 The following view shows the EKI 1528 EKI 1528I Figure 2 10 EKI 1528 EKI 1528I Dimensions 8 65 0 34 12 0 47 6 60 0 26 43 60 1 72 259 20 10 21 438 17 24...

Page 23: ...TI User Manual The following view shows the EKI 1526T EKI 1526TI Figure 2 11 EKI 1526T EKI 1526TI Dimensions LAN1 LAN2 5 1 6 2 7 3 8 4 13 9 11 10 14 15 12 16 8 65 0 34 12 0 47 9 60 0 38 43 60 1 72 259...

Page 24: ...EKI 1526 TI 1528 TI User Manual 12 The following view shows the EKI 1528T EKI 1528TI Figure 2 12 EKI 1528T EKI 1528TI Dimensions 8 65 0 34 12 0 47 43 60 1 72 438 17 24 9 60 0 38 259 20 10 21...

Page 25: ...Installing the Switch 2 2 2 Serial Connection EKI 1526 TI 1528 TI Series provides 8 16 ports DB9 male connectors RS 232 422 485 pin assignments as below Figure 2 15 DB9 Pin Assignment EKI 1526I Conso...

Page 26: ...al power source with the included power cord and check the power LED is on The fol lowing figure illustrates the power socket location on the rear side of a EKI 1528T EKI 1528TI or EKI 1526T EKI 1526T...

Page 27: ...Chapter 3 3Utility Configuration...

Page 28: ...s Configure the network settings you can set the IP address Gateway address and Subnet mask View and set the serial port parameters configure operating mode baud rate serial port settings and operatin...

Page 29: ...hield Wizard screen displays click Next to proceed with the installation Figure 3 1 InstallShield Wizard 1 of 4 5 The Software License Agreement displays press I Agree to continue or Cancel to stop th...

Page 30: ...lation path is C Program Files EKI Device Configuration Utility Figure 3 3 InstallShield Wizard 3 of 4 6 Once the installation of the package is finished a Configuration Utility Setup screen displays...

Page 31: ...cuts 3 Serial Device Server List Area Available devices are listed in this area Devices and COM ports can be organized or grouped in this area 4 Information Panel Click on the devices or move cursor t...

Page 32: ...product Clear Device List and Search Again Click to clear listed device servers in the Serial Device Server List Area and initiate a new search NOTE A continuous click of the icon results in the fol...

Page 33: ...eck box to activate the AdvLogMessage form The Form Log message displays Save Log to File Check the check box to save log to file Browse If the Save Log to File option is enabled click Browse to selec...

Page 34: ...the time to auto detection time 1 means dis able auto detection Auto detect devices every X second Enter a value to specify the time to auto detect devices Check device alive every X second Enter a v...

Page 35: ...k domain will be searched and display on Device Server List Area You can click on the device name to show the features of the specific device Click on the before the model name and the utility will ex...

Page 36: ...ding device type version and name Ethernet Information and Serial Port Information The serial port information frame displays the operation mode status and connected host IP Figure 3 10 Selecting a Gr...

Page 37: ...termine the IP address mode There are four mode types available Static IP mode to assign a specific assigned address DHCP AutoIP mode to automatically assign IP addresses through a DHCP server BOOTP A...

Page 38: ...Auto IP BOOTP Server assigned IP address DHCP BOOTP Auto IP DHCP Server assigned IP address Subnet Mask Default Gateway and DNS or BOOTP Server assigned IP address If the DHCP Server does not respond...

Page 39: ...27 EKI 1526 TI 1528 TI User Manual To reset the device 1 Right click a desired device to display the settings menu 2 Select Reset Device Figure 3 14 Reset Device...

Page 40: ...ecific serial device is possible through the Locate function To locate the serial device server 1 From the device list frame locate the desired device and right click on it to dis play the settings me...

Page 41: ...on utility provides a Lock Device function to make it more secure To lock the serial device server 1 Right click a desired device to display the settings menu 2 Select Lock Device Figure 3 16 Lock the...

Page 42: ...1528 TI User Manual 30 4 Right click a desired device to display the settings menu Select Reset Device to restart the serial device server and store your setting password into the mem ory Figure 3 18...

Page 43: ...duced in the next section 3 5 3 Restore to Factory Default Settings The configuration utility provides the function to restore the serial device server to factory default settings The confirm message...

Page 44: ...ation changes you have made since the last time you saved will be lost To reset the device 1 Right click a desired device to display the settings menu 2 Select Reset Device Figure 3 20 Change Password...

Page 45: ...as same as the serial device server or the host can establish the TCP connection to the serial device server To update firmware 1 Right click a desired device to display the settings menu 2 Select Upd...

Page 46: ...Chapter 4 4Selecting An Operating Mode...

Page 47: ...ifferent methods of making a serial connection across using one or more serial device serv ers 4 2 COM Port Redirector Virtual COM Port Advantech EKI Device Configuration Utility is a serial COM port...

Page 48: ...the same serial port and the EKI 1526 TI 1528 TI Series will also transmit data to every hosts When the multiple hosts transmit data to the same serial port at the same time the received data from Eth...

Page 49: ...ternet 4 3 1 USDG TCP Client Mode In TCP Client mode the TCP connection is established from the EKI serial device server This operation mode supports a maximum of 16 simultaneous connections for each...

Page 50: ...to the EKI serial device server This operation mode supports a maximum of five simultaneous con nections for each serial port on an EKI serial device server from a single or multiple hosts However a m...

Page 51: ...is 1024 65533 If an unknown caller wants to connect to the system and request services they must define the TCP UDP port to carry a long term conversation Each node on a TCP IP network has an IP addr...

Page 52: ...l Mode is designed for use with legacy operating systems such as MSDOS that do not support TCP IP Ethernet By connecting one of the EKI s serial ports to the MS DOS computer s serial port it is possib...

Page 53: ...ries devices to a local COM port on a host computer RFC2217 defines general COM port control options based on the Telnet protocol Third party drivers supporting RFC2217 are widely available on the Int...

Page 54: ...Chapter 5 5Setting Up Virtual COM Redirector...

Page 55: ...e integrated into one utility with same GUI The Advantech EKI Device Configuration Utility can create all Virtual COM ports using the Auto Mapping function or by using the manual mapping function 5 2...

Page 56: ...apping 7 From the network address list select the address options to map 8 Click Map Selected Ports to set the configuration Figure 5 3 Mapping Selected Ports Once the mapping function is initialized...

Page 57: ...lect it Figure 5 5 Selecting Manual Mapping The Manual Mapping Virtual COM Port window displays 5 In the Device Serial Port drop down menu select the target port to map This is the physical serial por...

Page 58: ...nfiguration Wizard 1 On your desktop navigate to Start All Programs EKI Device Configura tion Utility and click Advantech EKI Device Configuration Utility to open the utility 2 Under Serial Device Ser...

Page 59: ...vice Configura tion Utility and click Advantech EKI Device Configuration Utility to open the utility 2 Locate Serial Ports menu in the menu pane and click on the Expand icon next to Virtual COM Ports...

Page 60: ...d VCOM port should be listed under the same mapped set tings used in the previous steps Figure 5 10 System Port VCOM Mapping Configuration The newly mapped VCOM port is listed under the same mapped se...

Page 61: ...turn to the previ ous menu Once the procedure is completed a prompt displays the successful removal of the port from the VCOM mapping list 5 2 6 Exporting VCOM Mapping The VCOM mapping settings can be...

Page 62: ...e the file is selected the new settings are imported into the EKI serial device server 5 3 Running a Diagnostic Test The loopback test allows you to determine if the EKI serial device server is config...

Page 63: ...Chapter 6 6Web Configuration...

Page 64: ...gned for this device Once the IP is entered you will be presented with the following windows 6 2 Accessing the Web Page 6 2 1 Accessing the Web Page via Configuration Utility To access the web page vi...

Page 65: ...Telnet and SNMP functions Moreover you can set the Time zone related settings To access this page click System Figure 6 2 System The following table describes the items in the previous figure Item De...

Page 66: ...icast SNTP requests will be sent to this address If this address is a DNS hostname then that hostname should be resolved into an IP address each time a SNTP request is sent to it Save Click Save to sa...

Page 67: ...lect the DNS mode Automatic or Specific Current Status IP 1 Displays the current IP address 1 of the device IP 2 Displays the current IP address 2 of the device Save Click Save to save the values and...

Page 68: ...top bits 1 1 5 or 2 Flow Control Click the drop down menu to select the flow control mode None XOn XOff RTS CTS or DTR DSR Save Click Save to save the values and update the screen Item Description Ite...

Page 69: ...When Data Full Click the drop down menu to select process mode when data full Stop Pack conditions Pack sent immediately when reach 1024 Bytes By size Click the option to sent pack immediately by size...

Page 70: ...to define the host idle timeout period Save Click Save to save the values and update the screen Item Description Item Description Enable Delay Time Click the option to enter the value to postpone the...

Page 71: ...enter the value to define the timeout period RTL Receiver Trigger Level Click the option to determines how often or when the receiver interrupt is be triggered TTL Transmitter Trigger Level Click the...

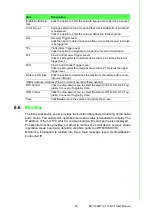
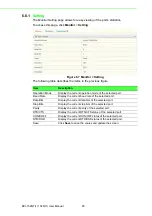
Page 72: ...n mode of the selected port Baud Rate Display the current baud rate of the selected port Data Bits Display the current data bits of the selected port Stop Bits Display the current stop bits of the sel...

Page 73: ...ort Rx Count Display the current Rx count of the selected port Total Tx Count Display the current total Tx count of the selected port Total Rx Count Display the current total Rx count of the selected...

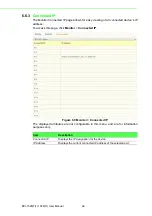
Page 74: ...IP address To access this page click Monitor Connected IP Figure 6 9 Monitor Connected IP The displayed attributes are not configurable in this menu and are for information purposes only Item Descript...

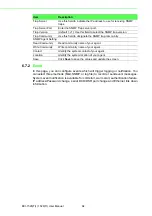
Page 75: ...Trap refers to send an SNMP Trap Agent refers to send the SNMP agent setting 6 7 1 Setting To access this page click Alarm Setting Figure 6 10 Alarm Setting The following table describes the items in...

Page 76: ...nformation Trap Server Use this field to indicate the IP address to use for receiving SNMP traps Trap Server Port Enter the SNMP Trap server port Trap Version default v1 Use this field to select the S...

Page 77: ...page click Alarm Event Figure 6 11 Alarm Event The following table describes the items in the previous figure Item Description System Event Cold Start Click the option to select a warning type when th...

Page 78: ...assword is entered IP address changed Click the option to select a warning type when the IP address is changed Password changed Click the option to select a warning type when the password is changed E...

Page 79: ...8 TI User Manual 6 8 2 Syslogd Message After enabling the syslogd function users can check the history in the syslogd mes sage page To access this page click Syslogd Syslogd Message Figure 6 13 Syslog...

Page 80: ...Enter the IP address or host name of the station to ping The initial value is blank The IP Address or host name you enter is not retained across a power cycle Host names are composed of series of lab...

Page 81: ...ement tools avail able you can streamline staffing and troubleshooting requirements to a centralized system 6 10 1 Log File If users enable the system event or serial event to log in file users can do...

Page 82: ...Access IP number to 0 unrestricted access Set Access IP number to greater than 0 restricted to listed Access IP listing To access this page click Management Secure access IP Figure 6 17 Management Sec...

Page 83: ...nfiguration settings to a conf file To access this page click Management Import Figure 6 18 System The following table describes the items in the previous figure Item Description Choose File Click Cho...

Page 84: ...Chapter 7 7Telnet...

Page 85: ...nctions of the console mode is to change the web con figuration login password You can use terminal software like Hyper Terminal Telix and other related terminal software 7 2 Telnet Console 7 2 1 Crea...

Page 86: ...server and the Telnet TCP port number is 23 Figure 7 2 Creating a Telnet Connection 7 2 3 Connection Success After connecting to the serial device server in HyperTerminal console a welcome greeting d...

Page 87: ...sole port with a RS 232 DB9 M type communication cable with the other end connecting to the host s serial port Make sure the connection is OK and then run the Hyper Termi nal Program on your host Figu...

Page 88: ...1526 TI 1528 TI device server for console configuration the port setting should match the EKI 1526 TI 1528 TI device sever default settings Figure 7 6 COM Port Settings Console configuration default S...

Page 89: ...l ports information portadv Show or configure the serial ports advanced settings mvcom Show or configure the serial ports in Virtual COM mode mctr Show or configure the serial ports in Control mode US...

Page 90: ...m Mark Parity parity s Space Parity Usage port nn all mode vcom ctrl data Set serial port as virtual COM port or control mode or data mode 7 4 3 portadv help portadv Show port advanced setting Usage p...

Page 91: ...one Setting 7 4 5 mctrl Usage mctrl Show port mode and mode informations Usage mctrl nn all Set port nn all as control mode Usage mctrl nn all idleto tcpp atp guardt hangchr Set data idle timeout s da...

Page 92: ...e password new 1 31 characters Set new password Usage password old new 1 31 characters Confirm the old password and set new password 7 4 9 alarm Usage alarm Show current alarm informations Usage alarm...

Page 93: ...ervice Usage service telnet enable disable Enable Disable telnet function Usage service snmp enable disable Enable Disable SNMP function 7 4 13 mrfc2217 Usage mrfc2217 Show all port mode and mode info...

Page 94: ...Chapter 8 8TCP and UDP Port Numbers...

Page 95: ...ation Utility 5202 TCP VCOM RVCOM 9999 TCP Firmware Download 22 TCP SSH 23 TCP Telnet 25 TCP SMTP Mail Client 53 TCP UDP DNS 67 UDP BOOTP Server DHCP 68 UDP BOOTP Client DHCP 80 TCP Web Interface HTTP...

Page 96: ...tions are subject to change without notice No part of this publication may be reproduced in any form or by any means electronic photocopying recording or otherwise without prior written permis sion of...

Reviews: