background image

8

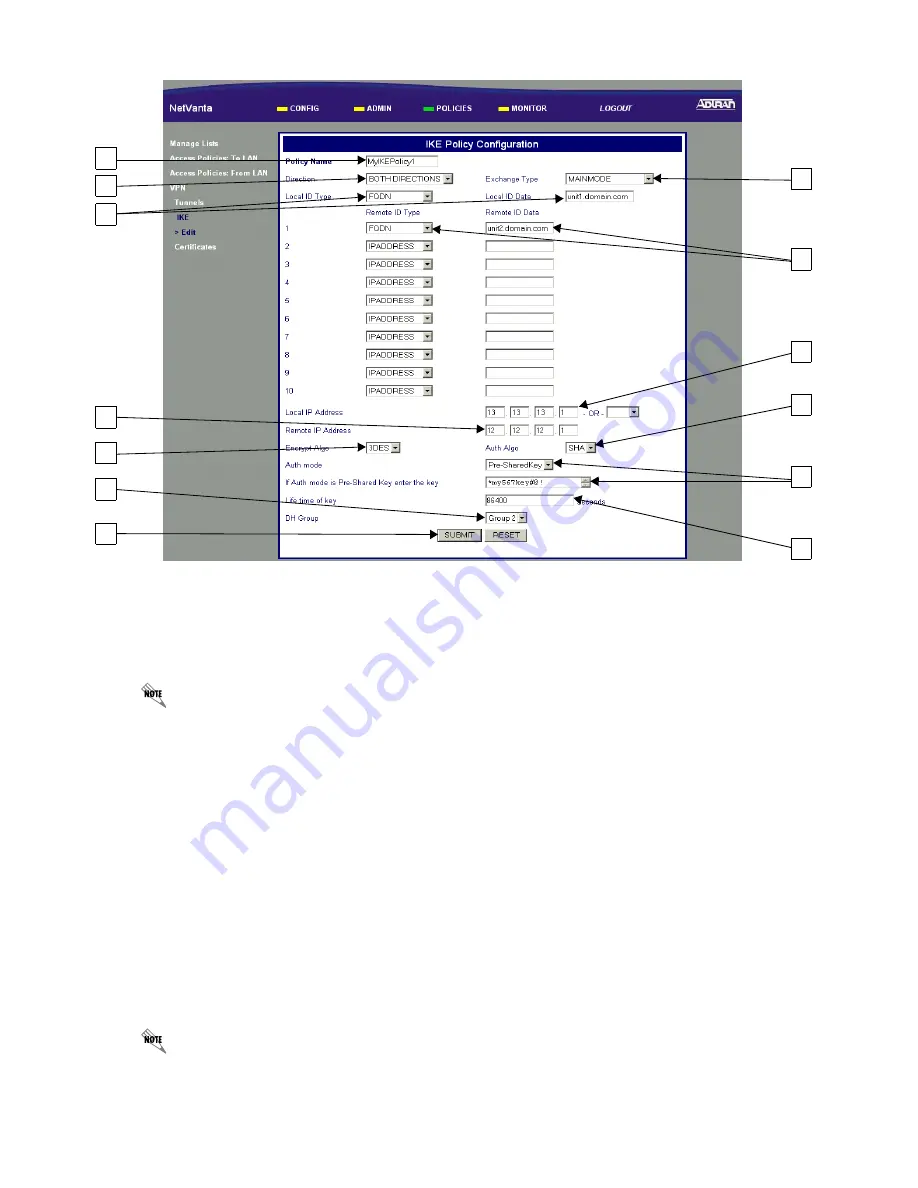
IKE Policy Configuration (continued)

1.

Enter an alphanumeric string (spaces are not valid characters) used to identify this policy.

2.

Select BOTH DIRECTIONS to allow IKE to be initiated by either the local or remote NetVanta.

3.

Select MAINMODE as the Exchange Type.

If both sides do not have permanent IP addresses, see the Aggressive Mode tech note on
www.adtran.com.

4.

Use the unique Fully Qualified Domain Name (FQDN) for the local NetVanta 2000 and enter the identifi-
cation data (these need not be registered names).

5.

Use the unique FQDN for the remote users and enter the identification data (these need not be registered
names).

6.

Enter the local NetVanta 2000's assigned WAN IP address.

7.

Enter the remote NetVanta 2000's assigned WAN IP address.

8.

Select 3DES to invoke Triple DES encryption.

9.

Select SHA to use the secure hash authentication algorithm #1.

10.

Select Pre-SharedKey and enter the key as a 12-character (minimum) alphanumeric string (spaces are
not valid characters). This key MUST be the same for both the local and remote units.

11.

Set the Life time of key to 86400 seconds (this is the ADTRAN suggested value).

When determining the appropriate value for your application, typical usage contains a 3:1 ratio
between the IKE and IPSec key lifetime values. This ratio provides for key negotiation overhead.

12.

Select Group 2 to invoke Diffie-Hellman Group 2.

13.

Click SUBMIT to register the changes.

1

2

4

7

8

12

13

11

10

6

9

5

3

Summary of Contents for NetVanta 2000 Series

Page 1: ...a 2000 means any router in the NetVanta 2000 series e g NetVanta 2100 NetVanta 2300 etc If a statement only applies to one particular router the text refers to the router individually Unpacking and In...

Page 2: ...obtains an IP address from the NetVanta 2000 DHCP server Alternately you could manu ally change your IP address to 10 10 10 10 24 Refer to your specific operating system s documentation for details on...

Page 3: ...Refer to your specific operating system s documentation for details on that process if it differs from the procedure provided below 1 Click Start on the task bar 2 Choose Run then type WINIPCFG in th...

Page 4: ...r ISP has supplied you with the configuration parameters for PPPoE including a username and password Changing the LAN IP parameters through the LAN interface results in a loss of management connectivi...

Page 5: ...t CONFIG 2 Select DHCP server 3 Enter an IP address range that is on the same subnet as the assigned LAN IP address of the unit 4 Enter the assigned LAN IP address of the unit 5 Click Submit to regist...

Page 6: ...Gateway IP Address The Gateway IP Address is supplied by your provider 8 Click Add Route to submit this route to the route table 4 5 6 8 7 Saving the Settings 4d 1 Select ADMIN 2 Select Save Settings...

Page 7: ...icy IKE Policy Configuration 5 1 Select POLICIES 2 Select VPN 3 Select IKE 4 Click the Add button This example assumes the NetVanta 2300 is already similarly configured for a VPN connection to this Ne...

Page 8: ...tered names 6 Enter the local NetVanta 2000 s assigned WAN IP address 7 Enter the remote NetVanta 2000 s assigned WAN IP address 8 Select 3DES to invoke Triple DES encryption 9 Select SHA to use the s...

Page 9: ...9 1 Select POLICIES 2 Select VPN 3 Click the auto button IPSec Policy Configuration 1 3 2...

Page 10: ...all data protocols 7 Enter the remote NetVanta 2000 s assigned WAN IP address If the remote NetVanta 2000 is configured for dynamic addressing on the WAN interface enter 0 0 0 0 here 8 Select NONE 9 S...

Page 11: ...Policy Configuration Inbound Traffic 5b 1 Select POLICIES 2 Select Access Policies To LAN incoming traffic 3 Select Beginning to place the new access policy at the beginning of the table 4 Click Subm...

Page 12: ...its 3 Select ANY to forward all TCP UDP ports or select OTHER and enter the port or port range in the field below it 4 Select ALL to forward all data protocols or select OTHER and enter the protocol v...

Page 13: ...cy Configuration Outbound Traffic 1 Select POLICIES 2 Select Access Policies From LAN 3 Select Beginning to place the new access policy at the beginning of the table 4 Click Submit to begin the policy...

Page 14: ...ask bits 3 Select ANY to forward all TCP UDP ports or select OTHER and enter the port or port range in the field below it 4 Select ALL to forward all data protocols or select OTHER and enter the proto...

Page 15: ...irm 2 1 3 Testing the New Tunnel 6 1 Ping the LAN IP address of the corporate NetVanta 2300 10 10 10 1 to test the new tunnel 2 If the ping is not successful have the administrator recheck the values...

Reviews: