ADTRAN NetVanta 1638 Hardware Installation Manual Download Page 31

NetVanta 1600 Series Hardware Installation Guide

 Unit Installation

61700568F1-34A

Copyright © 2011 ADTRAN, Inc.

31

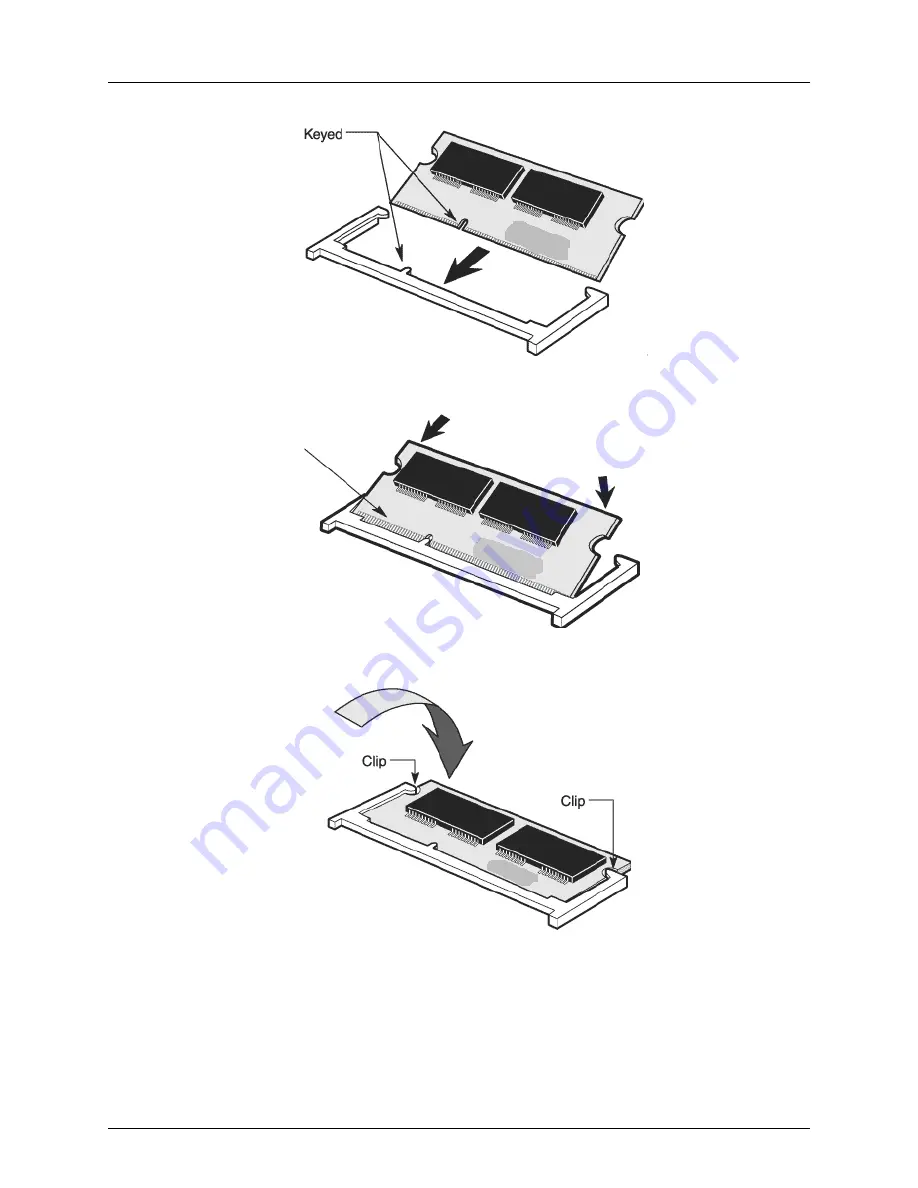
Figure 8.  SODIMM Installation – Keyed Slots

Figure 9.  SODIMM Installation – Applying Pressure

Figure 10.  SODIMM Installation – Rotating the Module Downward

Summary of Contents for NetVanta 1638

Page 1: ...rnet Switch Hardware Installation Guide 1700568F1 NetVanta 1638 1700569F1 NetVanta 1638P 1700460F1 NetVanta 120 W AC Power Supply 1700462F1 NetVanta 500 W PoE Power Supply 1700470F1 NetVanta Dual Stac...

Page 2: ...this publication Software Licensing Agreement Each ADTRAN product contains a single license for ADTRAN supplied software Pursuant to the Licensing Agreement you may a use the software on the purchase...

Page 3: ...1 34A Copyright 2011 ADTRAN Inc 3 Conventions Notes provide additional useful information Cautions signify information that could prevent service interruption or damage to the equipment Warnings provi...

Page 4: ...outlet shall be installed near the equipment and shall be easily accessible If any of the following conditions occur unplug the product from the electrical outlet and replace the part or contact your...

Page 5: ...t generates uses and can radiate radio frequency energy and if not installed and used in accordance with the instruction manual may cause harmful interference to radio frequencies Operation of this eq...

Page 6: ...Service and Warranty NetVanta 1600 Series Hardware Installation Guide 6 Copyright 2011 ADTRAN Inc 61700568F1 34A...

Page 7: ...hipping Contents 14 NetVanta 1638 15 NetVanta 1638P 17 LED Descriptions 20 Product Specifications 21 Option Modules 24 XAUI Interface Module Shipping Contents 24 XAUI Interface Module 25 Unit Installa...

Page 8: ...Table of Contents NetVanta 1600 Series Hardware Installation Guide 8 Copyright 2011 ADTRAN Inc 61700568F1 34A...

Page 9: ...ure 3 NetVanta 1638P Front Panel Layout 17 Figure 4 NetVanta 1638P Rear Panel Layout 19 Figure 5 NetVanta Dual Stacking XIM 25 Figure 6 Installing the Power Supply 28 Figure 7 XIM Installation 29 Figu...

Page 10: ...List of Figures NetVanta 1600 Series Hardware Installation Guide 10 Copyright 2011 ADTRAN Inc 61700568F1 34A...

Page 11: ...61700568F1 34A Copyright 2011 ADTRAN Inc 11 List of Tables Table 1 Front Panel LED Descriptions 20 Table A 1 CONSOLE Port Pinouts 33 Table A 2 1000Base T Gigabit Ethernet Port Pinouts 33...

Page 12: ...List of Tables NetVanta 1600 Series Hardware Installation Guide 12 Copyright 2011 ADTRAN Inc 61700568F1 34A...

Page 13: ...nal information on mounting options powering the unit and installing option modules refer to the following sections Mounting Options on page 27 Replacing the Power Supply on page 28 Installing XAUI In...

Page 14: ...l user interface GUI The NetVanta 1600 Series is RoHS compliant Power over Ethernet The NetVanta 1638P PoE device provides the same basic functionality as the NetVanta 1638 product By default the PoE...

Page 15: ...638P base unit NetVanta 500 W PoE power supply A detachable power cable with a grounded three prong plug Quick start guide Two 19 inch rack mounting brackets and eight screws International shipments o...

Page 16: ...e of the unit and indicates that the port LEDs are displaying VCID CONSOLE Interface The CONSOLE interface is an EIA 232 serial port DCE that provides local management and configuration via a DB 9 fem...

Page 17: ...PS status Power Connection The NetVanta 120 W AC power supply has a power input to the AC universal power supply Refer to Supplying Power to the Unit on page 28 for connection details NetVanta 1638P F...

Page 18: ...s that the port LEDs are displaying link activity for the interface Virtual Chassis LED Future Release The VCID LED is located on the left side of the unit and indicates that the port LEDs are display...

Page 19: ...abeled X1 and X2 that accept a variety of high speed option modules NetVanta 500 W PoE Power Supply The rear panel houses the field replaceable NetVanta 500 W PoE power supply For information on repla...

Page 20: ...is functioning Red solid EPS is connected and the internal supply has failed LINK ACT PoE units only Off Link status activity is not being displayed on port LEDs 1 through 48 Green solid Link status a...

Page 21: ...port host mode only Field replaceable power supply and fans Supports external redundant power supply Switching Layer 2 switching capability Layer 3 switching capability High speed stacking Virtual cha...

Page 22: ...al area networks VLANs 802 1Q tagged trunked VLANs VLAN assignment via 802 1x Storm Control Broadcast unicast and multicast Administration Familiar CLI GUI n Command support SNMP v3 SYSLOG logging Ema...

Page 23: ...A 50 60 Hz Internal AC power NetVanta 1638P 110 to 240 VAC 5 7A 50 60 Hz Redundant power supply future release 12 VDC Extended power supply PoE versions future release 50 VDC Compliance NetVanta 1638...

Page 24: ...tion module slots located on the rear of the base unit The NetVanta 1600 Series currently supports the following XIM NetVanta Dual Stacking XIM P N 1700470F1 on page 25 This section describes the modu...

Page 25: ...pable devices Figure 5 NetVanta Dual Stacking XIM STACKING XIM 1 2 1700470F1 Features and Specifications Stacking Interface Data Rate 10 Gbps 20 Gbps bidirectional Compliance Electromagnetic Compatibi...

Page 26: ...quired The customer provided tools required for the hardware installation of the NetVanta are Ethernet cables Network cables module dependent Phillips head screwdriver rack mounted applications only T...

Page 27: ...ration of the equipment is not compromised Be careful not to compromise the stability of the equipment mounting rack when installing this product Consideration should be given to the connection of the...

Page 28: ...ta 1638 P N 1700568F1 units The NetVanta 500 W PoE Power Supply P N 1700462F1 is designed for use only in NetVanta 1638P P N 1700569F1 units The NetVanta 1600 Series power supplies are intended to be...

Page 29: ...hem on an approved antistatic mat that is electrically grounded Always remove power from the unit prior to removing or installing a module Improper installation may result in damage to the modules Ins...

Page 30: ...ether and if necessary the two mounting brackets 3 Carefully lift and remove the unit s cover to expose the circuit board 4 Once you have discharged your static electricity pick up the SODIMM by its t...

Page 31: ...Installation Guide Unit Installation 61700568F1 34A Copyright 2011 ADTRAN Inc 31 Figure 8 SODIMM Installation Keyed Slots Figure 9 SODIMM Installation Applying Pressure Figure 10 SODIMM Installation...

Page 32: ...twork For information on switch configuration for a specific application refer to the configuration guides provided online on the ADTRAN s Knowledge Base at http kb adtran com For details on the CLI r...

Page 33: ...input 4 DTR Data Terminal Ready input 5 SG Signal Ground 6 DSR Data Set Ready Tied to pin 1 output 7 Unused 8 CTS Clear to Send Tied to pin 1 output 9 Unused Table A 2 1000Base T Gigabit Ethernet Por...

Page 34: ...Appendix A Connector Pin Definitions NetVanta 1600 Series Hardware Installation Guide 34 Copyright 2011 ADTRAN Inc 61700568F1 34A...

Page 35: ...K ACT LED 16 18 20 M MGMT interface 16 18 mounting options 27 N NetVanta 1600 Series 1638 15 1638P 17 specifications 21 NetVanta 1638 front panel 15 rear panel 17 shipping contents 14 NetVanta 1638P f...

Page 36: ...llation Guide 36 Copyright 2011 ADTRAN Inc 61700568F1 34A STAT LED 15 17 20 T tools required for installation 26 U USB interface 16 18 V VCID LED 16 18 20 W warranty 5 X X1 through X4 LEDs 16 18 XAUI...

Reviews: