background image


NCT-04/03/02 Punch CNC System (Commissioning Manual)


Relocation clamp forward distance 

P1.098 


3.6.3


Test Code


Refer to "Programming Manual" 7. Relocation instructions for details 

3.7


Punching Status Display Interface 

3.7.1


 Interface Introduction 

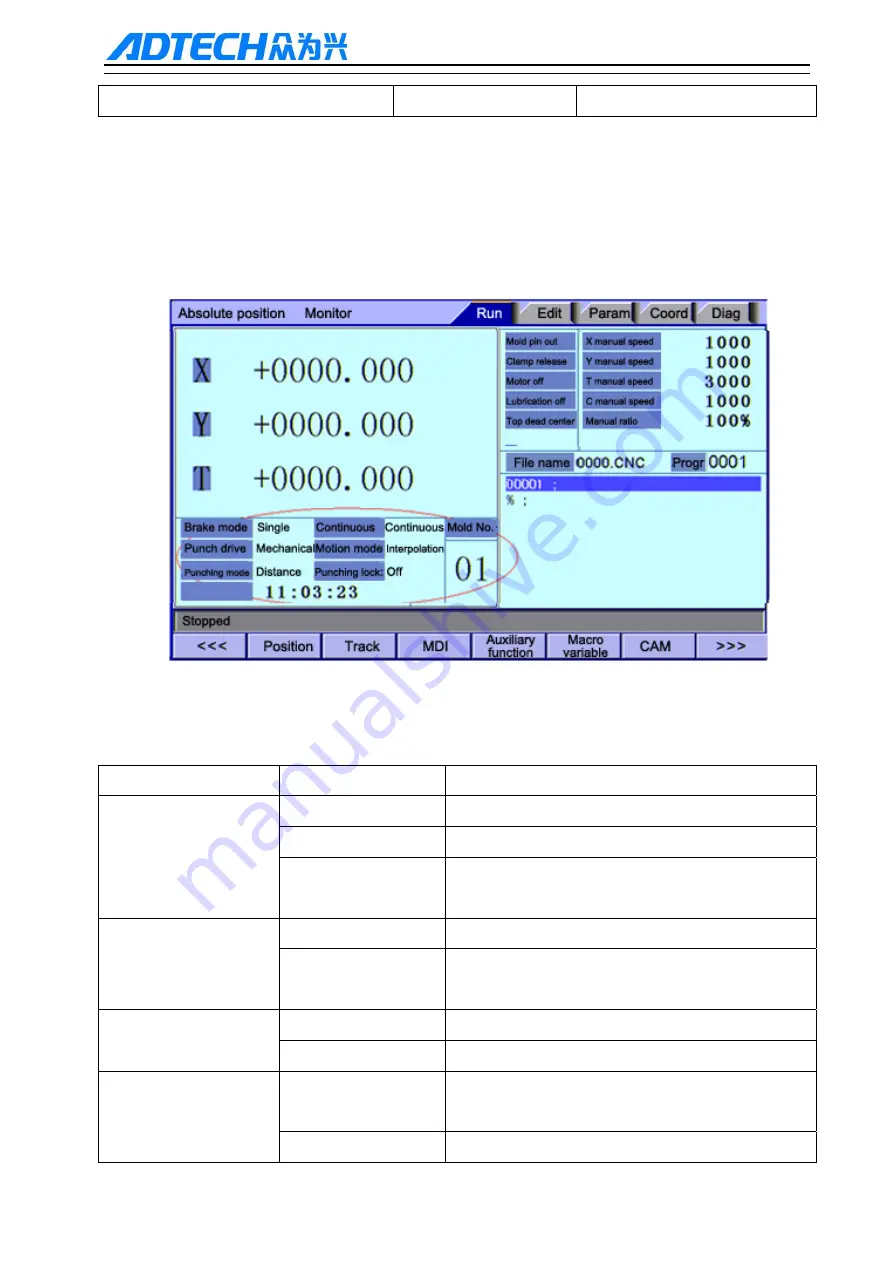
The following Fig. 3 - 1 shows the punch status display interface: 


Fig. 3-1 

Table 3 - 1 is the punch state description: 

Table 3-1 

Function


Parameter


Introduction


Brake mode 

Feeding 

Feeding signal as the off clutch signal 

Single stop 

Single stopping top dead center as off clutch signal

Double stop 

Single / continuous punching off clutch is controlled 

by a separate switch signal 

Single/Continuous 

Single 

The system will pause after punching a hole 

Continuous 

Punching process does not stop until the end of the 

program 

Punch drive 

Mechanical 

The punch main drive is mechanical 

Hydraulic 

The punch main drive is mechanical flywheel 

Running mode 

Point 

The starting speed, acceleration and rapid traverse 

speed can be set for each feeding axis individually. 

Interpolation 

Feeding axes arrive simultaneously 

Summary of Contents for NCT-02

Page 1: ... Manual ADTECH SHENZHEN TECHNOLOGY CO LTD 5th Floor 27 29th Building Tianxia IC Industrial Park Yiyuan road Nanshan District Shenzhen Post code 518052 Tel 0755 26099116 Fax 0755 26722718 E mail export machine controller com www machine controller com ...

Page 2: ...ion is prohibited This manual does not include any form of assurance standpoint expression or other intimations Adtech and the stuffs have no responsibility for any direct or indirect disclosure of the information benefit loss or business termination of this manual of the quoted product information In addition the product and the information mentioned in this manual are for reference only and the ...

Page 3: ...C System Commissioning Manual Basic Information Item No Initial uploading Version No Total Page Prepared by Typeset by BZ001B028A 2013 09 07 A0401 29 Zhang Qinggang Proofreading Records Date Version Page Result Confirmation ...

Page 4: ...auling or components replacement Make sure to check failures after short circuit or overloading and then restart the machine after troubleshooting Do not allow to frequently connect and disconnect the power and at least one minute interval between power on and power off Miscellaneous Do not open housing without permit Keep power OFF if not in use for a long time Pay close attention to keep dust an...

Page 5: ...g 7 2 4 Commissioning of Punch Related Signals 7 2 5 Turret Commissioning and Mold Parameter Settings 13 2 6 Establishing Coordinate System 15 2 7 Trial Processing 16 3Operation 19 3 1 Controller Operation Sequence and Processes 19 3 2 Platform Feeder Blowing Control 20 3 3 NCT 02 Blanking Control 21 3 4 Automatic Lubrication Function 22 3 5 Handheld Box Associated Button Configuration pedal posit...

Page 6: ...current fluctuations add filter if necessary For specific anti jamming measures refer to Maintenance Manual 11 1 3 Installation Considerations 1 2Relationship between Self diagnosis and Voltage Level 1 3Parameter Description P1 P5 indicate comprehensive axis configuration management mold and port respectively Example P5 061 indicates No 061 port parameter external start 2 detection port number Por...

Page 7: ...ctive level P2 022 2 1 3 Soft Limit If the hard limit isn t installed soft limit must be set to protect the machine Related parameters P1 021 P1 024 0 Note Soft limit coordinates are based on mechanical coordinates 2 2Debugging Motion Axes X Y Basic functions commissioning of X Y axis and the drive X axis for example Given the minimum resolution of the controller is 0 01mm requires servo alarm fun...

Page 8: ...pulse is 2MHz z Controller interpolation maximum output pulse is 500KHz 2 2 3 Commissioning After setting up the system and drive gear ratio check if the gear ratio is set accurately in metering approach The specific operation is as follows 1 Press the button to switch to step mode 2 Press to switch single step increment 3 Manually press X and measure whether the distance traveled by the machine i...

Page 9: ...at is during input diagnostics the red green moment Off clutching time is same as above Scope of Application This control method can be applied in occasions with relatively low punch frequency Advantage save cost reduce the risk of damage when a plurality of switches is used Disadvantage Switch mounting location should be considered the feeding timing and stopping top dead center position should b...

Page 10: ...etting P1 112 0 Note In this mode you must assign P5 13 port number otherwise nibbling stopping top dead center signal is invalid Example Example P5 011 IN 14 P1 080 0 P5 012 IN 15 P1 112 0 P5 013 IN 16 P1 112 0 Feeding time is moment of pin 14 level from 0 to 1 That is during input diagnostics the red green moment Stopping top dead center time moment of pin 15 16 level from 0 to 1 2 4 1 5 Manual ...

Page 11: ...e are schematic only and the range of feeding prohibited area is smaller than shown The position of the brake pad depends on the clearance of the clutch and pressure Pay special attention that the top dead center position is unique when the punch is at the highest point the top dead center sensing block aligns with the top dead center switch 2 4 1 7 Punch Signal Installation Diagram and Correspond...

Page 12: ...NCT 04 03 02 Punch CNC System Commissioning Manual ...

Page 13: ... 2 Hydraulic Drive CNC Turret Punch Press 2 4 2 1 Parameter Settings P1 085 punch control Hydraulic P1 078 punching mode Hydraulic single punch Feeding sensor switch port IN 22 internally fixed Ready signal P5 01 1 Cutoff punch signal IN 7 internally fixed ...

Page 14: ...ion 3 Enter the total mold count to Turret 002 Total turret mold number 4 Select Coordinates Offset to enter mold offset setting 0 Note 1 T1 turret position value must be 0 2 Turret Total turret mold number parameter total tool number can t be 0 or else alarm occurs when the mold is changed 2 5 2 Mold Pin Debugging 1 Connect the mold pin output and the detection switch mold pin output port OUT 3 m...

Page 15: ...ed parameter P2 069 2 5 4 Turret Trial Run 1 Press the button to switch the work mode to Retool 2 Press T T to move the turret for a station 3 In MDI enter the code to test retooling 0 Note 1 The system integrates turret retooling debugging function P1 1 10 Turret retooling debugging enabled 1 When the turret is in position the mold pin is not inserted it can be inserted manually 0 When the turret...

Page 16: ...the additional panel 4 Then the absolute coordinate values will be cleared Method 2 Clear via external handheld box 1 Set the coordinate system clearing port P5 042 default effective level is 0 2 Connect the external switch and enter the diagnose interface 3 Move the machine tool press the button and then the coordinate values will be cleared Method 3 Clear via controller 1 Enter Coordinates Coord...

Page 17: ...nd return to the program header 2 7 3 Operation Sequence in Auto Mode 2 7 3 1 Punching Center Distance Settings 1 Press Coordinates to enter the coordinate system setting interface 2 Set G54 coordinate offset 3 XY is the offset of workpiece origin relative to the machine zero 2 7 3 2 Machine Tool Reference Point 4 Press the Home key to enter the home mode 5 Press Start and the system performs T XY...

Page 18: ...while running press the key to stop running immediately Memory operation steps are as follows 14 Programs are stored in memory see 3 1 Copying Processing File with USB Disk 15 Select Edit File to enter the file operation screen or switch to the file operation screen quickly from File on the panel as shown below C drive uses YAFS file system D disk uses FAT system user processing files and system s...

Page 19: ... program start indicator is lit and the program begins running 19 Press Reset directly if exception occurs during running and the system will reset and continue processing Repeat steps 4 18 20 If the program aborts press Punch Lock in the next processing to locate the punching until the position that operation was aborted and then cancel punching lock ...

Page 20: ...NCT 04 03 02 Punch CNC System Commissioning Manual 3 Operation 3 1Controller Operation Sequence and Processes ...

Page 21: ...user profile Copy SYSTABLE CSV file to ADT directory on D disk enter Management interface 013 Import CSV System Configuration Table and press EOB in the Entry mode 2 Set blowing material parameters Parameter Comprehensive 130 Blowing control enable is set to 1 enter Run Macro Variables and set the relevant parameters 3 2 3 Parameter Description Parameter Description Blowing mode 0 3 Refer to the p...

Page 22: ...Entry mode 2 Set blowing parameters Parameter Comprehensive 132 blanking detection alarm frequency to appropriate value enter Run Macro Variable and set the relevant parameters Note If 132 blanking detection alarm frequency is set to 0 the system will not start blanking control function 3 3 3 Parameter Description Parameter Description Blanking detection ports 0 33 Detection port number select an ...

Page 23: ...indicator will flash and alarm Note If P1 052 is non zero the system automatically starts lubrication If no alarm is detected by the lubrication detection port press and hold Cancel to clear Set P5 061 to 8888 to shield the alarm 3 4 2 Displacement Parameter Description A lubrication cycle P1 137 B lubrication time P1 138 C lubrication output port P5 062 D lubrication detection input port P5 062 E...

Page 24: ... control P5 015 Default 0 NO P5 017 Origin positioning block control P5 018 Default 0 NO P5 019 Mold pin manual control P5 025 Default 0 NO P5 026 Clear coordinate system P5 042 Default 0 NO Single Continuous switch P5 043 Default 0 NO Jog Continuou s switch P5 044 Default 0 NO JOG X P5 036 Default 0 NO JOG X P5 037 Default 0 NO JOG Y P5 038 Default 0 NO JOG Y P5 039 Default 0 NO JOG T P5 040 Defa...

Page 25: ... Port Settings Function Parameter Remark Relocation cylinder output control port P5 029 Connect relocation cylinder Positioning cylinder compression test port P5 030 Check whether positioning cylinder is pressed down Positioning cylinder release detection port P5 031 Check whether the positioning cylinder is lifted Relocation clamp backward distance P1 097 ...

Page 26: ...eding signal as the off clutch signal Single stop Single stopping top dead center as off clutch signal Double stop Single continuous punching off clutch is controlled by a separate switch signal Single Continuous Single The system will pause after punching a hole Continuous Punching process does not stop until the end of the program Punch drive Mechanical The punch main drive is mechanical Hydraul...

Page 27: ...078 for details Hydraulic Hydraulic see P1 078 for details Distance Mechanical see P1 078 for details Punching lock Off Feeding punching ON Feeding only 3 7 2 When to start feeding When to off the clutch Fig 3 2 is mechanical feeding flow chart and Fig 3 3 is mechanical off clutch flow chart Mechanical feeding flow chart Fig 3 2 ...

Page 28: ...NCT 04 03 02 Punch CNC System Commissioning Manual Mechanical off clutch flow chart Fig 3 3 ...

Page 29: ... Port parameters refreshed Zhang Qinggang 22012 9 06 Documentation system uploaded Zhang Qinggang 22012 9 28 Documentation system uploaded Zhang Qinggang 22012 11 07 Documentation system uploaded Zhang Qinggang 22012 12 10 Added description of automatic lubrication Zhang Qinggang 22012 12 20 Added description of punch status display interface Zhang Qinggang ...

Reviews: