Addonics Technologies AD2SA3GPX1 User Manual Download Page 14

Addonics Technologies Users Guide v1.0

2-Port SATA II RAID5/JBOD PCI Express Controller Card

13

5.2. Windows XP Driver and Software Installation

Note:

Install the SATA Utilities from the CD that came with your package 

first before installing the Host Controller.

1. Power  on  the  system.    Insert  the  CDROM  that  came  with  the  product. 

The Addonics Technologies Driver Disk window pops up.

2. Windows Explorer will open up with two folders.

Drivers

Utilities

3. Select the Utilities folder. Under this folder you will find three folders.

These folders are:

Install first-Java JRE

Windows 32 bits Java RAID GUI

Windows 64 bits Java RAID GUI

4. Double  click  the  Install  first-Java  JRE  folder.  Install  the  Java  Runtime

Environment  Software  by  clicking  the

j2re-1_4_2-windows-i586-

iftw.exe

.  Follow the instructions.

5. Double  click  the  Windows  32  bits  Java  RAID  GUI  folder.  Install  the

SATARAID5 

software 

by 

clicking

3132_x86_win32_SATARAID5_1020

.

a. Welcome  to  the  InstallShield  Wizard  for  3132  SATARAID5.

Click

Next

.

b. InstallShield Wizard: Choose Destination Location. Click 

Next

.

c. InstallShield Wizard: Select Components. Click 

Next

.

d. InstallShield Wizard: Start Copying Files. Click 

Next

.

e. Do you want to create a desktop icon? Click either 

Yes

or

No

.

a. InstallShield  Wizard:  InstallShield  Wizard  Complete.  Click 

Finish

.

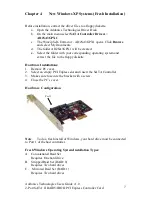
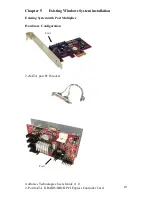
Hardware Installations: 

6. Power OFF PC and remove its cover.

7. Select an empty PCI Express slot and insert the SATA Controller.

8. Makes sure to secure the bracket with a screw.

9. Close the PC’s cover.

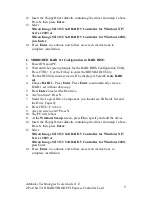
Windows XP Driver Installations

10. Turn computer ON. When Windows boots up,  “Found New Hardware

Wizard” pops on the screen and the Silicon Image SiI 3132 SoftRaid5 

Controller is identified. 

11. Please wait while the wizard installs the software…

12. The “Found New Hardware Wizard” pops on the screen and the Silicon 

Image’s Pseudo Processor Device is identified. 

13. Please wait while the wizard installs the software…

Summary of Contents for AD2SA3GPX1

Page 1: ...Addonics T E C H N O L O G I E S 2 Port SATA II RAID5 JBOD PCI Express Controller Card AD2SA3GPX1 User s Guide Revision 1 1...

Page 2: ...workmanship during the warranty period specified for each product when used within the limits set forth in the Specifications section in the user guide Unauthorized tempering of the product or using...

Page 3: ...pecifications 3 Chapter 2 RAID Tutorial 4 Chapter 3 BIOS Installation 5 6 Chapter 4 New Windows XP System fresh installation 7 9 Chapter 5 Existing Windows System installation 10 15 Hardware Configura...

Page 4: ...nnels Independent Link Transport and data FIFO Independent command fetch scatter gather and command execution Supports Native Command Queuing and Tagged Command Queuing Supports First Party DMA Suppor...

Page 5: ...neouslywritten to two disks This redundancy provides instantaneous protection from a single disk failure If a read failure occurs on one drive the system reads the data from the other drive 2 3 Mirror...

Page 6: ...Y to exit the setup 7 Your RAID configuration is complete Please proceed to software installation section 3 2 Creating Mirrored Sets RAID 1 1 As the BIOS boots Press CTRL S or F4 to enter the raid bi...

Page 7: ...t then all of the data will be lost If the set being deleted is a Mirrored set then the data will remain intact and accessible on both drives 3 6 Rebuilding Mirrored Sets 1 After replacing the failed...

Page 8: ...be created e Select the folder with your corresponding operating system and extract the file to the floppy diskette Hardware Installations 1 Remove PC cover 2 Select an empty PCI Express slot and inse...

Page 9: ...driver 11 Insert the Floppy Driver diskette containing the driver from step 1 above Press S then press Enter 12 Select Silicon Image SiI 3132 SoftRAID 5 Controller for Windows XP Server 2003 or Silic...

Page 10: ...RAID Utility 3 The RAID Utility menu screen will be displayed Select Create RAID set 4 Choose RAID 1 Press Enter Press Enter to automatically create a RAID 1 set without data copy 5 Press Enter to se...

Page 11: ...Users Guide v1 0 2 Port SATA II RAID5 JBOD PCI Express Controller Card 10 Chapter 5 Existing Windows System installation Existing System with Port Multiplier Hardware Configuration 2 eSATA port PCI b...

Page 12: ...system Insert the CDROM that came with the product The Addonics Technologies Driver Disk window pops up Select SATA Utilities Model AD2SA3GPX1 2 The WinZip Self Extractor SiI_3132 exe window pops up...

Page 13: ...the SATA Controller 7 Makes sure to secure the bracket with a screw 8 Close the PC s cover Windows 2000 Driver Installations 9 Turn computer ON When Windows boots up Found New Hardware Wizard pops on...

Page 14: ...der Install the SATARAID5 software by clicking 3132_x86_win32_SATARAID5_1020 a Welcome to the InstallShield Wizard for 3132 SATARAID5 Click Next b InstallShield Wizard Choose Destination Location Clic...

Page 15: ...t SATA II RAID5 JBOD PCI Express Controller Card 14 14 When the new hardware wizard has finished installing the Silicon Image s Pseudo Processor Device the System Setting Change window pops up Do you...

Page 16: ...der Install the SATARAID5 software by clicking 3132_x86_win32_SATARAID5_1020 a Welcome to the InstallShield Wizard for 3132 SATARAID5 Click Next b InstallShield Wizard Choose Destination Location Clic...

Page 17: ...hange window pops up Do you want to restart your computer now Click Yes Verifying Host Controller Driver installation under Windows 2000 XP 2003 1 Right click on My Computer icon select Properties lef...

Page 18: ...ou out MODEL NUMBER Please have this number on hand SYSTEM INFORMATION Type of computer peripherals etc OPERATING SYSTEM What version of Windows WHAT S THE TROUBLE Give enough information about your p...

Reviews: