| ADCOM GTP-860
II
Owner’s Manual
6
7
ADCOM GTP-860
II
Owner’s Manual |
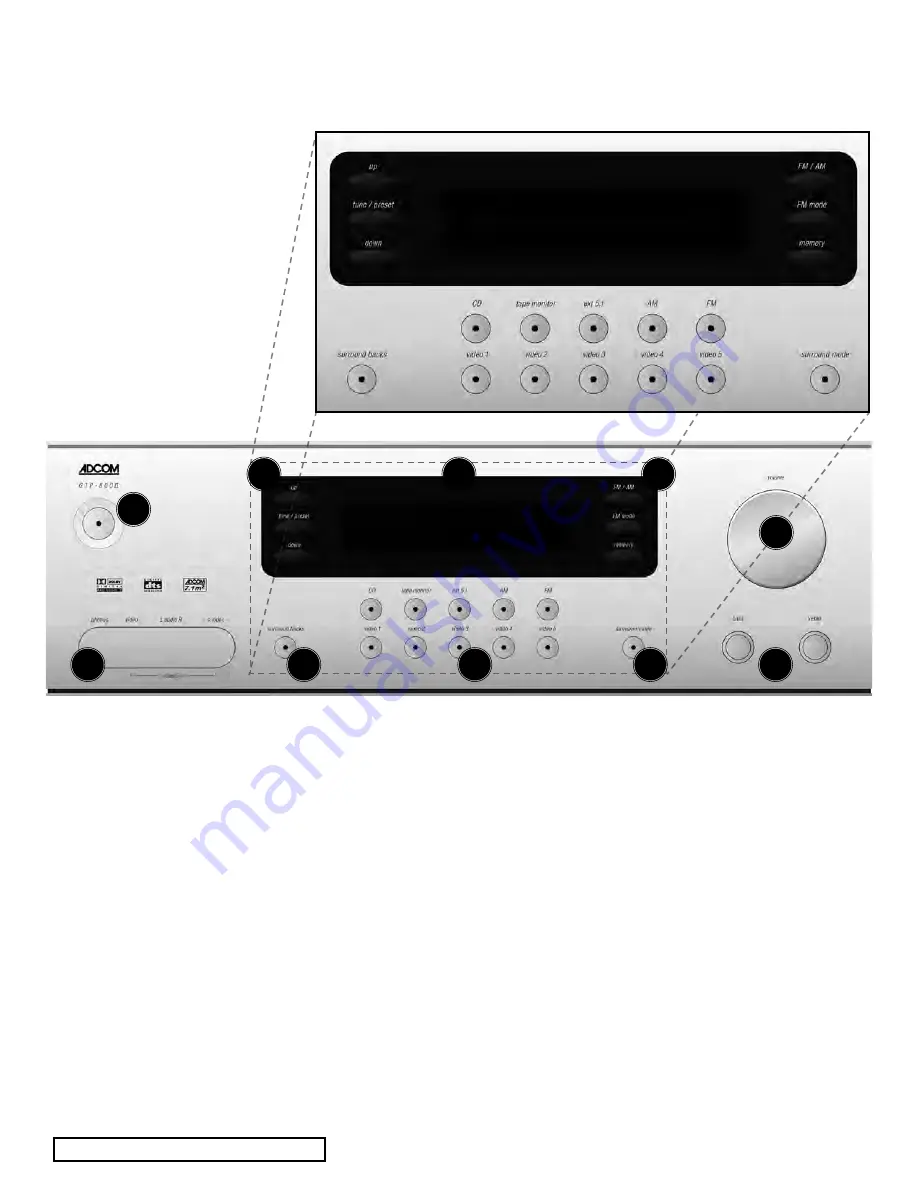
[1] Power Button
[2] Tuner Buttons
[3] Display Window
[4] Volume Knob
[5] Headphone/Vid 5 In
[6] Surround Backs
[7] Input Selector
[8] Surround Mode
[9] Bass/Treble Knobs
1.0 Description of Unit
1.1 Interface Overview
The GTP-860
II
’s front panel is
designed for ease of operation. All
controls are logically grouped for easy,
intuitive operation. Familiarize your-
self with the preceding diagram and
read the short explanations of each
feature below. When you finish, you
will be well on your way to enjoy-
ing the GTP-860
II
’s convenience and
sound quality.
[1] On/Off Power Switch
Depress the Power button to switch
the preamplifier to its On state. The
LED in the power button will light up
RED. Pressing the Power switch again
will turn the unit OFF completely.
If the unit is currently ON, pressing
the power button [27] on the remote
control, will switch the unit to the
standby mode. The front panel indi-
cators will turn off except for the LED
in the power button which will turn
to an amber color. Press the power
button on the remote again to switch
the unit from the Stand-By state to
the On state, and the last selected
source will be indicated in the
display.If the preamp is in the Stand-
By state, it can be turned On by
pressing any of the input selector
buttons on the front panel.
NOTE: In Stand-By mode the GTP-860
II
uses
very little power. However, it is recommended
that you switch the unit completely off if it is
not going to be used for more than a couple of
days. Turn the unit Off by pressing the Power
button on the front panel. All lights will extin-
guish. When the GTP-860
II
is plugged into the
wall current may still be flowing into the trans-
former. Only when the GTP-860
II
is unplugged
is all current into the device stopped.
GTP-860II Front Panel
1
9
5
2
2
3
7
6
8
4


