Adcom GTP-860II Owner'S Manual Download Page 24

|  ADCOM GTP-860

II

 Owner’s Manual

24

25

ADCOM GTP-860

II

 Owner’s Manual |

3.0 Operation & Setup 

After connecting your home theater, 
you may elect to configure the GTP-
860

II

 to the specific speaker arrange-

ment and dimensions of your system. 
The procedures described in this sec-
tion demonstrate how to use the GTP-
860

II

’s on-screen display to enter 

this information. Once complete, 
the GTP-860

II

 stores this informa-

tion so that these tasks need only be 
repeated if speakers are changed or 
substantially repositioned.   In addi-
tion to speaker setup, many other 
operations can be configured using 
the on-screen display system.

3.1 On-Screen Display

The GTP-860

II

 is equipped with an 

elaborate On-Screen Display (OSD) 
facility. As the OSD is an essential tool 
to set up the various parameters for 
surround sound correctly it is recom-
mended that you connect your monitor 
or television to the GTP-860

II

.  The 

OSD signal is only availble on the S-
Video and composite video outputs, 
not on the component video output.

The OSD is engaged by pressing main 
and then the setup button on the 
remote control. The SETUP Menu will 
appear as below:

Use the cursor buttons [36] on the 

remote control to navigate between 
the available options. The up and 
down arrow buttons are used to navi-
gate and select an option. The left 
or right arrow buttons are used to 
change settings, and select [37] is 
used to choose the desired option. 

3.2 Speaker Config

In order to optimize the performance 
of you system, the GTP-860 II can be 
configured specifically for the speak-
ers in your system. Information about 
each of your speakers allows the 
GTP860 II to tailor the audio output 
for best sound. The setup procedure 
breaks your speaker system into five 
groups: front, center, surrounds, sur-
round backs and subwoofer. 
There are a few options for each group.

Front: small or large
Center: small, large or none
Surrounds: small, large or none
Surr backs: yes or no
Subwoofer: yes or no

The large mode is used when the 
speaker is full range and capable of 
reproducing the entire audible fre-
quency spectrum from 20Hz to 20kHz. 
The small mode is used when the 
speaker is not capable of reproduc-
ing the deepest bass portion of the 
audio frequency 20Hz to 80Hz. When 
a speaker is set to small, the low fre-
quencies intended for that speaker 
are redirected either to the front 
speakers or the subwoofer. The front 
speakers can only be set to small if 
you are also using a subwoofer.

If you are not using one of the speakers 
in a group select “none” and the infor-
mation for that channel will be redi-
rected to the speakers you are using.

For best results, you should consider 
using a center speaker. Ideally it 
should be the same type as the left 

and right speakers. Using a separate 
center channel speaker will allow the 
dialogue to cut through even the big-
gest sound effects and musical scores. 
Having the sound spread across three 
front speakers also stabilizes the ste-
reo image, making the usable listen-
ing area much bigger. If you do not 
wish to use a center speaker select 
“no” for the center speaker.

Installing surround speakers will 
greatly enhance the surround experi-
ence as these speakers add consider-
ably to the overall sense of spacious-
ness in the playback system. It is best 
to choose loudspeakers which are 
similar in power handling and perfor-
mance capability to those of the front 
channels. If you are using only one 
pair of surround speakers, make sure 
to connect them to the surround rear 
outputs. If you choose to install the 
surround back speakers, locate them 
behind your listening position, and 
connect them to the surround back 
outputs. Surround back channels add 
to the spaciousness and coherence 
of the sound field, but the surround 
rear channels must be present for the 
desired effect. If you are using sur-
round back speakers select the surr 
backs option to yes. Note that the 
surround back speakers will track the 
surround rear speakers with regard to 
small/large settings.

Many film sound tracks rely heavily 
on very low frequency sound effects 
which are difficult for normal or 
smaller hi-fi speakers to reproduce. 
To faithfully reproduce these low 
frequencies you can use a specially 
designed low frequency loudspeaker 
with its own built-in amplifier (“pow-
ered subwoofer”). Because it is dif-
ficult to hear which direction very 
low frequencies come from, you only 
normally need one subwoofer and 
this can be placed virtually anywhere 
in the room. Dolby Digital uses a 
dedicated low frequency effects (LFE) 
channel. If a subwoofer has been 
selected, the LFE channel will be fed 
to the subwoofer output.
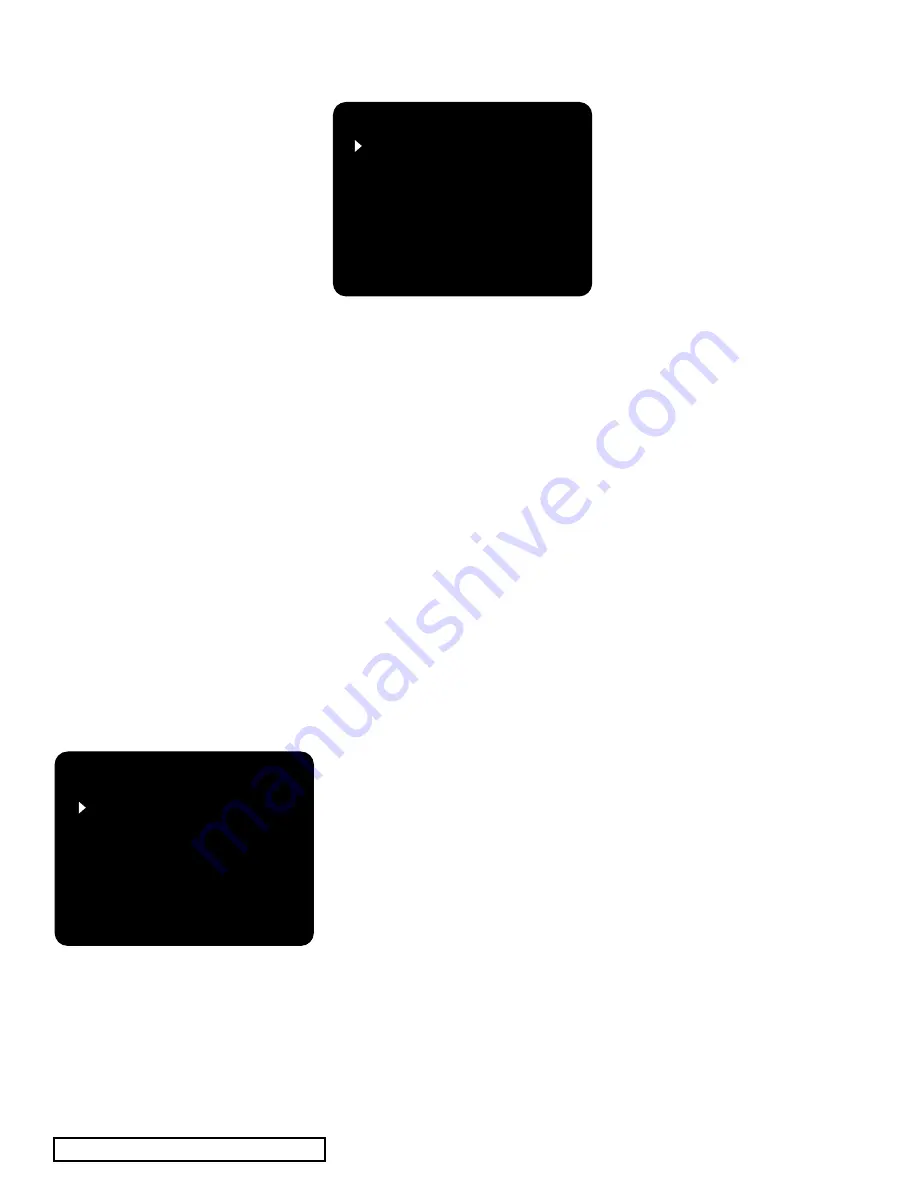
SETUP MAIN MENU

INPUT CONFIG

SPEAKER CONFIG

DELAY CONFIG

CHANNEL  BALANCE

CHANNEL TEST

PROLOGIC II SETUP

EXIT WITH SAVE

EXIT WITHOUT SAVE

     DELAY CONFIG

FRONT L/R DIS:    10ft

CENTER DIS:           8ft

SURROUND DIS:      5ft

DELAY UNIT:

   FEET

RETURN TO SETUP

     INPUT CONFIG

SOURCE:        VIDEO 2

INPUT:           OPTICAL2

EXT 5.1:         OFF

MODE:           DOLBY D

RETURN TO SETUP

     PROLOGIC II SETUP

CENTER WIDTH: 

3

DIMENSION:

0

RETURN TO SETUP

  CHANNEL BALANCE

LEFT:     

0dB

CENTER: 

3dB

RIGHT:

0dB

REAR  R :

0dB

BACK  R :

0dB

BACK  L :

0dB

REAR  L :

0dB

SUB:

0dB

RETURN TO SETUP

  SPEAKER CONFIG

FRONT: 

SMALL

CENTER: 

SMALL

SURROUNDS:  SMALL

SURR BACKS:  YES

SUBWOOFER:  YES

RETURN TO SETUP

  CHANNEL TEST

LEFT:     

0dB

CENTER: 

1dB

RIGHT:

0dB

REAR  R :

0dB

BACK  R :

0dB

BACK  L :

0dB

REAR  L :

0dB

SUB:

0dB

RETURN TO SETUP

Summary of Contents for GTP-860II

Page 1: ...cessing Tuner Preamplifier surround mode video 5 video 4 video 3 video 2 video 1 FM AM ext 5 1 tape monitor CD surround backs s video video 5 in L audio R video phones bass treble volume P R O L O G I...

Page 2: ...gn and Engineering Awards and have appeared on Stereophile s Recommended Components lists over 70 times since 1988 A reputation worth its weight in gold ENGINEERING PASSION Every Adcom component is no...

Page 3: ...EMOTE FUNCTION TABLE 18 19 2 3 PROGRAMMING YOUR REMOTE CONTROL 20 21 2 4 PROGRAMMING MACRO BUTTONS 21 2 5 DISCRETE CUSTOM CODES FOR INSTALLERS 22 SPEAKER PLACEMENT DRAWINGS 23 OPERATION SETUP 3 1 ON S...

Page 4: ...iced by qualified service personnel when A The power cord or the plug has been damaged or B Objects have fallen or liquid has been spilled into the unit or C The unit has been exposed to rain or liqui...

Page 5: ...ators and hot air ducts We recommend that you exercise care when placing components on top of the GTP 860II If you are placing a heat producing component such as an amplifier on top of or below the GT...

Page 6: ...y ON pressing the power button 27 on the remote control will switch the unit to the standby mode The front panel indi cators will turn off except for the LED in the power button which will turn to an...

Page 7: ...ntly selected or last selected followed by the stereo reception indicator if the station is being received in stereo The numbers next to the FM text are the frequency of the selected preset or station...

Page 8: ...als The 7 1m process can also be used to drive your surround back speakers when you are listening to an exter nally decoded DVD audio or SACD multi channel disc Due to the varying nature of film sound...

Page 9: ...utilize all your speakers in your sys tem when listening to a CD Pro Logic II Panorama PLII_P is a version of Pro Logic II that is intended for use with movie playback that spreads the images from th...

Page 10: ...robably answer most of your questions about interfacing the GTP 860II with other components in your system Note that the GTP 860II s RCA style jacks have color coded centers to make connections easier...

Page 11: ...inputs from a DVD player as you might do when listening to a DVD A or SACD disc 14 Video Analog Audio Inputs Outputs Apart from the audio signal these inputs will also accept a video signal which will...

Page 12: ...e connected correctly for instance use the red plugs at either end to connect the center channel and the white plugs for the subwoofer channel 20 Digital Audio Inputs Use these inputs to connect the c...

Page 13: ...x out monitor out Y PB PR Y PB PR Y PB PR video 1 component input video 2 component input video component output antenna AM gnd out tape front front surr rear surrounds back multi zone source output m...

Page 14: ...at button 43 Random button 44 Tuning Up Down buttons 45 Pre Tune button 46 RDS button 47 AM button 48 FM button 49 M1 M2 M3 M4 Macro Keys 50 Sleep button 51 Backlight button 52 Dim button 53 Main butt...

Page 15: ...h as volume saved under each page The ADCOM universal remote control ler is preset to operate all GTP 860II functions MAIN and TUNER device mode and most GCD 700 750 CD functions CD device mode Alkali...

Page 16: ...ode this is pre programmed to enter a selection chosen via the menu system 38 Direct Access Keys buttons 1 through 10 and 10 In CD mode buttons are pre programmed as track access com mands for the ADC...

Page 17: ...own on the Display Panel To adjust the Sleep Delay press the sleep but ton each consecutive press will reduce the sleep time in 30 minute increments as shown in the Display Panel To cancel the sleep m...

Page 18: ...CD POWER MUTE VOLUME UP VOLUME DOWN TAPE EXT 5 1 D RANGE STOP MODE PAUSE PLAY SETUP UP RIGHT DOWN Main Selects Main Selects Video 1 Selects Video 2 Selects Video 3 Selects Video 4 Selects Video 5 Sele...

Page 19: ...urrent Track Random Play Programmable Programmable Programmable Programmable Programmable Programmable For Macro Use For Macro Use For Macro Use For Macro Use Sleep BacklightsAll Buttons Programmable...

Page 20: ...e Begin by deciding which source com ponent s commands you will be trans ferring to the ADCOM remote Then press the appropriate source selector button For example if you re teach ing your ADCOM remote...

Page 21: ...1 vid 2 and vid 3 in Group 1 vid 4 vid 5 tuner and CD in Group 2 When you program a Group 1 macro you will start by pushing the main source selector After you ve completed and memo rized that macro co...

Page 22: ...ht Trim Back Right Trim 0010 1010 1010 1010 0111 0000 1111 0000 1111 0010 0111 0010 0011 1010 1011 1010 0111 1010 0100 0010 1100 0010 0110 0010 1110 0010 0001 0000 1001 0000 0101 0000 1101 0000 0001 0...

Page 23: ...round rear right front left front right center surround back right surround back left This speaker setting is preferred if you are not using surround backs This is the preferred speaker setting if you...

Page 24: ...ider using a center speaker Ideally it should be the same type as the left and right speakers Using a separate center channel speaker will allow the dialogue to cut through even the big gest sound eff...

Page 25: ...ofer level while listening to music If you wish to adjust the channel lev els without using the test tone then select the Channel Balance menu or push the bal 40 button on the remote Note that only sp...

Page 26: ...the front left right and center speaker As the value in increased the appa rant image width of the sound stage will increase 3 7 Other Setup Functions The GTP 860 II also has certain func tions that c...

Page 27: ...gnal Multi path signals or interfe ence from another station Interference from other electrical sources computers games consoles Interference from fluorescent lighting or electrical motor Station sign...

Page 28: ...the wall or the first component the cable is connected to i e the cable box or VCR If the hum is no longer present you must insert a 75 ground loop isolator before reconnect ing the line You should ch...

Page 29: ...cial Use Only ADCOM warrants this product against defects in materials or workmanship for a period of ninety 90 days after the date of original purchase from an ADCOM authorized dealer During this per...

Page 30: ...ADCOM GTP 860II Owner s Manual 30...

Page 31: ...mum Output Voltage 4 6V Tone Controls L and R front only Bass effective below 200Hz Bass Max Gain Cut 10dB 20Hz Treble effective above 6 3kHz Treble Max Gain Cut 10dB 20Hz FM Tuner Usable Mono Sensiti...

Page 32: ...ADCOM A division of Klein Technology Group LLC 8541 East Anderson Drive Scottsdale Arizona 85255 Voice 480 607 2277 Fax 480 348 9876 http www adcom com GTP860II_manual_v1...

Reviews: