background image

1

1

PRESTIGE 42-50-75-100-120 Solo : A1007856 - 664Y6200 • G

EN

FR

NL

ES

IT

DE

PL

RU

en

39

STARTING UP

STARTING UP THE BOILER

Set-up conditions

•  All connections made
•  Gas conversion carried out as required 
•  Condensate trap full of water
•  Electrical power supply on
•  Gas supply open
•  Hydraulic circuit full of water

Procedure

1.  Check that there is no gas leak.

2.  Push in the ON/OFF master switch (   ). 
3.  If a room thermostat is installed, possibly increase the temperature set-point to generate a 

demand.

4.  Check the gas pressure and allow the boiler to heat up for a few minutes
5.  Check and adjust the burner according to local standards and regulations, refer to “Checking 

and Adjusting the Burner” on page 39.

6.  Set the central heating temperature to the required value using the control panel. Refer to 

“Boiler Setup Guide” on page 8 and to the Installer’s Handbook (or the ACVMax System 

Control manual, depending on the boiler build, refer to page 3.)

7.  After 5 minutes of operation, bleed the heating circuit until all air is evacuated and restore a 

1.5 bar pressure.

8.  Bleed the central heating circuit once again and top it up with water to get the required pres-

sure, if necessary.

9.  Make sure that the central heating system is properly balanced and, if needed, adjust the 

valves to prevent certain circuits or radiators from getting a flow rate that is far above or below 

the set rate.

Follow-on tasks

1.  Check that there are no leaks.

2.  Check that the flow rate in the appliance is sufficient  as follows :

•  Operate the boiler at maximum power
•  Once the temperatures are stable, read out the supply and return temperatures
•  Check that the difference between the supply and return temperature is equal or less than 

20k.

•  If the Delta T is higher than 20k, check the pump settings/specifications.  

CHECKING AND ADJUSTING THE BURNER

When the burner operates at full power, the CO

2

 rate must be within the limits mentioned 

in the technical characteristics, (see “Combustion Characteristics” on page 18).

Set-up conditions

•  Operating boiler

Procedure 

1.  Check if the ACVMAX parameters are set to meet the user's requirements (refer to “Boiler Setup 

Guide” on page 8), and change them if required. 

2.  Put the boiler to maximum power mode (Refer to the Installer’s Handbook (or the ACVMax System 

Control manual, depending on the boiler build, refer to page 3)).

3.  Using a pressure tester, check that the dynamic gas pressure at the gas valve is at least 18 mbar. 
4.  Allow the appliance to heat for a few minutes until it reaches at least 60°C. 
5.  Make sure that the front panel is closed. 

6.  Measure the burner combustion by placing the flue gas analyser probe into the measurement unit 

port on the flue pipe and compare the CO and CO

2

 values displayed with those indicated in the 

combustion characteristics table. Refer to “Combustion Characteristics” on page 18. 

7.  Open the front panel, refer to “Removal and Installation of the Front and Top Panels” on page 32.

8.  Measure the CO

2

.  If the difference in CO

2

 Max power with and without front panel is > 0.4% (abso-

lute), then check the flue system for recirculation. 

9.  If the CO

value (front panel closed) differs by more than 0.3% from the value mentioned in the 

“Combustion Characteristics” on page 18, carry out the adjustment mentioned in the procedure 

below.

10.  Then put the boiler to the minimum power mode (Refer to the  Installer’s Handbook (or the ACVMax 

System Control manual, depending on the boiler build, refer to page 3)). Allow the boiler to stabilize 

for a few minutes.

11.  Measure the CO

2

 level. It must be equal to the value at full power, or lower than that value by 0.5% 

maximum. In case of significant deviation, please contact ACV's maintenance department.

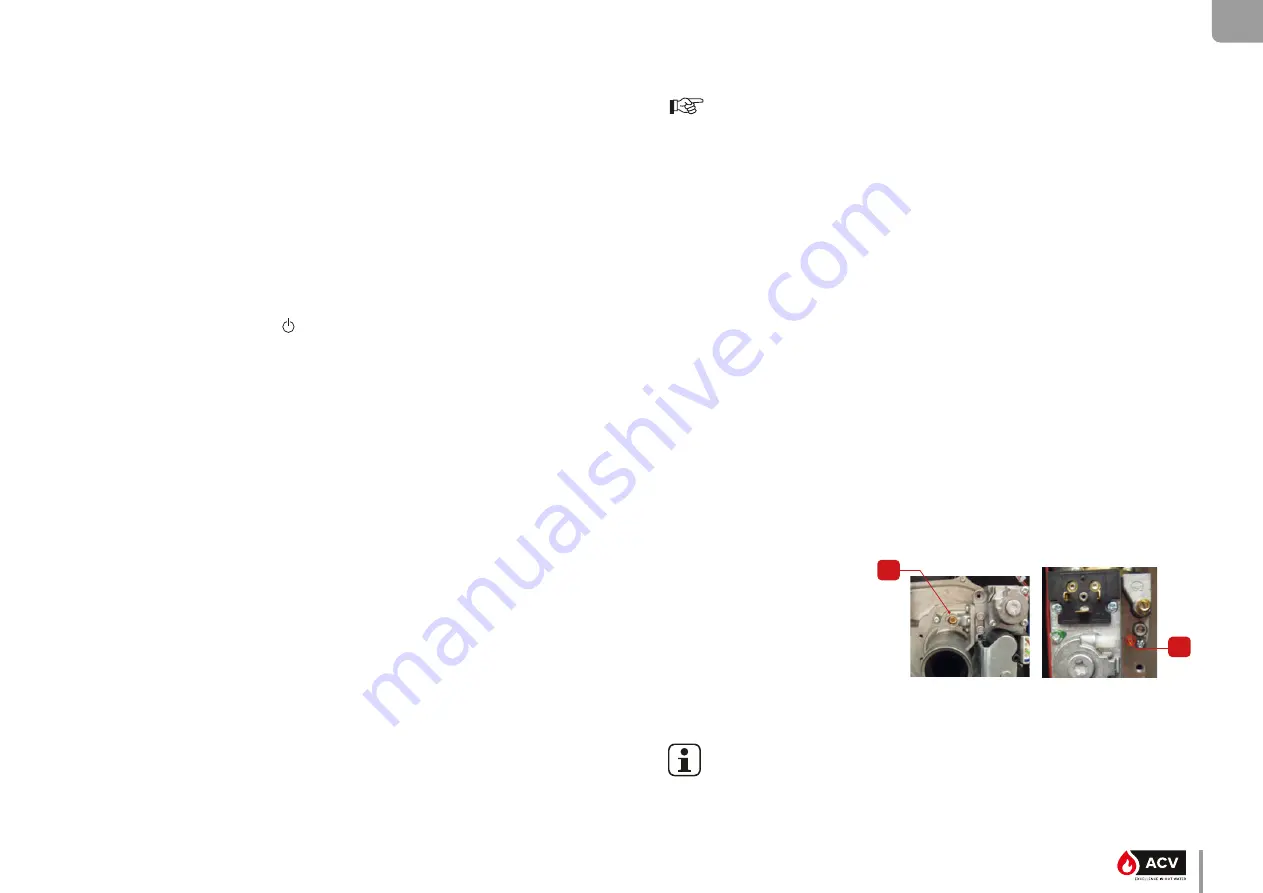
CO2 adjustment procedure 

To adjust the CO

2

 rate, rotate the venturi  

screw (

1

) :

•  to the left (counter-clockwise) to in-

crease the  CO

2

 rate.

•  to the right (clockwise) to decrease the  

CO

2

 rate. 

Follow-on tasks

None

The CO

2

 adjustment screw (1) of the Prestige 100 - 120 Solo is a worm screw, whose 

rotation in a direction causes the CO

2

 rate to cyclically increase to the maximum, then 

decrease to the minimum, then increase again, and so on. To adjust, monitor the value 

change on the analyzer to determine whether the rotation in the selected direction 

causes the CO

2

 value to increase or decrease

Prestige 42 - 50 - 75 Solo

Prestige 100 - 120 Solo

Summary of Contents for Prestige Solo 100

Page 1: ...EN FR NL ES IT DE PL RU Installation operation and maintenance instructions 42 50 75 100 120 Solo Prestige for the Installer and the User A1007856 664Y6200 G...

Page 2: ...ue Pipe Length 31 Removal and Installation of the Front and Top Panels 32 Electrical Connection 32 Gas Connection 33 Conversion to Propane and G25 Natural Gas 33 Ball condensate Trap Installation 34 C...

Page 3: ...ards that ACV applies to its appliances during production inspection and transport faults may occur Please immediately notify your approved installer of any faults If you smell gas Immediately isolate...

Page 4: ...mbols on the appliance Meaning Gas connection Condensate trap ball syphon Domestic Hot Water circuit Primary circuit Connection to the sewage system Electricity Alarm Symbols in the man ual Meaning Es...

Page 5: ...number Code and serial number N of the appliance are indicated on its rating plate and must be provided to ACV in case of warranty claim Failure to do so will make the claim void BOILER MARKING Locati...

Page 6: ...r to access the menus of the ACVMAX controller to set up the system 4 Arrow keys and OK key to browse through the screens of the ACVMAX controller set up the boiler increase and decrease the displayed...

Page 7: ...riority Timeout Central heating and domestic hot water calls are being received simultane ously The domestic hot water priority time limit has been exceeded Priority will now switch back and forth bet...

Page 8: ...at a time If a large amount of cold water is added in a hot boiler the boiler can be damaged definitively If the system needs to be refilled repeatedly with water please contact your installer Check...

Page 9: ...mperature setpoint then press OK to store the setting The CH2 Setpoint screen appears CH2 Setpoint prompts to enter the fixed setpoint for a CH2 heating call when a Setpoint option is chosen in Select...

Page 10: ...a CH1 heating call when an Outdoor Reset option is chosen in Select CH Demand Outdoor curve presets are available to cover most applications The outdoor curve can also be adjusted to any desired setti...

Page 11: ...ete Additional changes can be made in the Installer Menu if required Press OK to return to EZ Setup Menu EZ Setup Complete Heating EZ setup is complete Additional changes can be made in the Installer...

Page 12: ...res the use of an optional Indirect Water Heater Sensor The Prestige monitors the DHW storage temperature and generates a DHW call whenever the temperature drops below the DHW storage setpoint by 3 C...

Page 13: ...t all EZ setup settings Display Easy Setup Display EZ Setup allows to select the interface language Nine different lan guages English French Dutch Span ish Italian German Czech Polish and Russian Pres...

Page 14: ...the object CH or DHW icon then press OK to toggle between the enabled disabled status The status of the circuit is displayed at the top of the screen Using the arrow keys select the HOME or RETURN ic...

Page 15: ...5 C the burner starts up until the flow temperature rises above 15 C The pumps continue to run for around 10 minutes The function can be enabled or disabled through the installer menu When the frost...

Page 16: ...rotection P3 DHW P4 84 C 61 C 1 2 PRESTIGE 87 mm 178 mm 220 mm 300 mm 371mm 410 mm 364 mm 397 mm 551 mm 632 mm 1086 mm 998 mm 150 mm 600 mm 132 mm 134 mm 100 mm PRESTIGE 42 50 75 100 120 Solo A1007856...

Page 17: ...960 mm 406 mm 406 mm 888 mm Prestige 42 50 75 Solo Prestige 100 120 Solo PRESTIGE 42 50 75 100 120 Solo A1007856 664Y6200 G EN FR NL ES IT DE PL RU en 17 TECHNICAL CHARACTERISTICS CLEARANCE WALL MOUNT...

Page 18: ...10 2 8 8 10 4 8 8 10 4 8 7 10 3 8 8 10 4 Min output CO2 8 7 10 2 8 8 10 4 8 8 10 4 8 7 10 3 8 8 10 4 CO2 closed front panel Max output CO2 9 0 10 5 9 1 10 7 9 1 10 7 9 0 10 6 9 1 10 7 Min output CO2...

Page 19: ...I2E3B P II2ELL3B P DK II2H3B P EE II2H3B P ES II2H3P FI II2H3B P FR II2Er3P II2E 3 GB II2H3P II2H3 GR II2H3P II2H3 HR II2H3P II2H3B P HU II2H3B P IE II2H3P II2H3 Gas type G20 G25 G20 G25 G31 G30 G30 G...

Page 20: ...Low temperature circuit For low temp circuit operation black wires from X3 terminals 1 6 must be routed to X20 terminals 3 4 13 High limit switch 14 Low water pressure sensor 15 PCB Display 16 ACVMax...

Page 21: ...8 7 6 5 4 3 2 1 1 2 3 4 5 6 1 2 3 5 F00 X100 W ON OFF 3 230 V 50Hz 1 N L N L N L 2 6 25 B Y Gr Br B Y Gr Br Br B Bk B Y Gr Y Gr Y Gr Y Gr Y Gr Y Gr V B Y Gr W B Y Gr Br B Y Gr Br B Y Gr B Or Y Gr X101...

Page 22: ...ture circuit For low temp circuit operation black wires from X3 terminals 1 6 must be routed to X20 terminals 3 4 13 High limit switch 14 Low water pressure sensor 15 PCB Display 16 ACVMax programmati...

Page 23: ...2 3 4 5 6 B V B W P13 B Or 1 2 3 Bk B Y Gr W Br B Br Br Y Gr B B 1 2 3 4 5 6 7 8 8 7 6 5 4 3 2 1 1 2 3 5 F00 X100 N L N L W ON OFF 3 230 V 50Hz 1 N L N L N L 2 6 B Y Gr Br B Y Gr Br Br B Bk B Y Gr Y...

Page 24: ...OPERATING CONDITIONS Maximum Service Pressure Primary circuit 4 bar Maximum Operating Conditions Maximum temperature primary 87 C Water Quality See Recommendations for the Prevention of Corrosion and...

Page 25: ...ate exchanger or equivalent In that case it is recommended to install a hydrocyclone or magnetic filter on the installation side 2 Limit the fill frequency Limit fill operations In order to check the...

Page 26: ...e by persons including children with reduced physical sensory or mental capabilities or lack of experience and knowledge unless supervised or unless they have been given instruction concerning the use...

Page 27: ...vent built in PRESTIGE 1 1 7 2 4 5 6 8 3 PRESTIGE 1 1 2 3 4 5 6 7 8 9 Cold water Hot water Cold water Hot water PRESTIGE 42 50 75 100 120 Solo A1007856 664Y6200 G EN FR NL ES IT DE PL RU en 27 INSTAL...

Page 28: ...bly Make sure that the condensate drain assembly is filled with water before starting up the boiler and check regularly the water level Fill with water as necessary It is mandatory to ventilate the bo...

Page 29: ...only C53 x Connection to separate ducts for supplying combustion air and discharging combustion prod ucts these ducts may end in zones with different pressure levels but are not allowed to be install...

Page 30: ...000 mm 537D6304 2000 mm 537D6517 Sliding extension straight 50 to 130 mm 537D6305 43 45 537D6306 87 90 537D6307 Measuring Tube 537D6308 Measuring T piece with inspection 537D6310 Weather Slate Steep 2...

Page 31: ...e assembly is comprised of 2 x 90 elbows 6 meters of straight pipes 2 x 45 elbows The installer can check that the connection complies with the recommended value using the method below Method a Calcul...

Page 32: ...s Top panel Prestige 100 120 Solo only To remove the top panel the front panel must be removed 1 Release four screws 2 Retain for reinstallation 2 Lift the top panel to remove it from the boiler Insta...

Page 33: ...iler room air vent system the tightness of flue gas outlet pipes and of the burner chamber plate Control the gas pressure and consumption at appliance start up Check the boiler CO2 adjustment refer to...

Page 34: ...reinstal lation 6 Remove the natural gas orifice and install as necessary the propane orifice 4 in the center of the O ring 3 Make sure to position the O ring correctly 7 Reinstall the adaptation pie...

Page 35: ...lowing pages with the required accessories required electrical connections and ACVMAX setup using the EZ setup function Additional configurations requiring more advanced setup are shown in the Install...

Page 36: ...CV Max B Br 1 2 3 4 5 1 2 3 4 5 1 2 3 4 5 6 7 8 Or Bk Bk V Bk 4 2 1 3 2 1 8 9 10 11 12 1 2 3 4 5 1 2 3 4 5 6 7 8 9 10 W R Y R Y W 6 7 8 9 10 1 2 3 4 5 X3 1 2 3 4 5 6 7 8 9 10 11 12 V W R Bk 7 8 9 10 1...

Page 37: ...and steps in Boiler Setup Guide on page 8 DHW settings when no optional water heater sensor is installed with the DHW tank DHW EZ Setup Select DHW Demand Thermostat Sensor Select Thermostat when no o...

Page 38: ...heating primary circuit Refer to the hot water preparation tank manual for more information Set up conditions External power supply isolated DHW circuit if any under pressure Filling procedure 1 Open...

Page 39: ...X parameters are set to meet the user s requirements refer to Boiler Setup Guide on page 8 and change them if required 2 Put the boiler to maximum power mode Refer to the Installer s Handbook or the A...

Page 40: ...INTENANCE BOILER SHUT DOWN FOR MAINTENANCE 1 Switch the boiler off using the ON OFF master switch and isolate the external power supply 2 Close the gas supply valve of the boiler PERIODIC BOILER MAINT...

Page 41: ...EN FR NL ES IT DE PL RU en 41 MAINTENANCE REMOVAL CHECK AND INSTALLATION OF THE BURNER ELECTRODE Set up conditions Boiler shut down External power supply isolated Gas supply closed Front and top panel...

Page 42: ...dition and replace it if required Check that there is no discoloured or cracked area on the burner hood If there is contact ACV s maintenance department 8 Remove and replace the seals and gaskets 9 If...

Page 43: ...3 1 5 7 6 8 9 10 11 4 12 2 X 5 5 6 7 11 9 8 1 3 4 12 10 2 X 6 PRESTIGE 42 50 75 100 120 Solo A1007856 664Y6200 G EN FR NL ES IT DE PL RU en 43 MAINTENANCE Prestige 42 50 75 Solo Prestige 100 120 Solo...

Page 44: ...ge 42 Front and top panels open as required refer to Removal and Installation of the Front and Top Panels on page 32 Procedure 1 Brush and vacuum clean the chamber 2 Pour some water in the chamber to...

Page 45: ...ation 2 If the problem persists replace the ACVMax circuit board E 13 Reset limit reached Resets are limited to 5 every 15 minutes 1 Turn unit off and on to resume normal operation 2 If the problem pe...

Page 46: ...s been detected in the appliance flue temperature sensor circuit 1 Check flue temperature sensor and wiring harness for a short circuit 2 If necessary replace the sensor or the wire harness 3 After fi...

Page 47: ...sensor or the wire harness 3 After fixing the problem reset the appliance and resume normal operation E 92 System Sensor Open An open circuit has been detected in the system tem perature sensor circui...

Page 48: ...PRESTIGE 42 50 75 100 120 Solo A1007856 664Y6200 G en 48 EN FR NL ES IT DE PL RU SERVICE LOG Service date CO2 Flue gas T Efficiency Remarks Name Signature SERVICE LOG...

Page 49: ...12 2 14 6 20 3 29 3 33 6 at rated output and high temp re gime P4 kW 40 7 48 5 67 8 97 5 111 8 Useful efficiency at 30 of rated heat output 1 97 7 98 2 97 7 97 4 97 3 at rated output and high temp re...

Page 50: ...ion condensation condensation condensation condensation condensation condensation condensation condensation Declared load profile for water heating XL XL Seasonal space heating energy efficiency class...

Page 51: ...PRESTIGE 42 50 75 100 120 Solo A1007856 664Y6200 G EN FR NL ES IT DE PL RU en 51...

Page 52: ...PRESTIGE 42 50 75 100 120 Solo A1007856 664Y6200 G en 52 EN FR NL ES IT DE PL RU...

Reviews: