Acumen Ai-D8 Series Instruction Manual Download Page 6

DVR User Manuel  5

User Guide 

Chapter 1: Basic Operation 

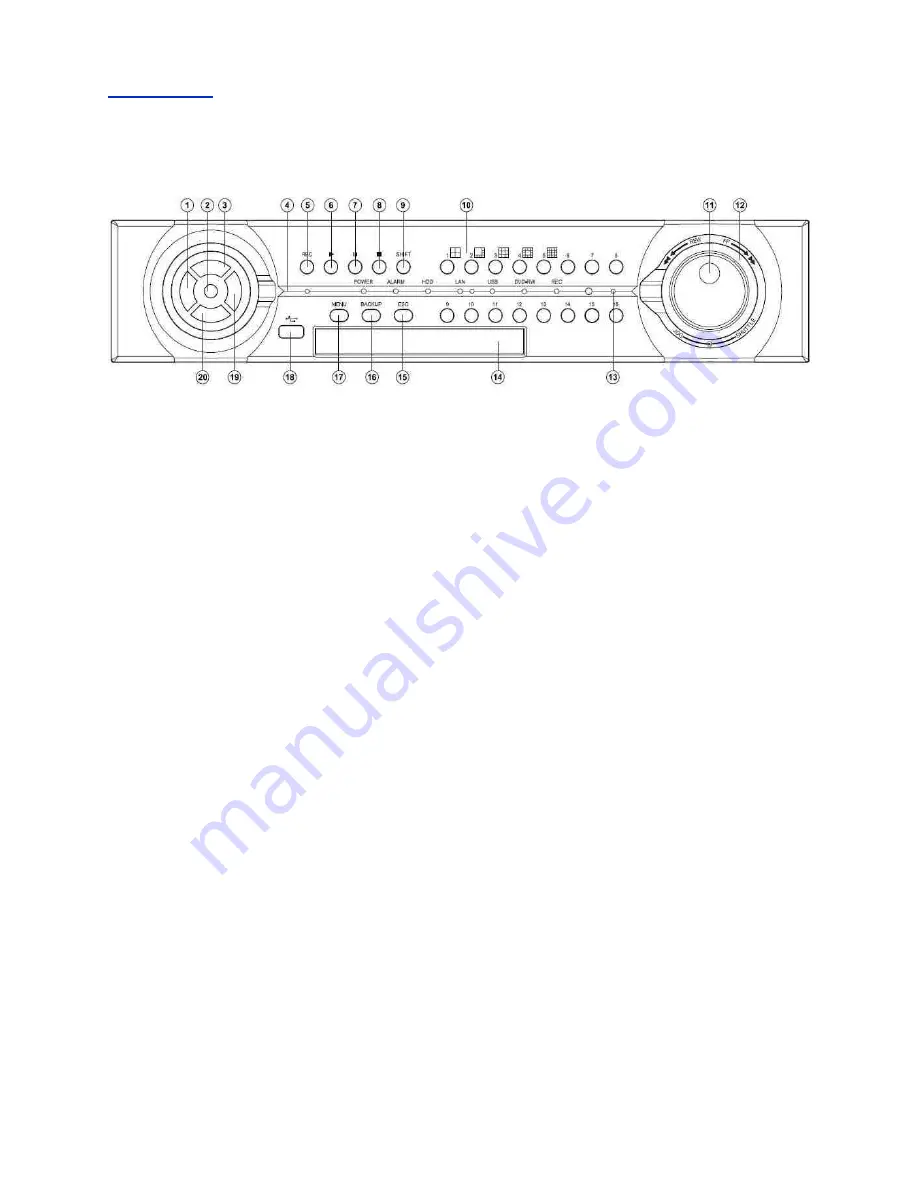
1.1  [16CH 2U Front Panel]  

1.

Left
Move cursor left
Pan left
Decrease value

2.

Enter
Enter operation in menu setup
Instant PTZ camera selection at live
mode
Camera active

3.

Up
Move cursor up
Tilt up

4.

LED status panel

5.

REC button
Start or stop recording

6.

Play button
Use this button to start playback

7.

Pause button

8.

Stop button

9.

Shift
Mode switch for split-display or
camera selection

10. Split-display/camera buttons

4, 8, 9, 13, 16 split-display
Camera selection mode

11. Jog dial

Play recorded image frame by frame in 
playback
Perform zoom in and out

12. Shuttle ring

Fast forward video in playback mode.

13. IR receiver
14. Built-in Slim DVD/RW drive

(DVD model only)

15. ESC button
16. Backup button
17. Menu button
18. USB 2.0 connector

USB flash disk
USB DVD/RW

19. Right button

Move cursor right
Pan right
Increase value

20. Down button

Move cursor down
Tilt down

Summary of Contents for Ai-D8 Series

Page 1: ...INSTRUCTION MANUAL Ai D8 Series DVR...

Page 2: ...tures are provided DVR series can provides 960H and D1 camera real time for 8 16 channel recording and playback Full features web based user interface multiple DVR system monitoring features and vario...

Page 3: ...arks or registered trademarks of their respective owners Caution Do not drop or strike the equipment Do not install the equipment near naked flames or heat sources Do not expose this unit to rain mois...

Page 4: ...0 7 3 Playback controls 22 8 Alarm management 24 9 Backup Export 26 10 Event 29 11 Basic web based browser viewing 31 11 1 Web based browser playback 31 11 2 Web based browser backup 32 11 3 Web based...

Page 5: ...Connections between a DVR and a RS 485 Keyboard 67 2 Connections multiple of between DVRs and a RS 485 Keyboard 67 3 Connections between a DVR and multiple RS 485 PTZs 68 4 Alarm I Os and RS 485 for...

Page 6: ...Pause button 8 Stop button 9 Shift Mode switch for split display or camera selection 10 Split display camera buttons 4 8 9 13 16 split display Camera selection mode 11 Jog dial Play recorded image fr...

Page 7: ...split display 8 Enter Enter operation in menu setup Instant PTZ camera selection at live mode Camera active 9 Up Move cursor up Tilt up 9 split display 10 IR receiver 11 USB 2 0 connector USB flash d...

Page 8: ...de Camera active 9 Up Move cursor up Tilt up 10 IR receiver 11 USB 2 0 connector USB flash disk USB DVD RW USB Mouse 12 Right button Move cursor right Pan right Increase value 9 split display 13 Down...

Page 9: ...access light Green USB USB device access light Green DVD RW Backup LED indicator Yellow flashing REC Recording indicator Yellow 16CH 8CH 1U LED Panel The status of each LED is described as in the foll...

Page 10: ...switch ZOOM Digital video zooming REC Record stop recording FREEZE Live video freeze Pause Playback Stop Fast forward Fast rewind Next single channel Previous single channel 4 split display 8 split di...

Page 11: ...3 axis Pan Tilt Zoom 2 axis Pan Tilt 3 Keypad panel there are 54 keys which can control PTZ matrix DVR and telemetry receivers 4 Power indicator 5 Alarm indicator 6 R T indicator data communication in...

Page 12: ...r 12 CLR clear to setting data 13 ENT enter or confirm data programming 14 Wiper lens 15 Spray 16 Light C ESC 17 CTRL 1 C SET 18 CTRL 2 180 19 Search 20 Shift 21 Auto pan 22 SEQ 23 Zoom in zoom out 24...

Page 13: ...Return to previous screen Return to live mode Save and return to previous screen Right mouse click Mouse scroll Left mouse click Note The DVR can be controlled via multiple methods a front panel 16CH...

Page 14: ...reen split style icons To select a single full screen view enter the camera number e g for camera 3 press 03 c Via keyboard To select multi screen view by clicking into one of the following screen spl...

Page 15: ...se directional keys to move the video screen left right up and down 4 To return to constant live time video view by choosing one of the following screen split style icon c Via keyboard Alternative met...

Page 16: ...on the remote control 2 Once paused the pause icon at the top left hand corner of the screen will be highlighted in colour blue 3 To return to live mode by pressing the Pause icon again c Via keyboar...

Page 17: ...get the camera back to the preset position For example for preset 3 press Preset icon followed by entering 003 5 Press Auto button to start auto pan tour 6 To deactivate the auto pan tour by pressing...

Page 18: ...joystick shown on the right can be used to navigate through the entire video image 4 Press ESC to return back to main menu Chapter 6 Audio a Via remote control To enable audio by selecting the desired...

Page 19: ...pressing the Play button d Via touch screen monitor mouse To access playback by pressing then click on 7 2 Select time and date for playback a Via front panel Use up and down keys to navigate time fra...

Page 20: ...t playback twist zoom the joystick d Via touch screen monitor Select the specific time frame by pressing the time desired and then select the time by dragging the box or Use pinch to zoom technique to...

Page 21: ...ewind or forward To select individual cameras or change screen view by following camera selection process To turn audio on or off by pressing Menu button To activate WYSIWYG what you see is what you g...

Page 22: ...rewind step fast forward by pressing pause then use your controller keys to move frames d Via touch screen monitor mouse Use on screen keys to play stop or pause Use button to rewind Use to fast forwa...

Page 23: ...down direction keys to select recorded event Use right and left direction keys to select action b Via remote control To select alarm indicator by pressing Menu and use left and right direction keys un...

Page 24: ...select alarm indicator touch alarm key located at the top left hand corner of the screen Use touch screen interface to select alarm events Press Load icon to load alarm events Use up and down scroll b...

Page 25: ...rovide a different export result Email will send a stationary image USB will save a stationary image Playback will take you to the selected event on screen 5 Recorded data 2 Time Frame 3 Unit selector...

Page 26: ...period Press Enter to complete Once Enter has been pressed a backup start and backup end box will appear If correct press the backup key and select export method Once started backup the display screen...

Page 27: ...t time by dragging unit selector or use pinch to zoom technique For backup range press orange bar and drag for required time period Once drag is complete backup start and backup end box will appear If...

Page 28: ...g event refers to designated areas selected by the user a Via front panel To access event manager by pressing Menu Use left and right keys to locate the event manager icon Press Enter to select b Via...

Page 29: ...r by pressing Set Use left and rights keys to locate the event manager icon Press the Enter to select d Via touch screen mouse To access event manager by pressing the Menu icon Scroll through the menu...

Page 30: ...screen double click on required camera view Double click to return to multi screen view 11 1 Web based browser playback Press the playback button on the left hand side Choose time and date required i...

Page 31: ...backup file download Web based browser export applies to either backups created through the browser or through the temporary hard drive space at the unit Click required file and save to desired locati...

Page 32: ...ownload Convert already downloaded files 12 1 Playback exported files Open Backup Manager To select files USB DVD or web based exported files click file open folder Saved files will then appear Highli...

Page 33: ...ded it will remain stored for future use Highlight your DVR from the left hand bar and click connect A download panel will then appear This means the backup manager programme is communicating with you...

Page 34: ...eleted 12 3 Convert already downloaded files Backup Manager allows you to convert multi channel backups to single channel AVI files Please follow the steps below Open Backup Manager Click file convert...

Page 35: ...Output 4 Power switch 15 15 HDMI Output 5 FAN 16 Audio Inputs Audio 5 16 6 DC 12V input 17 Line Out 7 RJ 45 Keyboard out Connect to the next DVR s input RJ 45 connector 18 MIC In 8 RJ 45 Keyboard in C...

Page 36: ...3 LAN Network RJ 45 connector 4 Audio Inputs RCA audio connectors 15 14 RS485 For PTZ connection 5 Audio Output RCA audio connector 15 Alarm I Os Alarm 8 input switches 1 N O alarm output 1 N C alarm...

Page 37: ...rm output 1 N C alarm output 4 MIC In 15 14 External IR receiver 5 Line Out 15 RJ 45 Keyboard in Connected from previous DVR s keyboard output in daisy chain 6 HDMI Output 16 RJ 45 Keyboard out Connec...

Page 38: ...Power up unit by turning the switch on the rear to on 2 2 Formatting Hard Drive s Enter the setup menu Select system from the left hand options Select HDD info Installed drives will be listed Select...

Page 39: ...Time and Date Settings Enter the setup menu Select system from the left hand options Select date time Adjust time and date Select display format Note See user guide for how to navigate the system i e...

Page 40: ...gs Enter the setup menu Select network from the left hand options Ensure static is displayed under IP mode Enter your IP address and subnet mask range Note This guide will refer to a static IP address...

Page 41: ...up menu items are described in this chapter 1 1 Camera setup To setup the camera use the following steps 1 1 1 Camera select Use the directional arrows to select camera you wish to edit add 1 1 2 Came...

Page 42: ...e video 1 1 4 Video Setup Brightness contrast saturation hue sharpness and load default are configurable per camera 1 1 5 Video Loss Detection To enable or disable video loss detection please set this...

Page 43: ...specific time period Once the sequence time is set press SEQ button on the remote controller or the keypad to activate the sequence feature The main monitor output can be configured in displaying cam...

Page 44: ...ction box and alarm switching time 1 2 5 Output resolution Set accordingly to match your HDMI and VGA monitor resolution 1 3 Record setup Record setup menu allows for setting recording features such a...

Page 45: ...ording this feature must be turned on 1 3 6 Post alarm Recording Post alarm recording records the video of a camera after a particular alarm motion is triggered This can be set between 1 100 seconds 1...

Page 46: ...In many countries HDD recording may be limited and can be only accessed for a certain period of time Once the recorded data passes the chosen period the data can no longer be accessed Set your desire...

Page 47: ...Lowest Press Left or Right to change the sensitivity setting 1 4 5 Motion area setup There are a number of ways to set the motion detection area The detailed setting sequence is described as follows...

Page 48: ...e in the relevant FTP account information 1 4 9 Buzzer timer Select a time period you wish the buzzer on DVR to sound for upon an alarm trigger This can be set between 1 100 seconds it can be set to a...

Page 49: ...IP address for the DVR using the virtual keyboard 1 5 3 Subnet mask Enter the Subnet Mask for the network using the virtual keyboard 1 5 4 gateway Enter the Gateway address for the network using the...

Page 50: ...is also used by Backup Manager exe Backup Manager can manage all the DVR s playback clips via a network 1 5 10 MAC Display the MAC address of the DVR 1 5 11 PPPoE IP Enter IP address 1 5 12 DDNS If yo...

Page 51: ...service 1 6 System setup To set up the system settings use the following instructions 1 6 1 Date Time Press enter to set Date Time on the DVR The display format can also be set here If a Keyboard is...

Page 52: ...the HDD s Approximate recording days recording days based on the HDD s Average REC size average recording data size HDD Format Select the HDD s you wish to format select the HDD format menu item A pas...

Page 53: ...yback Allow PTZ Allow Backup Allow Division Allow Shutdown Allow Alarm Allow Shortcut Allow Network Setup Allow Network Playback 1 6 4 Factory reset A user may want to restore manufacturing default se...

Page 54: ...708 bin To perform firmware update using USB flash disk follow the instructions 1 Plug in a portable USB disk at the DVR s USB port 2 Press Enter to start firmware update 3 After the transfer has fini...

Page 55: ...1 6 8 Audio volume To turn on or off live audio volume monitoring set Live Audio option 1 6 9 Line Out volume To turn on or off line out audio volume set Line Out Audio option 1 6 10 Health check The...

Page 56: ...hows listed models in the PTZ protocol list Model Baud Rate Number of Bytes CO 93 MLP1 9600 3 CO 95 MLP1 9600 3 CO 97 MLP1 9600 3 CO 98 MLP2 9600 7 CO 99 MLP2 9600 7 Pelco D 2400 9600 None Pelco P 240...

Page 57: ...these settings as required Focus and auto focus Adjust these settings as required Save presets Once the above parameters are entered the preset can be saved Clear all presets To clear all the preset p...

Page 58: ...g Internet browser Add DVR IP address to trusted sites Make sure that your Internet browser allows signed ActiveX plug in to run on your PC Set Download Signed ActiveX plug in controls to Prompt and R...

Page 59: ...home page will appear 2 3 Configuring the DVR via web page Features of the DVR s main menu system can be configured via web interface Features such as camera alarm recording network and backup can all...

Page 60: ...R recording mode HDD Overwritten option for circular recording Camera Recording Mode assign schedule recording or no recording for a camera Camera Quality setup the recording quality for a camera Came...

Page 61: ...le alarm motion email From from email address To to email address Host IP Address SMTP mail server s IP or DNS address Authentication option for user and password authentication Email Account senders...

Page 62: ...video port HTTP Port HTML port number 2 3 7 System setting MAC Address MAC address of the DVR Firmware firmware version of the DVR Device ID addressable DVR ID for multiple DVRs remote control using r...

Page 63: ...e of the DVR Time Current time of the DVR 2 3 7 2 User setting There are three levels admin operator and guest of user authentication allowed in the DVR To change password specify the old password new...

Page 64: ...ector HDD Reading Speed HDD reading speed detector Device ID DVR ID RS 485 ID Last Reboot Time last time for rebooting the DVR Kernel OS version of the DVR 2 3 7 4 Firmware update This DVR is set to p...

Page 65: ...The DVR provides 12V DC for the keyboard There is no need to connect to your power adapter A DVR A Keyboard connection diagram 2 Connections of multiple between DVRs and a RS 485 keyboard To connect...

Page 66: ...Connections between a DVR and multiple RS 485 PTZs Please use twisted pair cable to connect a PTZ to a NDR The connections between PTZs please refer PTZs user manual A DVR PTZs System Diagram A DVR PT...

Page 67: ...rm input 2 Pin 3 Alarm input 3 Pin 4 Alarm input 4 Pin 5 Alarm input 5 Pin 6 Alarm input 6 Pin 7 Alarm input 7 Pin 8 Alarm input 8 Pin 9 GND Pin 10 ALARM NO normal open Pin 11 ALARM NC normal close Pi...

Page 68: ...S 2TB WD20EVDS 2TB WD15EURS 1 5TB WD10EZRX 1TB WD10EARX 1TB WD10EARS 1TB WD10EALX 1TB WD10EURS 1TB WD5000AVDS 500GB WD5000AVVS 500GB WEST DIGITAL WD3200AVVS 320GB ST4000DM000 4TB ST3000DM001 3TB ST200...

Page 69: ...Melody DVD RW 4 7GB 4x Rewritable RiTEK DVD RW 4 7GB 8x Rewritable Sony DVD R 4 7GB 8x Burn once OEM disk DVD R 4 7GB 8x Burn once Appendix E Supported USB Flash Disk Transcend 8G 16G Kingston 4G 8G 1...

Page 70: ...S2340T Planar PXL2430MW Appendix H Troubleshooting FAQ Question Does the DVR Touch series provide unicode multi nation support for camera names Answer Yes the DVR Touch series provides unicode for ca...

Page 71: ...ternal alarm video loss stop recording power recovering motion detection schedule logon HDD format Email Alarm notification with JPEG attachments Accessories Remote controller addressable up to 255DVR...

Reviews: