background image

Installation

4

Installation

Please read through this chapter carefully before you attempt to attach the Pioneer 2 TCM2 Module to

your Pioneer 2 Mobile Robot.

The P2 TCM2 Module requires P2OS version 1.6 or later.


Contact [email protected] if you need to update P2OS.

Step 1: Remove Power

Switch the Main power to the Pioneer 2 Mobile Robot off.

Step 2a: Locate Auxiliary Extension Cable

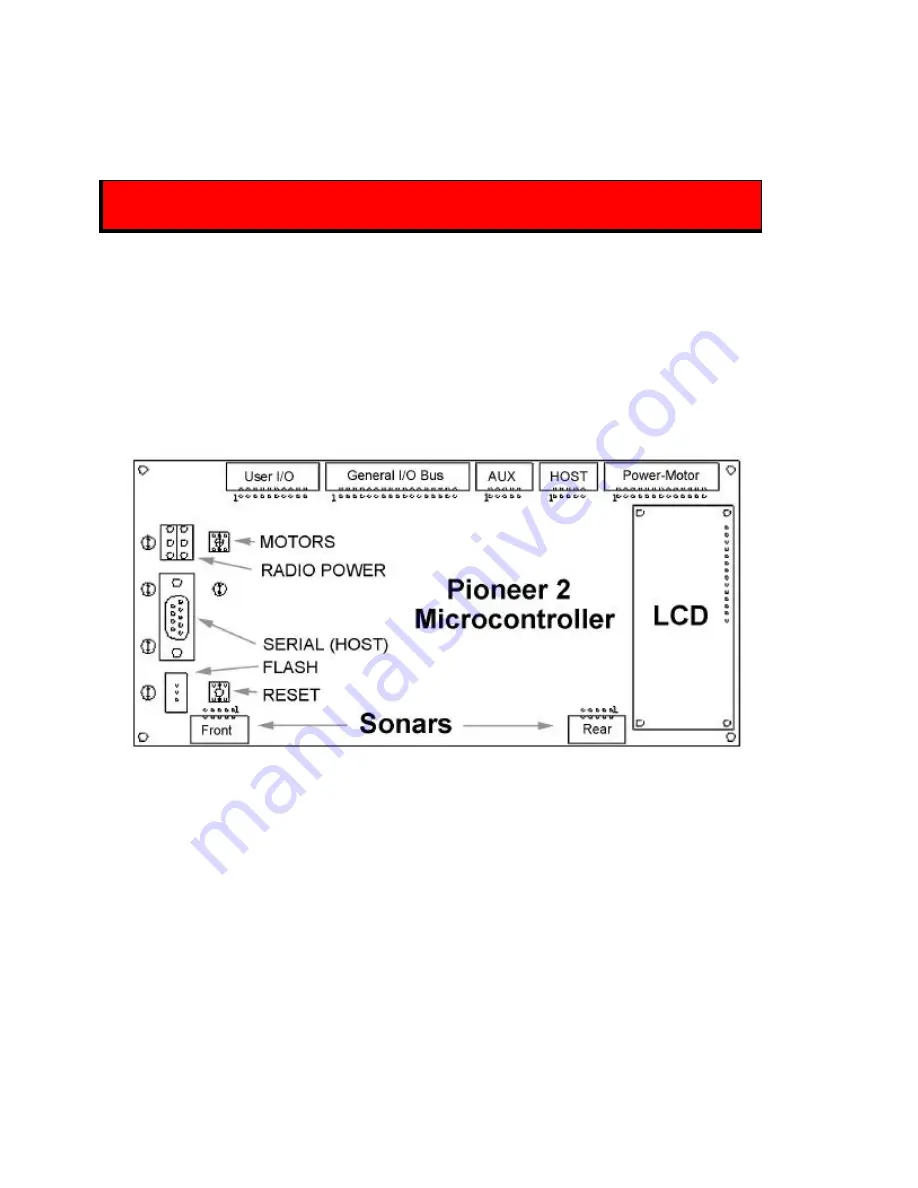
The TCM2 Module attaches to your Pioneer 2’s microcontroller's AUX serial port (Figure 2-1). Some

robots, including those with radio Ethernet and/or the Sony robotic camera, come with an extension cable
already attached to the auxiliary serial port on the microcontroller to which you may plug in the TCM2
Module.

Figure 2-1. Pioneer 2 Microcontroller

Locate the Auxiliary extension cable by removing the Access plug from the Top Plate. Inside, you may

find the extension cable. If one exists and has an open connector,  simply insert the 10-pin IDC plug at the
end of the TCM2 Module's cable into that 10-pin socket. That's all there is to it; skip to Step 3.

Step 2b: Install AUX Extension Cable

If your robot does not have an AUX extension cable, or if the one installed does not have an open

socket, install the AUX extension cable that comes with your TCM2 Module. Deft fingers can locate the
port through the Access plug (locking tab on top of the connector) and plug in the AUX extension cable.

Summary of Contents for Pioneer 2 TCM2

Page 1: ...Pioneer with Pioneer Server Operating System Software TCM2 Integrated Compass Inclinometer Magnetometer Thermometer ...

Page 2: ...oneer developers and users are authorized by revocable license to develop and operate custom software for personal research and educational use only Duplication distribution reverse engineering or commercial application of the Pioneer software and hardware without the expressed written consent of ActivMEDIA ROBOTICS is explicitly forbidden The various names and logos for products used in this manu...

Page 3: ... 4 Step 2a Locate Auxiliary Extension Cable 4 Step 2b Install AUX Extension Cable 4 Step 3 Mount the Module to the Robot 5 Step 4 Enabling the TCM2 in P2OS 5 Step 5 Test the Assembly 6 Operation and Programming 7 TCM2 I O 7 P2OS TCM2 Servers 7 Mode 0 8 Default Mode 1 8 Modes 2 and 3 TCM2 Server Information Packet 8 Calibration Modes 4 6 10 Reset Mode 7 10 Saphira TCM2 Plugin 10 TTY2 and GETAUX 10 ...

Page 4: ...iv ...

Page 5: ...ou unpack it from the shipping crate Package Components ü Pioneer 2 TCM2 Module complete with mounting hardware and cabling ü TCM2 Power and Serial Adapter Cable ü Auxiliary serial breakout cable ü This P2 TCM2 Manual ü TCM2 User s Manual ü P2OS update and TCM2 software disk Win32 and Linux User Supplied Components ü Pioneer 2 Mobile Robot ü 9 Volt battery optional Basic Pioneer 2 Platform Pioneer...

Page 6: ...ional Resources below If still in doubt please contact pioneer support activmedia com for help in updating your robot s server software Additional Resources Every Pioneer customer gets three additional and valuable resources a private account on ActivMedia ROBOTICS Internet server for downloading Pioneer software updates and manuals access to private Pioneer and Saphira robotics newsgroups and e m...

Page 7: ...eration and programming Support Have a problem Can t find the answer in this or any of the accompanying manuals Know a way that we might improve Pioneer Share your thoughts and questions directly with us pioneer support ActivMedia com Your message goes to our team of Pioneer developers who will help you directly or point you to where you may find help Because this is a support option not a general...

Page 8: ...cable already attached to the auxiliary serial port on the microcontroller to which you may plug in the TCM2 Module Figure 2 1 Pioneer 2 Microcontroller Locate the Auxiliary extension cable by removing the Access plug from the Top Plate Inside you may find the extension cable If one exists and has an open connector simply insert the 10 pin IDC plug at the end of the TCM2 Module s cable into that 1...

Page 9: ...n32 self extracting icon p2osV_r EXE V and r are the Version and revision numbers respectively p2os1_6 for example or uncompress untar the p2osV_r tgz Linux version that is on the disk that accompanied your TCM2 or a distribution that you have downloaded from the http robot activmedia com support website In all cases the extracted archive creates a p2os directory containing the necessary download ...

Page 10: ...he robot This section describes the TCM2 Module s self test Consult the Pioneer 2 Operation Manual for a detailed description of the location and operation of the various Console function buttons and switches and for how to test the drive I O and sonar subsystems Do not perform Pioneer 2 Mobile Robot self tests on a tabletop Enable P2OS self test mode by pressing and releasing the white MOTORS but...

Page 11: ... with the Pioneer 2 Microcontroller s AUX serial Port TCM2 Pin Label Description AUX Pin Label 1 nc 2 Vsupply 6 25VDC unregulated 4 Vpp battery 12VDC RADIO switched 3 GND Power ground 6 GND 4 RxD RS232 serial 3 TxD 5 TxD RS232 serial 5 RxD 6 nc 7 GND Data ground 9 GND 8 nc 9 nc 10 nc nc no connection TCM2 I O The RS232 standard serial baud rate for the TCM2 Module and the AUX serial port on the Pi...

Page 12: ...parameter value to 2 to enable the TCM2 servers in P2OS version 1 6 or later Default Mode 1 By default after startup or RESET or when disconnected from or first connected to a client the TCM2 Module reverts to mode 1 When in mode 1 the P2OS TCM2 servers only read the Module s compass That compass reading relative to magnetic north gets included in the standard Server Information Packet SIP that P2...

Page 13: ...nteger Bit mapped error code see TCM2 User s Manual for meanings Calibration byte H score 0 9 Scores byte V score 0 9 integer M score times 100 Checksum integer SIP checksum The Module transmits its data in ASCII format which the P2OS servers convert into integers for transmission in the TCM2 SIP It is up to the client software to parse an incoming TCM2 SIP and extract the salient information We p...

Page 14: ...tructure Place the TCM2_plugin EXE Win32 or TCM2_plugin tgz Linux into the top level directory of your Saphira 6 2 distribution Saphira ver62 for example and either execute the self extracting archive EXE or unzip untar the tgz file tar zxvf TCM2_plugin tgz The process creates a devices tcm2 directory containing the plugin sources and makefiles The tcm2 dll Win32 or tcm2 so plugin get placed in Sa...

Page 15: ...cise and configure the Module from a PC You may also communicate with the TCM2 Module through any common serial ASCII terminal program such as minicom under Linux or Hyperterminal for Microsoft Windows With the Pioneer 2 TCM2 package we supply a serial and power adapter for the Module so you can make the right connections Simply attach a 9 VDC battery to the adapter s power socket plug the Module ...

Page 16: ...hat it needs repair here s who to contact pioneer support ActivMedia com 603 924 2184 fax In the body of your E mail or fax message give your Pioneer 2 s serial number so we can look up its configuration and describe the problem in as much detail as possible Also include your name e mail and mail addresses as well as phone and fax numbers and when and how we can best contact you we will assume e m...

Page 17: ...ned integer Multiply by VelConvFactor to convert to millimeters per second Battery byte Battery charge in tenths of volts Bumpers integer Motor stall indicators left msb Control signed integer Setpoint of the server s angular position servo multiply by AngleConvFactor for degrees PTU unsigned integer Pulse width of selected servo 1 Compass byte Compass heading in 2 degree units Sonar readings byte...

Page 18: ...rers of Pioneer shall bear no liabilities for operation and use of the robot or any accompanying software except that covered by the warranty and period The developers marketers or manufacturers shall not be held responsible for any injury to persons or property involving the Pioneer Mobile Robot in any way They shall bear no responsibilities or liabilities for any operation or application of the ...

Page 19: ...15 44 Concord Street Peterborough NH 03458 603 924 9100 603 924 2184 fax http www ActivRobots com ...

Reviews: