background image

Version 1.2

Operation Manual, Nimbie USB Plus


 G

ETTING

 F

AMILIAR


WITH


THE


DEVICE


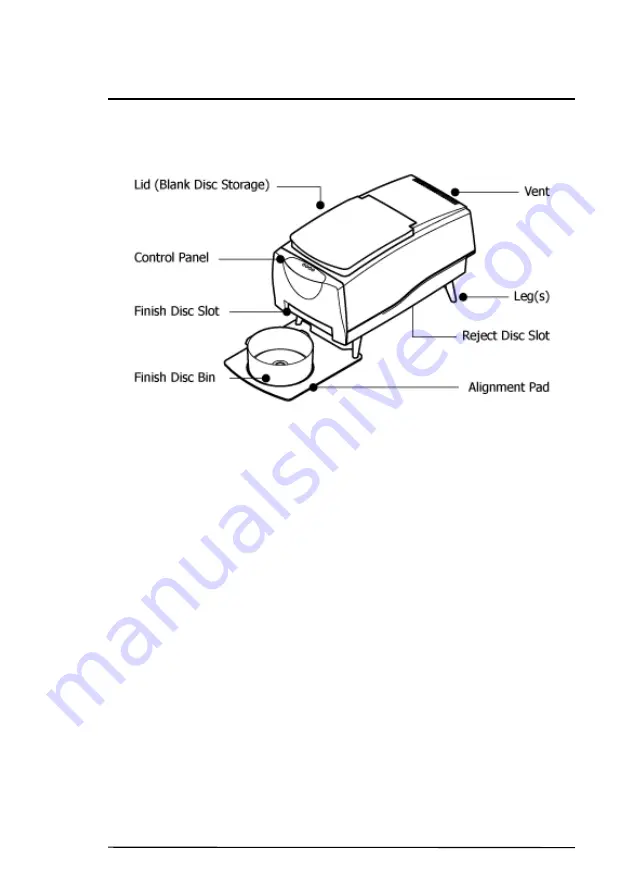
A Look at Nimbie USB Plus

ƒ

Lid (Blank Disc Storage) 

Open the lid to access the blank disc storage area.

ƒ

Control Panel

Located on the top front of Nimbie USB Plus, the control panel
contains the LED indicators.

ƒ

Legs

Use the four legs included with your Nimbie USB Plus to provide
space underneath for rejected discs.

ƒ

Reject Disc Slot

The rejected discs will slide out from the Reject Disc Slot at the
bottom of the unit.  Always allow space beneath Nimbie USB Plus
to accommodate rejected discs.

ƒ

Finish Disc Slot

Finished discs will exit from this slot.

ƒ

Finish Disc Bin

This bin serves as the storage container for receiving and
stacking completed discs.  As illustrated, a spindle box serves as
a good Finish Disc Bin. 

ƒ

Alignment Pad

Use the pad to appropriately position the Finish Disc Bin under
the Finish Disc Slot.

© 2012, Acronova Technology, Inc.

9

Summary of Contents for NB21 Series

Page 1: ...Operation Manual Nimbie USB Plus Disc Autoloader Model NB21 Series PC Connected Serial Number ______________________________ The serial number is labeled on the bottom of the device Operation Manual...

Page 2: ...s device generates heat during the duplication process Out of specification or unstable power supply may cause overheating low productivity increased failure rate and damage to the device Use a reliab...

Page 3: ...ables is required to comply with the Class B limits of Part 15 of the FCC Rules You are cautioned that any changes or modifications not expressly approved in this manual could void your authority to o...

Page 4: ...efect in this product or its documentation including without limitation damages or costs relating to the loss of data profits business or goodwill even if Acronova Technology Inc its authorized dealer...

Page 5: ...tting Started 15 Handling Optical Discs 15 Loading Discs to Nimbie USB Plus 15 Rejected Discs 16 More Than 30 Discs in One Session 16 Nimbie USB Plus Maintenance 17 Choosing Reliable Blank Discs 17 Di...

Page 6: ...using legs Write Speed BD R 12X DVD R 16X CD R 40X Interface USB 3 0 SuperSpeed backward compatible with USB 2 0 Disc Size 120 mm in diameter Operation Temperature 42 to 86 6 to 30 Humidity 5 to 85 no...

Page 7: ...to the operation manual that came with the installation disc for further details Please read this manual carefully before using Nimbie USB Plus This user guide contains all the information about its o...

Page 8: ...e Spindle Box serves as the Finish Disc Bin Three Extension Rods attached to the underside of Nimbie USB Plus lid One Alignment Pad Four Legs One Installation Disc includes device driver and software...

Page 9: ...underneath for rejected discs Reject Disc Slot The rejected discs will slide out from the Reject Disc Slot at the bottom of the unit Always allow space beneath Nimbie USB Plus to accommodate rejected...

Page 10: ...r backward compatible with USB 2 0 at USB 2 0 transfer speeds Kensington Security Slot Security lock anti theft system To use Nimbie USB Plus at its MAXIMUM speed a USB 3 0 compatible PC or Host Card...

Page 11: ...empty z z USB 2 0 Hi speed connection established discs in loader z z USB 2 0 Hi speed connection established disc loader empty z z z USB connection NOT detected discs in loader z z z USB connection...

Page 12: ...r high humidity as it may cause the unit to malfunction If you desire Nimbie USB Plus can be placed on a raised block so there is ample room to receive discs from the Finish Disc Slot Please refer to...

Page 13: ...e application software installation the device driver must be installed System Requirements Microsoft Windows XP Vista 7 or Apple OS X 10 6 10 7 for QQGetTray only 1GB RAM or higher Optical disc drive...

Page 14: ...low to complete the installation 1 Insert the installation disc into an available optical drive on PC 2 After the Main Menu is launched click Install and follow the on screen instructions to get appli...

Page 15: ...nter hole Loading Discs to Nimbie USB Plus Load one disc into the disc loader first and assure it is firmly resting on the three wheels in the illustration to the right Then gradually add and stack ad...

Page 16: ...s in One Session Using the extension rods Nimbie USB Plus can process 100 discs without refilling To increase capacity to 100 discs please follow the instructions below 1 Open the Blank Disc Storage L...

Page 17: ...rom the wall outlet 4 Clean Nimbie USB Plus using a lint free cloth moistened with warm water 5 Dry the unit immediately with a dry lint free cloth Choosing Reliable Blank Discs The quality of a recor...

Page 18: ...ult to separate Avoid using these types of discs Nimbie USB Plus is equipped with a patent pending disc separator which handles discs that adhere to each other better than traditional autoloaders Howe...

Page 19: ...e robotic initialization process to complete then the ready indicator will light up 6 Launch application software Refer to application software user s guide for operation directions For details on sof...

Page 20: ...the tray automatically after the next disc is loaded Set up third party software for auto loading process Make sure the software has been set to 1 Auto process when a disc is loaded into the CD DVD d...

Page 21: ...s CD DVD drive then begin monitoring the disc tray and change discs automatically The START and LOAD button will change to STOP and UNLOAD button after activation LOAD Click this button to load a disc...

Page 22: ...s get stuck in the disc loader Check to see if the disc is the standard size 120mm Make sure discs are level in the loader What should I do when the autoloder dropping two or more discs at the same ti...

Page 23: ...s and BD CD DVD recordable media formats on the market We do our best to test certain media types It is impossible for us to guarantee that all discs will be compatible Please choose a blank disc that...

Page 24: ...le disc Use a reliable master disc for testing purposes You should also try different specification and brands of blank discs You should also check the power supply s voltage and amperes Insufficient...

Page 25: ...website http www imgburn com 3 Copy files BSRobot20 dll winusb dll from installation disc ImgBurn folder to where you installed ImgBurn i e C Program Files ImgBurn in the same folder as ImgBurn exe 4...

Page 26: ...omatically you can close ImgBurn and run it again it will automatically detect the Nimbie USB Plus 9 Now you can use ImgBurn with Nimbie USB Plus to unload discs after burnt and load the next blank di...

Page 27: ...o check Nimbie USB Plus in ImgBurn 1 There is an Auto Loader Control function in ImgBurn and you can use it to test the Nimbie USB Plus 2 You can click the Tool menu and select Changer Auto Loader Con...

Page 28: ...Operation Manual Nimbie USB Plus Version 1 2 Acronova Technology Inc http www acronova com Manual Ver 1 2 February 2012 Part 711 NT21 9AC6 1 28 2012 Acronova Technology Inc...

Reviews: