background image


19

4.  Shake the control solution bottle well. Squeeze it 

gently and discard the first drop. If the tip clogs, 
tap the tip gently on a clean, hard surface. Then 
shake again and use. Squeeze out a second 
small drop on a clean nonabsorbent surface. Touch the sample tip of the 
test strip to the control solution drop. If the audio option is turned on, the 
meter will beep to indicate a sufficient sample has been applied.   


Notes

  Do not apply control solution to the test strip directly from the bottle. 

  If the control solution sample does not fill the check window, do not add 

a second drop. Discard the test strip and start over with a new test strip. 


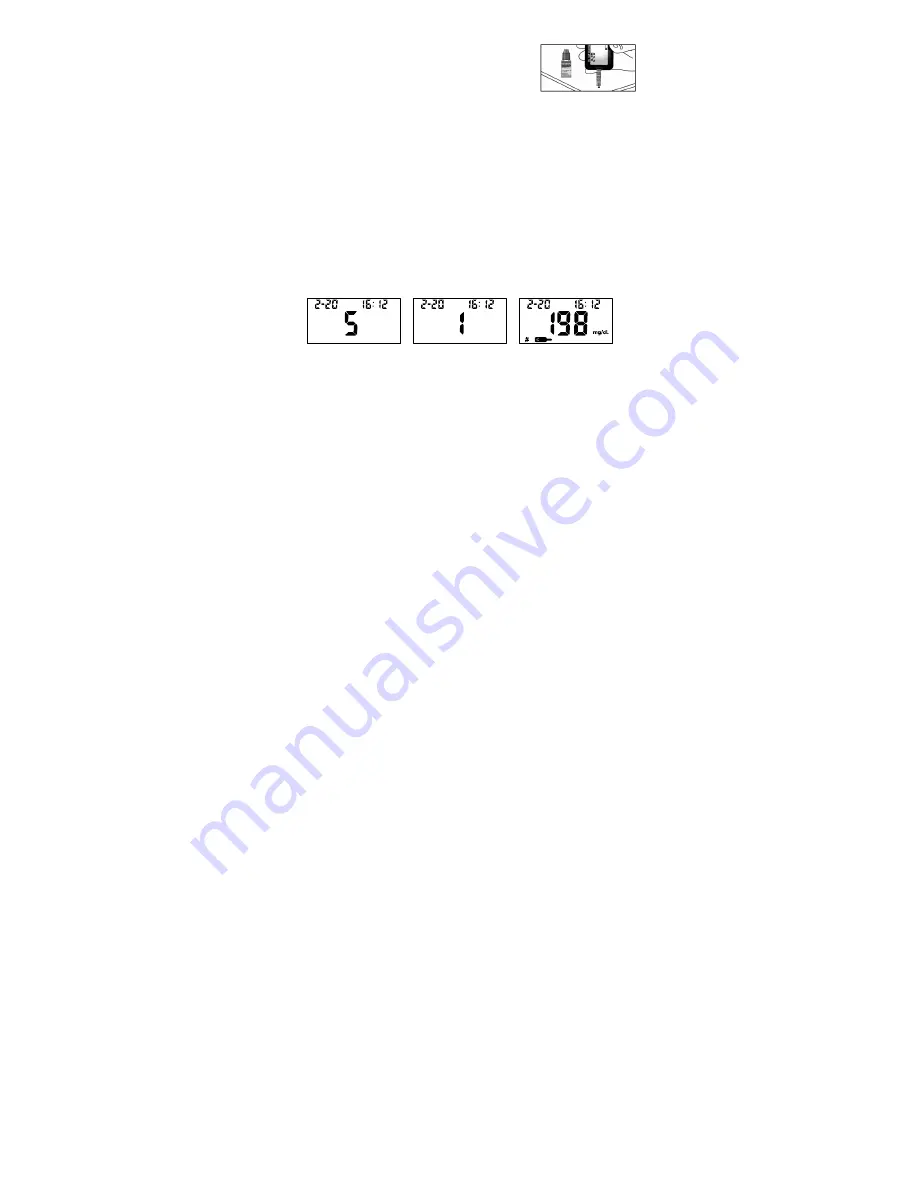
5.  Once a sufficient sample has been applied, the meter display will count 

down from 5 to 1. Then the result and a control solution symbol will be 
displayed on the screen. The control solution test results should be within 
the control range (CTRL 1) printed on the test strip vial (or on the foil 
pouch). This means that your blood glucose monitoring system is working 
properly and that you are performing the procedure correctly. 


Test results are displayed either in mmol/L or mg/dL depending on the unit           
of measure most common in your country. The meter will be set to mg/dL 
by default when sold in the United States. 


Note

:

 The control solution range is the expected range for the control 

solution results. It is not a recommended range for a blood glucose level. 


6. Remove and discard the test strip.   

The display should also show a pound sign (#) indicating the test is a 
control solution test. This shows that the number will not be counted in the 
7, 14, 30, 60 and 90-day averages. The pound sign (#) will also be 
displayed when reviewing the results stored in memory. 

Summary of Contents for on call vivid pal

Page 1: ......

Page 2: ......

Page 3: ...n fresh capillary whole blood It allows diabetics to take blood samples from the fingertip forearm or palm It is used at home as a way to monitor the effectiveness of diabetes control programs Alternate testing sites forearm and palm should be used only during steady state times when blood glucose level is not changing rapidly The On Call Vivid Pal Blood Glucose Monitoring System is intended to be...

Page 4: ...ll Vivid Pal meter For self testers consult your physician or doctor before making any adjustments to your medication diet or activity routines Keep out of reach of children Keep this User s Manual in a safe place do not discard it Not for use on critically ill patients patients in shock dehydrated patients or hyperosmolar patients By following the instructions outlined in this User s Manual you w...

Page 5: ...st 18 Testing Your Blood 21 Step 1 Getting a Drop of Blood 21 Step 2 Testing Blood Glucose 28 HI and LO Messages 31 Using the Meter Memory 33 Viewing Stored Records 33 Clearing the Memory 35 Transferring Records 35 Maintenance 37 Replacing the Battery 37 Caring for Your On Call Vivid Pal Blood Glucose Monitoring System 39 Suggested Testing Times and Target Goals 43 Comparing Meter and Laboratory R...

Page 6: ...d to buy some accessories separately please contact Customer Service at 1 800 838 9502 for purchasing Please check the list of contents on the outer box for details on which components are included with your purchase Carrying Case Sterile Lancet On Call Vivid Pal Blood Glucose Meter On Call Lancing Device On Call Lancing Device Clear Cap On Call Vivid Blood Glucose Test Strip On Call Vivid Blood G...

Page 7: ...scard after use 6 On Call Vivid Blood Glucose Control Solution Confirms that the blood glucose monitoring system is properly working Use this solution in place of a blood sample to check the test strips and meter for a pre calibrated reading Control Solution 1 is all you need most of the time Control Solution 2 is also available if you want to do a level 2 test The two levels of control solution a...

Page 8: ...s use of meter and lancing device may cause Bloodborne Pathogens Transmission For more information please refer to the FDA Public Health Notification Use of Fingerstick Devices on More than One Person Poses Risk for Transmitting Bloodborne Pathogens Initial Communication 2010 at http www fda gov MedicalDevices Safety AlertsandNotices ucm224025 htm You may also refer to the CDC Clinical Reminder Us...

Page 9: ...r The meter reads the test strips and displays the blood glucose concentration Use these diagrams to familiarize yourself with all the parts of your meter Button OK Button Button Liquid Crystal Display LCD Battery Cover Data Port Strip Port ...

Page 10: ...cts meter settings and performs other menu selection functions Strip Port Test strips are inserted into this area to perform a test OK Button Used to confirm the selection and enter the set up mode Battery Cover Remove the battery cover to install one CR 2032 coin cell battery Data Port Sends information to a computer via an optional data transfer cable Allows you to view analyze and print stored ...

Page 11: ...control test result A pound sign will also be displayed when control solution symbol appears Test Result Area Indicates a test result Measurement Unit Only one unit will be displayed on your meter It cannot be adjusted Memory Shows a test result stored in memory Before Meal Symbol Appears when before meal test results are displayed After Meal Symbol Appears when after meal test results are display...

Page 12: ...or humidity Do not leave it in your car Do not drop the meter or get it wet If you do drop the meter or get it wet check the meter by running a quality control test Refer to Quality Control Test on page 18 for instructions Do not take the meter apart This will void the warranty Refer to the Caring for Your Meter section on page 38 for details on cleaning the meter Keep the meter and all associated...

Page 13: ...e A transient electrical current is formed during the reaction The blood glucose concentration is calculated based on the electrical current detected by the meter The result is shown on the meter display The meter is set to display plasma equivalent results IMPORTANT Apply sample only to the sample tip of the test strip Do not apply blood or control solution to the top of the test strip This may r...

Page 14: ... review the following storage and handling instructions Store test strips in a cool dry place Store them at 41 86 F 5 30ºC Store test strips away from heat and direct sunlight Do not freeze or refrigerate Do not store or use test strips in a humid place such as a bathroom Do not store the meter the test strips or control solution near bleach or cleaners that contain bleach The test strip should be...

Page 15: ... Tear the pouch carefully starting from the tear gap Avoid damaging or bending the test strip Use the test strip immediately after removing it from the pouch Test Strips Precautions For in vitro diagnostic use Test strips are to be used only outside the body for testing purposes Do not use test strips that are torn bent or damaged in any way Do not reuse test strips Keep the test strips vial or th...

Page 16: ...arly to make sure you are getting correct results You should run a quality control test Before you first use your meter to familiarize yourself with its operation Before using a new box of test strips When you suspect that the meter or test strips are not working properly When you suspect that your test results are inaccurate or if they are inconsistent with how you feel When you suspect that your...

Page 17: ...ntrol Solution Precautions For in vitro diagnostic use The control solution is for testing only outside the body Do not swallow or inject Shake well before using Control solution tests are designed to be accurate only when tested between 50 104 F 10 and 40 C The control ranges shown on the test strip vial or on the foil pouch are not recommended ranges for your blood glucose level Your personal bl...

Page 18: ... the battery in your carrying case and install it according to the following steps 1 Turn over the meter and slide the battery cover off the top of the meter 2 Insert one CR 2032 3 0 V coin cell battery into the battery carrier Make sure it is aligned with the plus facing down 3 Slide the battery cover back on and make sure that it snaps shut ...

Page 19: ...o save your choice Now you can start to set the year month and date Note The clock needs to be reset after replacing the battery 3 Date The year will appear at the top of the display Press the or button to increase or decrease the year Once you have selected the correct year press the OK button to save your choice Then you can start to set the month Press the or button to increase or decrease the ...

Page 20: ...llows the user to enable or disable this option The words On or Off will be displayed on the large center segments of the display The before meal symbol together with the after meal symbol will be displayed as shown below Press the or button to switch between turning the meal marker On and Off Press the OK button to confirm your selection 6 Audio Feature The meter comes with the meter audio featur...

Page 21: ...t Reminder is On pressing the OK button will go to the set up of the time for the first Test Reminder Press the or button to adjust the first Test Reminder time Press the OK button to confirm the first Test Reminder time and then go to the second Test Reminder set up When the Test Reminder is Off during the second Test Reminder set up pressing the OK button will go to the set up of the third Test ...

Page 22: ...es when it is first set It will beep again two minutes later and two minutes after that unless you insert a test strip or press any button This function will still work with Audio feature turned off When the meter beeps at the time set by the Test Reminder feature the date time and strip symbols will be displayed and the test reminder symbol will flash The display sample is shown below ...

Page 23: ...1 Insert a test strip into the strip port contact bars end first and facing up It will turn on the meter and display all the display segments If the audio option is on the meter will beep signaling that the meter is turned on 2 Check the display to confirm that all the display segments turn on Next a dash will move across the display See illustrations above 3 The meter is ready for testing when th...

Page 24: ...lt and a control solution symbol will be displayed on the screen The control solution test results should be within the control range CTRL 1 printed on the test strip vial or on the foil pouch This means that your blood glucose monitoring system is working properly and that you are performing the procedure correctly Test results are displayed either in mmol L or mg dL depending on the unit of meas...

Page 25: ...trol range shown on the test strip vial or on the foil pouch your meter may be defective Please contact Customer Support at 1 800 838 9502 Two levels of control solution are available labeled Control Solution 1 and Control Solution 2 Control Solution 1 is sufficient for most all self testing needs If you think your meter or strips may not be working correctly you may also want to do a level 2 test...

Page 26: ...mportant Prior to testing wipe the test site with an alcohol swab or soapy water Use warm water to increase blood flow if necessary Dry your hands and the test site thoroughly Make sure there is no alcohol soap or lotion on the test site Note Never share lancets or the lancing device with others Cross use of meter and lancing device may cause blood borne pathogens transmission Always use a new ste...

Page 27: ...he lancing device cover from the body of the lancing device Insert a sterile lancet into the lancet holder and push it until the lancet comes to a complete stop in the lancing device 2 Hold the lancet firmly in the lancet holder and twist the safety tab of the lancet until it loosens then pull the safety tab off the lancet Save the safety tab for lancet disposal ...

Page 28: ... delicate skin 3 and 4 for normal skin 5 and 6 for calloused or thick skin Note Increased pressure of the lancing device against the finger will also increase the puncture depth 5 Pull the cocking barrel back to set the lancing device You may hear a click The device is now loaded and ready to obtain a drop of blood 6 Prior to testing wipe your hands with an alcohol swab or wash your hands with soa...

Page 29: ...od Note For the greatest reduction in pain lance on the sides of the fingertips Rotation of sites is recommended Repeated punctures in the same spot can make your fingers sore and callused Forearm and Palm Testing The forearm and palm areas have less nerve endings than the fingertip for that reason you may find that obtaining blood from these sites is less painful than from the fingertip The proce...

Page 30: ... of a meal an insulin dose or exercise You should also use fingertip testing any time you feel your glucose levels are changing rapidly You should test with the fingertips anytime there is a concern for hypoglycemia or you suffer from hypoglycemia unawareness Alternative Site Testing AST should not be used to calibrate continuous glucose monitors CGMs nor for use in insulin dose calculations Pleas...

Page 31: ...nst the puncture site for a few seconds Press the release button of the lancing device Do not immediately lift the lancing device from the puncture site Continue to hold the lancing device against the puncture site until you can confirm a sufficient blood sample has formed Disposal of the Lancet 1 Unscrew the lancing device cover Place the safety tab of the lancet on a hard surface Carefully inser...

Page 32: ...e needle is bent Use caution whenever the lancet needle is exposed Never share lancets or the lancing device with other people In order to reduce the risk of infection from prior use of the instrument always use a new sterile lancet Do not reuse lancets Avoid getting the lancing device or lancets dirty with hand lotion oils dirt or debris For Alternative Site Testing AST if the current lancets are...

Page 33: ...display segments turn on with no missing components The display will then show only the date and time with a dash moving across the display Check the display to ensure no inappropriate segments or icons are permanently turned on 2 Following this display check the system will enter the test mode The display will show the date and time and the strip icon with the blood sample icon blinking to indica...

Page 34: ...er will also beep to indicate that the measurement is complete then your blood glucose level will display on the screen The measurement s unit date and time of the test will also be displayed Blood Glucose results are automatically stored in the memory To mark invalid results and prevent them from being included in the 7 14 30 60 and 90 day averages press the or button A pound sign will appear on ...

Page 35: ...otes The default before meal time periods are 5 00 7 59 10 00 11 59 and 15 00 17 59 The default after meal time periods are 8 00 9 59 12 00 14 59 and 18 00 20 59 If an error message appears on the display refer to the Troubleshooting Guide on page 45 If a HI or LO error appears on the display refer to HI and LO messages below 5 Record valid results in your logbook with the date and time and compar...

Page 36: ...e retaken to ensure that no mistake was made in the procedure If you are certain the meter is functioning properly and no mistakes were made in the procedure and your blood glucose is still consistently measured as LO it may indicate severe hypoglycemia low blood glucose You should treat yourself for hypoglycemia immediately as recommended by your doctor Precautions and Limitations The On Call Viv...

Page 37: ...ers Blood samples from patients in shock severe dehydration or a hyperosmolar state with or without ketosis have not been tested It s not recommended to test those samples with On Call Vivid and On Call Vivid Pal Blood Glucose Monitoring Systems On Call Vivid Pal Blood Glucose Monitoring System is not for use in critically ill patients Dispose of blood samples and materials with care Treat all blo...

Page 38: ...ter on and enter memory mode The most recent value and the word MEM will appear on the display 2 If you are using the meter for the very first time the meter display will show three dashed lines the word MEM and the unit of measure This shows that no data have been stored in memory 3 The date and time will be displayed together with the results stored in memory A pound sign indicates records that ...

Page 39: ...and 90 day averages 6 If there are fewer than 7 14 30 60 and 90 days in memory all the readings without the pound sign currently stored in memory will be averaged instead If you are using the meter for the very first time no value will appear on the display This means that no records have been stored in memory If you have not marked any results as before meal or after meal no value will appear on ...

Page 40: ...ete mode but want to exit without deleting the recorded data press the OK button This will turn the meter off without deleting any data Transferring Records The meter can transfer stored information to a Windows based personal computer PC using an optional data transfer cable and software package To make use of this feature you need the On Call Diabetes Management Software and a data transfer cabl...

Page 41: ...ram will automatically run The data transfer from meter to PC starts automatically 4 During the data transfer the meter will display to and PC This means the data is being transferred from the meter to the PC 5 Once the data transfer is complete the meter will display End and PC 6 After the data transfer from the meter to PC is completed press the OK button to turn off the meter If nothing happens...

Page 42: ...ar if the battery is too low to perform any more blood glucose tests The meter will not function until the battery is replaced Instructions 1 Turn the meter off before removing the battery 2 Turn the meter over to locate the battery cover Slide the battery cover off the top of the meter to get the battery 3 Press the symbol on the white plastic battery holder to loosen the old battery 4 Pull out a...

Page 43: ...8 5 Close the battery cover and make sure that it snaps shut 6 Recheck and reset the clock setting after battery replacement if necessary To set the meter clock see Meter Setup before Testing on page 14 ...

Page 44: ...e disinfection process This pre cleaning process is for preparing the meter and lancing device surface to be ready for disinfection process After pre cleaning please use another DisCide Ultra Disinfecting Towelette EPA Registration No 10492 4 to disinfect your meter and lancing device For disinfection please wipe the entire meter and lancing device surface and make certain to wet the entire meter ...

Page 45: ... any stains debris before disinfection application to ensure effective disinfection can be achieved for the meter and lancing device outside surface You should also wash hands thoroughly with soap and water after handling the meter and test strips Disinfection Wipes and Where to Buy Them The material suitable for your On Call Vivid Pal meter and lancing device pre cleaning and disinfection is DisC...

Page 46: ...ve been tested to withstand the pre cleaning and disinfection process during the 4 5 year meter and lancing device life based on the operation frequency mentioned above You should always check for the existing of all display segments for normal meter electronics operation when the meter is turned on each time before testing However if you have any problem with your meter and lancing device please ...

Page 47: ...y segments verification after meter turn on All meter set up verification including 12 or 24 Hour mode Year Month Date Hour Minute Meal Marker Audio Test Reminder 1 Test Reminder 2 Test Reminder 3 Test Reminder 4 Test Reminder 5 If any of the above items show sign of deterioration on your meter and lancing device after cleaning and disinfection procedure please stop using your meter and lancing de...

Page 48: ... 2 hours after breakfast Before lunch 1 2 hours after lunch Before or after exercise Before dinner 1 2 hours after dinner Before bedtime After a snack At 2 or 3 AM if taking insulin You may need to test more often whenever 1 You add or adjust your diabetes medication You think your blood glucose levels may be too low or too high You are ill or feeling uncomfortable over long periods of time Expect...

Page 49: ... Bring the logbook with you when you visit your doctor Together you can determine how well your blood glucose is being controlled This can help you and your doctor make the best decisions about your glucose control plan 1 Jennifer Mayfield and Stephen Havas Self Control A Physician s Guide to Blood Glucose Monitoring in the Management of Diabetes An American Family Physician Monograph 2 ADA Clinic...

Page 50: ...s To ensure a reasonable comparison follow these guidelines Before you go to the lab Bring your meter test strips and control solution with you Make sure your meter is clean Perform a quality control test to make sure the meter is working properly Comparisons will be more accurate if you do not eat for at least four hours before testing Eight hours is preferable At the lab Wash your hands before o...

Page 51: ...rby place more distance between the meter and any of these sources then retest If the problem persists please contact Customer Support at 1 800 838 9502 Test strip was removed during the test Repeat the test and ensure that the test strip remains in place Sample was applied to the test strip too soon Repeat the test and apply the sample after the blood drop test strip symbol appears Test strip is ...

Page 52: ...ackage insert included with the On Call Diabetes Management Software for troubleshooting Strip testing error Repeat the test and apply enough sample to fill the test strip check window within 3 seconds When repeat testing do not touch the strip during the meter s count down Please make sure fresh blood sample with intended hematocrit level is used Please make sure blood sample is not contaminated ...

Page 53: ...not considering data transfer Glucose Units of Measure The meter is preset to either millimoles per liter mmol L or milligrams per deciliter mg dL depending on the standard of your country The meter will bet set to mg dL by default when sold in the Unites States Memory Up to 500 records with time and date Automatic shutoff 2 minutes after last action Meter Size 75 0 mm 40 0 mm 13 0 mm Display Size...

Page 54: ...ils to work for any reason other than obvious abuse within the first five 5 years from purchase we will replace it with a new meter free of charge For your records also write the purchase date of your product here Date of purchase _______________________________________________ Note This warranty applies only to the meter in the original purchase and does not apply to the battery supplied with the...

Page 55: ...2 30o C 36 86 o F Contains sufficient for n tests Use by Lot Number Manufacturer Authorized Representative Sterilized using irradiation Control Range Catalog MODEL Model Number Do not dispose along with household waste Fragile handle with care This Side Up Keep away from sunlight and heat Keep Dry ...

Page 56: ...emory 33 Meter Use and Precautions 7 Meter Setup 14 Setting the Clock 14 OK Button 4 Specifications 48 Procedure Precautions and Limitations 31 Testing Your Blood 21 Quality Control Test 18 Control Solution 11 How to Run 18 Results Blood Glucose 28 Control Solution 19 Meter vs Lab Results 45 Target Goals 43 Unit of Measure 19 Suggested Testing Times 43 Symbols Index of 50 Test Strip 8 Expiration 9...

Page 57: ......

Page 58: ......

Reviews: