background image

XR343CK User Guide English

13

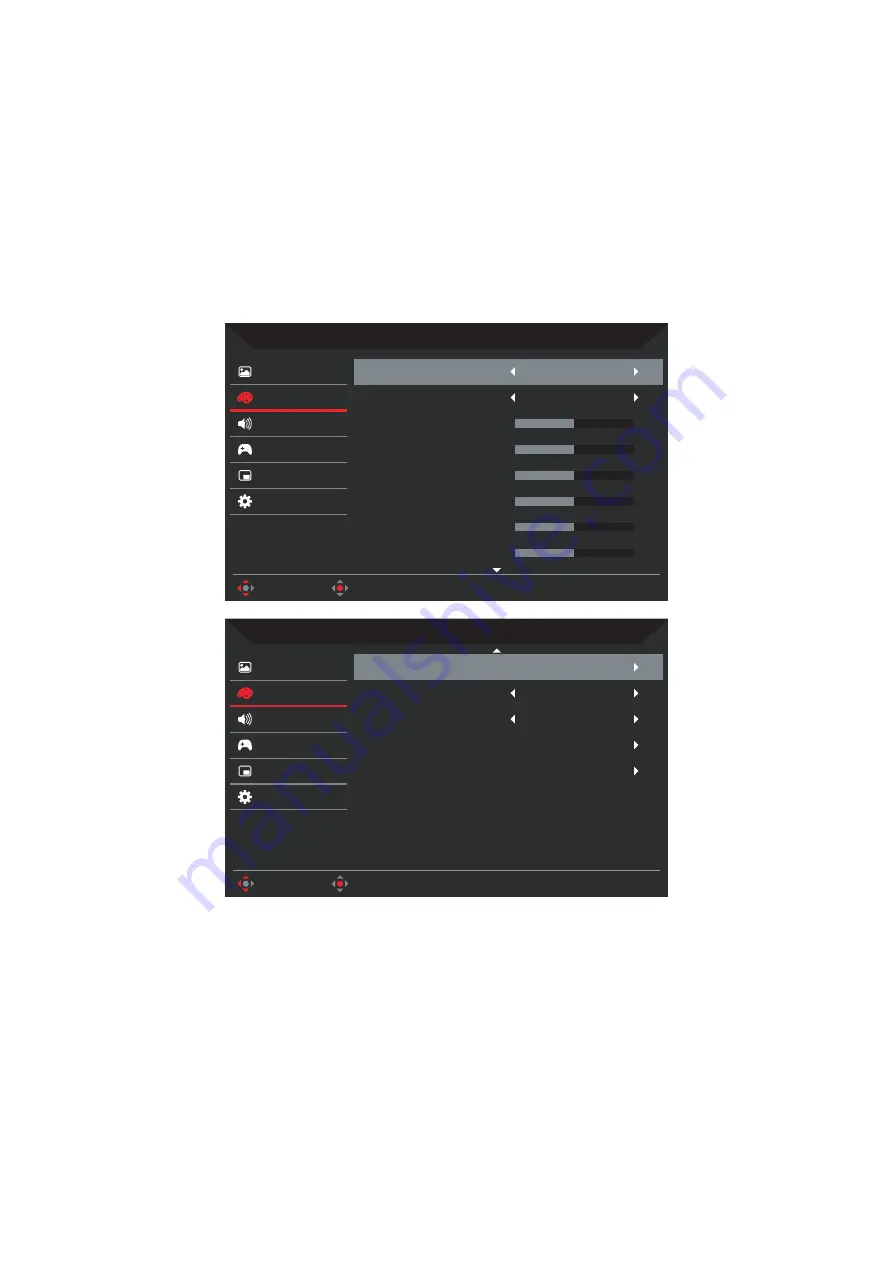
•  Light Sensor

: Detect ambient light conditions and dynamically optimize image 

brightness and color parameters accordingly. Select from 

Off

 (function is 

disabled), 

Level 1

 (brightness will be automatically adjusted to the minimum 

range), 

Level 2

 (brightness will be automatically adjusted to the moderate 

range) or 

Level 3

 (brightness will be automatically adjusted to the maximum 

range).

•  Super Sharpness

: Super Sharpness technology can simulate high-resolution 

images by boosting the pixel density of the original source to make images 

sharper and clearer. Turn this function 

On

 or 

Off

.

Color

Picture

Move

Enter

Mode - Standard

Audio

Gaming

Color

OSD

System

2.2

Gamma

Warm

Color Temp.

R Gain

50

G Gain

50

B Gain

50

R Bias

50

G Bias

50

B Bias

50

Picture

Move

Enter

Mode - Standard

Audio

Gaming

Color

OSD

System

6-axis Hue

6-axis Saturate

Modes

Off

Grayscale Mode

Standard

Color Space

•  Gamma

: Adjust the luminance tone. Select from 

1.8

2.0

2.2

2.4

 or 

2.6

.

Note:


Gamma value 

2.2

 is the standard value for Windows operating 

environment.

•  Color Temp.

: Select the screen image color temperature from: 

Warm

: Increases the color temperature and makes the screen image appear 

warmer with a red and yellow tint.

Normal

: Loads the monitor’s normal color settings.

Cool

: Decreases the color temperature and makes the screen image to 

appear cooler with a blue tint.

Blue Light

: Decreases the level of blue light emitted from the screen to make 

the screen image more comfortable to view for your eyes.

Summary of Contents for XR343CK

Page 1: ...Acer LCD Monitor User Guide ...

Page 2: ...ovided below The serial number and model number are recorded on the label affixed to your computer All correspondence concerning your unit should include the serial number model number and purchase information No part of this publication may be reproduced stored in a retrieval system or transmitted in any form or by any means electronically mechanically by photocopy recording or otherwise without ...

Page 3: ...your monitor Please carefully follow these guidelines when cleaning the monitor Always unplug the monitor before cleaning Use a soft cloth to wipe the screen and cabinet front and sides Accessibility Be sure that the power outlet you plug the power cord into is easily accessible and located as close to the equipment operator as possible When you need to disconnect power from the equipment be sure ...

Page 4: ...an extension cord is used with this product make sure that the total ampere rating of the equipment plugged into the extension cord does not exceed the extension cord ampere rating Also make sure that the total rating of all products plugged into the wall outlet does not exceed the fuse rating Do not overload a power outlet strip or receptacle by plugging in too many devices The overall system loa...

Page 5: ... engine Sparks in such areas could cause an explosion or fire resulting in bodily injury or even death Switch off the device near depots storage and distribution areas chemical plants or where blasting operations are in progress Areas with a potentially explosive atmosphere are often but not always marked They include below deck on boats chemical transfer or storage facilities vehicles using lique...

Page 6: ...f working in front of a computer Long work periods bad posture poor work habits stress inadequate working conditions personal health and other factors greatly increase the risk of physical injury Incorrect computer usage may lead to carpal tunnel syndrome tendonitis tenosynovitis or other musculoskeletal disorders The following symptoms may appear in the hands wrists arms shoulders neck or back nu...

Page 7: ... or contrast to a comfortable level for enhanced text readability and graphics clarity Eliminate glare and reflections by placing your display in such a way that the side faces the window or any light source minimizing room light by using drapes shades or blinds using a task light changing the display s viewing angle using a glare reduction filter using a display visor such as a piece of cardboard...

Page 8: ...e relevant Union harmonization legislationsas below Directive and following harmonized standards and or other relevant standards have been applied EMC Directive 2014 30 EU EN 55032 2012 AC 2013Class B EN 55032 2015 AC 2016 Class B EN 61000 3 2 2014 Class D EN 55024 2010 EN 61000 3 3 2013 LVD Directive 2014 35 EU EN 60950 1 2006 A11 2009 A1 2010 A12 2011 A2 2013 RoHS Directive 2011 65 EU EN 50581 2...

Page 9: ...y not cause harmful interference and 2 this device must accept any interference received including interference that may cause undesired operation The following local Manufacturer Importer is responsible for this declaration Product LCD Monitor Model Number XR343CK SKU Number XR343CK xxxxxx x 0 9 a z or A Z Name of Responsible Party Acer America Corporation 333 West San Carlos St Address of Respon...

Page 10: ...pixel statement v Tips and information for comfortable use v Finding your comfort zone v Taking care of your vision vi Developing good work habits vi Unpacking 1 Adjusting the monitor 2 Disassembly Velcro 2 Height Adjustment 2 Tilt 3 Swivel 3 Wall Mounting 4 Monitor introduction 5 Connecting the cables 5 Connecting the adapter and AC Power cord 6 Power saving 6 Display Data Channel DDC 7 Standard ...

Page 11: ... unpack the box and save the packing materials in case you need to ship or transport the monitor in the future LCD monitor Quick start guide Warranty card USERGUIDE LCD Monitor NITRO XR3Series XR343CKP USB cable Optional USB Type C cable Optional HDMI cable Optional AC Power cord DP Cable Optional ...

Page 12: ...or from falling when you change its angle You can adjust the monitor s angle from 5 to 35 and it allows 30 swivel adjustment from either left or right You can also adjust the monitor s height within 130 mm Disassembly Velcro 1 2 Note Velcro is used to prevent height adjustment burst and hurting people Height Adjustment HDMI 1 HDMI 2 DP 1 DP 2 2 130mm 1 Note Please adjust the height of the monitor ...

Page 13: ...XR343CK User Guide English 3 Tilt 5 35 Swivel 30 30 ...

Page 14: ...nting arm onto the back of the monitor Line up the holes of the arm with the holes in the back of the monitor 4 Insert the 4 screws into the holes and tighten 5 Reconnect the cables Refer to the user s manual that came with the optional wall mounting arm for instructions on attaching it to the wall Note VESA mounting screw holes are not available for all models please check with the dealer If inst...

Page 15: ...n page Press again to enter next function in the Function Menu b The single toggle button on the backside of the Display bezel operates like a joystick To move the cursor simply toggle the button in four directions Press the button to select desired option Red indicates operable Grey indicates inoperable Connecting the cables To install the monitor on your host system please follow the steps below...

Page 16: ...C voltage area No user adjustment is required Plug one end of the AC power cord to the Adapter and plug the other end into an AC outlet For units using 120 V AC Use a UL listed cord set type SVT wire and plug rated 10 A 125 V For units using 220 240 V AC Use a cord set consisting of H05VV F cord and plug rated 10 A 250 V The cord set should have the appropriate safety approvals for the country in ...

Page 17: ...iming The monitor supports the DDC2B standard 20 pin color display signal cable PIN No Description PIN No Description 1 ML_Lane 0 2 GND 3 ML_Lane 0 4 ML_Lane 1 5 GND 6 ML_Lane 1 7 ML_Lane 2 8 GND 9 ML_Lane 2 10 ML_Lane 3 11 GND 12 ML_Lane 3 13 CONFIG1 14 CONFIG2 15 AUX CH 16 GND 17 AUX CH 18 Hot Plug 19 Return 20 DP_PWR 19 pin color display signal cable PIN No Description PIN No Description 1 TMDS...

Page 18: ...ice 15 SCL 16 SDA 17 DDC CEC Ground 18 5V Power 19 Hot Plug Detect 24 pin USB Type C cable PIN No Description PIN No Description A1 GND B12 GND A2 SSTXp1 B11 SSTXp1 A3 SSTXn1 B10 SSTXn1 A4 VBUS B9 VBUS A5 CC1 B8 CC1 A6 Dp1 B7 Dp1 A7 Dn1 B6 Dn1 A8 SBU1 B5 SBU1 A9 VBUS B4 VBUS A10 SSTXn2 B3 SSTXn2 A11 SSTXp2 B2 SSTXp2 A12 GND B1 GND ...

Page 19: ...00 60Hz 7 WXGA 1680x1050 60Hz 8 UXGA 1920x1080 60Hz 9 UXGA 2560x1440 60Hz 10 UltraWide QHD 3840x1600 60Hz 11 UltraWide QHD 3840x1600 100Hz 12 UltraWide QHD 3840x1600 144Hz 13 UltraWide QHD 3840x1600 185Hz Note Item 1 2 3 10 is standard timing table Item 4 5 6 7 8 9 is PC graphic card generate timing Item 11 is HDMI DP timing only Item 12 13 is DP timing only Item 13 is over clock timing ...

Page 20: ...l settings For advanced settings please refer to following page Main page Mode Standard Brightness 75 Input HDMI1 2 0 Menu 1 2 3 4 1 Hot Key1 Modes Volume Gamma Contrast Blue Light Over Drive VRB PIP PBP 2 Hot Key2 Modes Volume Gamma Contrast Blue Light Over Drive VRB PIP PBP 3 Hot Key3 Input Switch Hot Key 4 Main Menu Hot key1 default Modes To choose scenario mode Action Racing Sports which user ...

Page 21: ...re done press the joystick to exit current page and store Move Enter Exit Input HDMI1 2 0 Input On Auto Source Main Menu Press the MENU key to open the OSD Toggle the joystick to the up or down to select Picture from the OSD Then toggle to the right to navigate to the element you wish to adjust and press the joystick to enter it Toggle the joystick to the left or right to adjust the sliding scales...

Page 22: ...ht through For the best protection select a lower value When Blue Light function is set to On Brightness and Contrast will show each level of Blue Light value Adaptive Contrast Management ACM Dynamically adjust the contrast ratio of the input image to achieve ultra sharp images Every scene is analyzed to adjust images frame by frame and enhance colour quality achieving the whitest whites and the d...

Page 23: ... Audio Gaming Color OSD System 2 2 Gamma Warm Color Temp R Gain 50 G Gain 50 B Gain 50 R Bias 50 G Bias 50 B Bias 50 Picture Move Enter Mode Standard Audio Gaming Color OSD System 6 axis Hue 6 axis Saturate Modes Off Grayscale Mode Standard Color Space Gamma Adjust the luminance tone Select from 1 8 2 0 2 2 2 4 or 2 6 Note Gamma value 2 2 is the standard value for Windows operating environment Col...

Page 24: ... basic PC application ECO For saving electricity with low power consumption by providing minimum brightness for all running programs Graphics For better color matching representation with the graphics HDR For better color matching representation with the high dynamic lighting rendering HDR For more information on HDR features refer to page 12 Color Space Select your desired color space from Standa...

Page 25: ...uips gamers with a superior gameplay experience at peak performance Select On to switch on AMD FreeSync Premium or Off to disable the function Refresh Rate Num Select On to display the monitor s current refresh rate on the screen or Off to disable the function Visual Response Boost VRB Visual Response Boost technology makes gameplay seamless and practically blur free Select On to enable this funct...

Page 26: ...arency Select the transparency when using gaming mode from Off 20 40 60 or 80 OSD Lock Select On to prevent unwanted access to the OSD menu or Off to disable this function Note If you set OSD Lock to On a notification appears on the screen informing the OSD is locked OSD Locked During lock state you cannot use any User Control keys To unlock the OSD press and hold the joystick for about 5 seconds ...

Page 27: ...tion select the PIP Position from Top Left Top Right Bottom Right or Bottom Left and Sub Source from HDMI1 2 0 HDMI2 2 0 DP1 DP2 or TYPE C Then select Source Swap to swap the main source and sub source Finally select Audio Source from Main source or Sub source PBP Displays the main source and sub source next to each other Select the PBP Size from Aspect and Full select Sub Source from HDMI1 2 0 HD...

Page 28: ...e ngs to Off Power off USB charge Off Quick Start Mode Off USB 3 0 C Type USB Port Select 1 Press the MENU key to open the OSD 2 Toggle the joystick to the up or down to select Save Setting to from the OSD 3 Toggle the joystick to the right to access the menu items 4 Toggle the joystick to the up or down to select your preferred game mode Game Mode Action Game Mode Racing or Game Mode Sports where...

Page 29: ...D menu adjust brightness and contrast to maximum or reset to their default setting Off Check the power switch Check if the AC power cord is properly connected to the monitor Amber Check if the video signal cable is properly connected at the back of the monitor Check if the computer system is switched on and in power saving standby mode Note Acer monitor is purposed for video and visual display of ...

Reviews: