background image


Acer V551 (new) CRT Monitor Service Guide 
 

Chapter 2 Circuit Operation Theory 


10 

Confidence and Property 


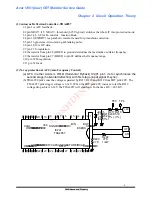
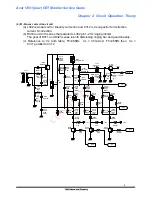
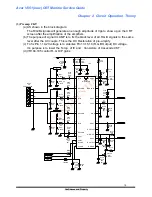
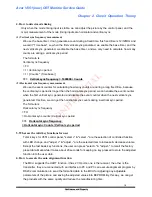
(3) Preamp CKT 

(a) AS shown in the block diagram: 
      The R/G/B signals will generate an enough amplitude of Vpp to show up on the CRT 

screen after the amplification of the amplifiers.   

(b) The purpose of signal CLAMP is to fix the black level of all R.G.B signals to the same 

level after the AC couple. This is the DC Restoration of pre-amplify   

(c) To fix Pin 1,19,20 voltage is to stabilize Pin 13,15,18 (R,G,B Output) DC voltage. 
      It’s purpose is to lower the Temp. of IC and    transistors of Casecode CKT. 
(d) VR104,105 control R.,G O/P gains 


B OUT

B CUTOFF

B DRIVE

R DRIVE

R CUTOFF

R OUT

R CLAMP

R-IN

B CLAMP

B-IN

CLAMP

BLANK

CONT

G DRIVE

VCC1

G CUTOFF

G OUT

G CLAMP

GND

GND

VCC2

G-IN

22

21

15

16

17

18

19

20

14

13

12

8

7

6

5

4

3

2

1

11

10

9

+

+

+

6

5

4

3

2

1

D115

D113

D111

D112

D114

D116

C109

C110

IC101

C105

C103

C101

C118

C130

C122

ZD107

R109

R101

R102

R103

R142

R110

R112

R111

R138

R137

R108

R117

R123

R131

M102

R120

C106

C102

C104

C129

C154

C108

VR105

VR104

R106

R176

R177

R178

R100

D100

C100

1N4148

1N4148

1N4148

1N4148

1N4148

1N4148

(OPEN)

50V
(D)

0.01U

50V
(D)

MM1375XD

50V

0.1U

(D)

50V

0.1U

(D)

50V

0.1U

(D)

25V

47U

(EL)

50V

10U

(EL)

10U
50V

(EL)

8.2V

1/2W

120

75

75

75

1.5k

3k

3K

4.7K

9.1K

56K

100

390

390

390

20.60010.106

6P

1/4W

4.7

50V

0.1U

(D)

50V

0.1U

(D)

50V

0.1U

(D)

50V

0.01U

(D)

50V

(OPEN)

(D)

50V

0.01U

(D)

(B-DRV)

2K

(R-DRV)

2K

1/2W

100

33

33

33

4.7K

1N4148

(OPEN)

50V
(D)

GO

CONTRAST

+12V

CLAMP

+8V

+8V

+8V

+8V

RO

BO

RI

RI

GI

GI

BI

BI

H-BLANK


Summary of Contents for V551

Page 1: ... 1 B Adjustment For function test station only 2 2 Geometry Adjustment 2 3 Background Adjustment 3 4 Foreground Adjustment 3 5 Final Check 3 6 Focus Adjustment 4 7 Convergence Adjustment 4 8 Power Saving Function Check 4 9 Geometry Specification for Production Line 5 10 Eyelet parts 5 11 Touch up parts 7 12 Glue parts 8 13 Wire Dressing parts 9 ...

Page 2: ...zontal B to be 50 0 0 2VDC 2 Geometry Adjustment a Enter factory area Press SELECT and ADJUST at the same time then turn power switch on b Press ADJUST and ADJUST at the same time to clear user area c Input mode 31 5KHz VGA 640x480 with tilt adjustment pattern d Adjust CRT screw to meet tilt and orthogonal spec Tilt 1 mm Orthogonal 1 5mm e Input the presetting modes and supporting modes with full ...

Page 3: ... Adjustment a Input mode 53 6KHz SVGA5 with 3 inch block pattern b Check the drive VRs of VR104 105 at center position c Adjust external brightness key to cut off and external contrast key to let the light output be 15 Ft L d Adjust VR103 104 to let the color temperature meet the specification x 0 281 0 003 y 0 311 0 003 e Adjust external contrast key to let light output be 45 3 Ft L f Press SELEC...

Page 4: ...n e Input mode 53 6KHz SVGA5 with white cross hatch pattern f Re confirm the mis convergence can meet spec B D A A 0 2 mm C E B C D E 0 3 mm 8 Power Saving Function Check a Input mode 53 6KHz SVGA5 with full white pattern b Set external contrast and brightness keys to maximum position c Remove H Sync only the video and raster should be extinguished The LED shows amber color and the power consumpti...

Page 5: ...or Production Line Table 2 ITEM DESCRIPTION SPECIFICATION 1 HORI SIZE 270 4 mm 2 VERT SIZE 202 4 mm 3 SIDE PIN 2 0 mm 4 TOP BOTTOM PIN 1 0 mm 5 SIDE BARREL 1 0 mm 6 TOP BOTTOM BARREL 1 0 mm 7 TRAPEZOID 1 0 mm 8 VIDEO OFFSET 4 0 mm 9 PARALLELGRAM 2 0 mm 10 HORI LINEARITY 5 11 VERT LINEARITY 5 10 Eyelet parts 1 Q602 Heat sink ...

Page 6: ... Acer V551 new CRT Monitor Service Guide Chapter 3 Alignment Procedure 6 Confidence and Property 2 T303 3 IC202 Heat sink T302 4 M101 CRT socket ...

Page 7: ...onitor Service Guide Chapter 3 Alignment Procedure 7 Confidence and Property 11 Touch up parts The component listed below must touch up to avoid solder crack 1 Q310 3 points 2 D307 3 points 3 L302 2 points 4 CN601 3 points ...

Page 8: ...Acer V551 new CRT Monitor Service Guide Chapter 3 Alignment Procedure 8 Confidence and Property 5 Q602 3 points 6 C612 2 points 7 M101 8 points 12 Glue parts 1 G2 G4 VR add glue to fix the position of VR ...

Page 9: ... Acer V551 new CRT Monitor Service Guide Chapter 3 Alignment Procedure 9 Confidence and Property 2 R607 add glue to fix the Heat sink 13 Wire Dressing parts 1 Left side view 2 Right side view ...

Page 10: ... Acer V551 new CRT Monitor Service Guide Chapter 3 Alignment Procedure 10 Confidence and Property 3 Rear side view 4 Left Bottom degaussing fixed 5 Right Bottom degaussing fixed ...

Page 11: ...ality 6 4 4 Image Stability 6 5 User Controls 6 5 1 Basic 6 5 2 Advanced 7 6 Mechanical Characteristics 8 6 1 Dimension 8 6 2 Weight 8 6 3 Plastic 8 6 4 Carton 8 7 Pallet Shipment 9 7 1 Dimension 9 7 2 Shipping Container 9 7 3 Air Transport Container 9 8 Certification 10 8 1 Environment 10 8 2 PC Monitor 10 8 3 Safety 10 8 4 EMC 10 8 5 X Ray Requirement 11 8 6 Ergonomics 11 9 Appendix Table 12 Tab...

Page 12: ...On 75 W max LED Green DPMS Standby 5 W LED Amber Suspend 5 W LED Amber Off 5 W LED Amber Inrush Current 110 VAC 50Hz 40 Amp peak cold start Leakage Current 264 VAC 50Hz 3 5mA Hi Pot 1 1500VAC 1 sec 2 Ground test 30A 1sec w o damage 0 1 ohm in line test in lab test Power cord Length 1800 mm Color Flint Gray KC 003 1 2 Signal Interface Condition Spec OK N A Remark Pin assignment 5V on Pin 9 Video in...

Page 13: ...6 User mode No 10 Preset Resolution Fh KHz Fv Hz OK N A Remark VGA400 640x400 31 47KHz 70Hz VGA480 640x480 31 47KHz 59 94Hz 6448A 640X480 37 5KHz 75Hz 6448B 640X480 43 269KHz 85Hz SVGA4 800x600 46 88KHz 75Hz UVGA1 1024x768 48 3KHz 60Hz SVGA5 800x600 53 67KHz 85Hz Apple 16 832x624 49 71KHz 74 533Hz UVGA2 1024x768 56 476KHz 70 069Hz UVGA7 1024x768 60 023KHz 75 029Hz Super MAC 19 1024x768 60 24KHz 75...

Page 14: ...s Axis for x y z 2 Random Vibration Package Non Operating 5 100Hz 0 dB Oct 0 015g2 Hz 100 200Hz 6 dB Oct 200Hz 0 0038g2 Hz Non package Non Operating 20Hz 2000 0 0185g2 Hz Drop With packing Package Non Operating 13 7kg 76cm Height 1 corner 3 edges 6 faces Electrostatic Discharge IEC801 2 standard Contact 8KV Air 15KV 0 5 8KV tip table no blanking Acoustical Noise 40 dB A Power Line Transient IEC801...

Page 15: ... trio missing as approval sheet see table 2 4 Front of Screen 4 1 Geometry OK N A Remark Magnetic Environment Northern Hemisphere H 0 0 05 V 0 45 0 05 Southern Hemisphere H 0 0 05 V 0 45 0 05 Equatorial H 0 0 05 V 0 0 05 Size Hor 270 4 mm Ver 202 4 mm Centering Hor Ver A B C D 4 mm See table 4 Geometric Distortion Top Bottom Side Pincushion 2 mm Top Bottom Side Barreling 2 mm Hor Ver Trapezoid 2 m...

Page 16: ...rit cut off Cont max x 0 281 0 010 y 0 311 0 010 UVGA5 800x600 53 6KHz 85Hz Purity W R G B X max X min Y max Y min 0 015 Color Tracking Brightness cut off x y nominal 0 015 Max Brightness with ABL Full white pattern 28Ft L min Cut off Max Brightness no ABL 3 Block 40Ft L min Cut off Brightness Uniformity Full white pattern 70 center to corner Raster light O P Bright Cont Max 0 5 1 5Ft L Contrast r...

Page 17: ...cation 7 Confidence and Property Parallelogram Trapezoid I Key 5 2 Advanced Function Spec OK N A Remark OSD position Color Gain Corner Pin balance Tilt Color Temp C1 C2 9300K 6500K Manual Degauss Recall Languages 5 languages Mis Convergence adj Moire adj D sub BNC switch ...

Page 18: ... Tilt and Swivel range Tilt 4 5 12 5 degree Swivel 45 45 degrees 6 2 Weight Spec OK N A Remark Monitor Net 12 0 Monitor w packaging Gross 13 7 6 3 Plastic Spec OK N A Remark Flammability UL 94 V0 Heat deflection To ABS PC ABS 65 70 UV stability ABS PC ABS Delta E 5 after 300Hr Xted test Delta E 1 5 after 300Hr Xted test MPR2 Model TCO Model Resin MPR2 ABS TCO PC ABS Texture RE 6625 Color Light Gra...

Page 19: ...ping Container Stowing Type Quantity of products sets Quantity of Products sets Quantity of pallet sets Every container Every Pallet Every Container 20 300 Pallet A 30 Pallet A 10 Pallet B X Pallet B With pallet 40 630 Pallet A 30 Pallet A 21 Pallet B X Pallet B X 20 X X X X Without pallet 40 X X X X 7 3 Air Transport Container Container Type Quantity of products sets Every container Quantity of P...

Page 20: ...61000 3 2 Harmonics TCO92 95 TCO99 8 2 PC Monitor Condition Spec OK N A Remark Microsoft Windows PC98 99 DPMS VESA DDC 1 2B Version 3 0 USB External 8 3 Safety Condition Spec OK N A Remark UL USA UL 1950 3rd edition CSA Canada C22 2 No 950 M89 DNSF EN60950 IEC950 A1 A2 A3 A4 EN60950 A1 A2 A3 A4 73 23 EEC CB Nordics TUV GS EN60950 CCIB China EIAJ JEIDA Japan NOM Mexico IAA Korea 8 4 EMC Condition S...

Page 21: ... Confidence and Property BCIQ Taiwan C Tick Australia AS3548 RRL Korean 8 5 X Ray Requirement Condition Spec OK N A Remark DHHS 21 CFR USA X Ray Standard DNHW PTB German X Ray standard MPRII MPRIII 8 6 Ergonomics Condition Spec OK N A Remark ZH1 618 German ergonomic ISO 9241 3 7 8 ...

Page 22: ...use 0 if n a 11 Year of Manufacture year 1990 12 01 EDID version 1 13 01 Revision 1 14 08 Video Input Define see Note 1 15 1B Max H Image Size 270 mm 16 14 Max V Image Size 202 mm 17 gamma 100 100 see Note 3 18 E8 DPMS see Note 2 19 Red Green Bits Rx1Rx0Ry1Ry0Gx1Gx0Gy1Gy0 1A Blue White Bits Bx1Bx0By1By0Wx1Wx0Wy1Wy0 1B Red x bit9 2 1C Red y bit9 2 1D Green x bit9 2 see Note 3 1E Green y bits9 2 1F ...

Page 23: ... 01 2 29 01 2A 01 3 2B 01 2C 01 4 2D 01 2E 01 5 2F 01 30 01 6 31 01 32 01 7 33 01 34 01 8 35 01 36 00 Detailed Timing Description 1 37 00 38 00 39 FE 3A 00 3B 4D 3C 6F 3D 6E 3E 69 3F 74 40 6F 41 72 42 0A 43 47 20 48 00 Detailed Timing Description 2 49 00 4A 00 4B FE 4C 00 4D 4D 4E 6F 4F 6E 50 69 51 74 52 6F 53 72 54 0A 55 20 56 20 ...

Page 24: ...n 57 20 58 20 59 20 5A 00 Detailed Timing Description 3 5B 00 5C 00 5D FE 5E 00 5F 4D 60 6F 61 6E 62 69 63 74 64 6F 65 72 66 0A 67 20 68 20 69 20 6A 20 6B 20 6C 00 Detailed Timing Description 4 6D 00 6E 00 6F FE 70 00 71 4D 72 6F 73 6E 74 69 75 74 76 6F 77 72 78 0A 79 20 7A 20 7B 20 7C 20 7D 20 7E 00 Extension Flag 7F Check sum ...

Page 25: ...e following but provisions have been made in anticipation of a common video output standard for Flat Panel Display FPD use 6 5 Signal Level Standard 6 5 Refer to the following bit definitions Identified by the level of reference white volts above blank followed by the level of the sync tips in volts below blank Bit 6 Bit 5 Operation 0 0 0 700V 0 300V 1 000V p p 0 1 0 714V 0 286V 1 000V p p 1 0 1 0...

Page 26: ...or display 1 0 Non RGB multicolor display example RGY 1 1 Undefined Bit 2 0 Reserved Set at 00h until defined Note 3 CRT Vender Chunghwa Hitachi Samsung Philips Orion 17h BC A6 7E BB E2 CRT Vender Chunghwa Hitachi Samsung Philips Orion 19h 06 0E FB A2 07 1Ah 4E 6E BE AE 4E 1Bh A0 A0 A1 9E A0 1Ch 57 57 55 59 57 1Dh 4F 48 4B 4E 4A 1Eh 97 99 97 99 9A 1Fh 26 26 24 27 26 20h 10 10 10 10 10 21h 47 47 47...

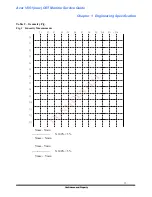
Page 27: ...er 1 Engineering Specification 17 Confidence and Property Table 2 Geometry Fig Fig 1 Linearity Measurements X1 X2 X3 X4 X6 X7 X8 X9 X10 X11 X18 Y0 Y1 Y2 Y3 Y4 Y5 Y8 Y10 Y7 Y6 Y11 Y12 Y13 X5 Y9 Xmax Xmin X 100 5 Xmax Xmin Ymax Ymin X 100 5 Ymax Ymin ...

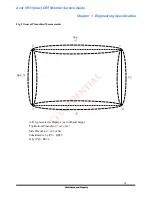
Page 28: ...neering Specification 18 Confidence and Property Fig 2 General Pincushion Measurements P Amm a1 S b2 R a2 Q Bmm b1 A B represented as display area width and height Top Bottom Pincushion a1 or a2 Side Pincushion b1 or b2 Substituted A by PS QR 2 B by PQ RS 2 ...

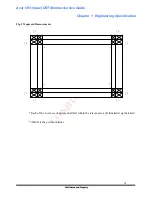
Page 29: ...r 1 Engineering Specification 19 Confidence and Property Fig 3 Trapezoid Measurements 2 5 2 5 2 5 2 5 2 5 2 5 2 5 2 5 D C A B Each of the 4 corners of picture shall fall within the relevant area F illustrated up hatched ABCD is the picture outlines ...

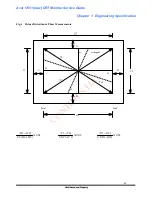
Page 30: ...hapter 1 Engineering Specification 20 Confidence and Property Fig 4 Picture Distortion Phase Measurements b2 a1 b1 a2 Tilt orthogoal A B C D V2 H2 Peak Total H1 V1 D1 D2 02 0 2 1 5 0 2 1 H H H H 02 0 2 1 5 0 2 1 V V V V 03 0 2 1 5 0 2 1 D D D D ...

Page 31: ...lack Diagram of Video 9 2 MM1375XD Block Diagram 9 3 Preamp CKT 10 4 Cascode CKT 11 5 DC Restore CKT 12 6 ABL CKT Auto Brightness Limit 13 7 Brightness V blank change mode blank spot killer CKT 14 ACER V551 MICROCONTROLLER CIRCUIT OPERATION THEORY 15 1 Introduction 15 2 Block diagram 15 3 MCU 15 4 How to detect mode timing 16 1 Vertical sync frequency measurement 16 2 Horizontal sync frequency mea...

Page 32: ...223 C206 R220 D201 ZD201 R207 Q204 C208 C210 C209 C212 R203 C205 C201 R212 R214 R215 R219 R217 R218 R208 R206 R210 R209 R213 R201 R202 R211 R223 R204 R205 IC201 C211 C202 C207 C213 50V 0 1U D 56K 9 1K 47K 22K OPEN 1N41481N4148 OPEN HVADJ OPEN OPEN 180 180 1 8K OPEN OPEN OPEN 1 4W 27K 10K 25V 100U EL D 50V 4700P 2 7K 1N4148 30V 6 8K H945 100V 0 1U PE 100V 1000P PE 100V 0 33U PE 100V 6800P PE 100K 2...

Page 33: ... 31 H regulation 2 11 pin 32 focus 3 X ray protection AFC Auto Frequency Control a AFC in other words is HFLB Horizontal Flyback IC201 pin1 its for synchronize the second stage horizontal deflection with first stage input signal H sync b TDA4858 pin2 sense the voltage separated by R217 R218 and R219 from FBT pin9 40V The TDA 4857 pin2 trigger voltage is 6 14V When the FBT pin9 40V increase to let ...

Page 34: ...gh Q307 inverting amplify the modulating wave to control Q302 Q303 Darlington pair to control H size e R307 and R308 separate the voltage B then provide the different voltage for different horizontal frequency to H size modulation circuit Fh SC0 SC1 45KHz 1 1 40K 45K 1 0 45 40KHz 0 1 35KHz 0 0 Cs truth table C320 D314 D318 R328 R327 R305 D321 Q301 Q312 Q307 R345 R346 R301 R344 R307 R302 R312 R308 ...

Page 35: ...ring the Q310 at ON cycle provides the plus part and during Q310 at latter OFF cycle provides the minus part through the flyback diode D307 c R333 and C318 series is a snubber circuit to inhibit spike d C324 R329 D313 and D310 is used to compensate the cross over distortion when the D307 OFF Q310 ON 2 1 2 3 1 10 2 G2 HV FOCUS 8 3 9 5 6 1 12 11 6 5 4 3 1 R313 Q310 H DY C324 D307 C313 C318 C339 C315...

Page 36: ...23 R384 R383 C317 Q333 T302 Q318 D306 C325 R316 C324 D307 C357 C310 C313 C339 C315 R317 R392 R311 R339 R387 R315 R314 R337 R391 R389 R338 R336 R329 D313 D356 D310 D312 D305 D323 J303 L303 Q314 M301 T301 C314 C312 C311 C356 R330 L302 OPEN 1 2W OPEN OPEN OPEN BU2508AF OPEN 250V MPS 20 60047 104 OPEN OPEN H945 H945 OPEN OPEN 50V OPEN EL 4 7K 4 7K 50V OPEN D IRF630 OPEN LIN COIL OPEN OPEN 100V OPEN PE...

Page 37: ...04 storage energy and D317 is off when Q317 turns off L304 release energy and D317 turns on to charge C326 to B d The higher Hor frequency needs higher B so B Drive duty must vary with frequency 10 2 G2 HV FOCUS 8 3 9 5 6 1 12 11 13 Q305 C309 C326 R347 D316 D317 Q306 L304 Q317 T303 R373 C363 R363 C364 H945 D 500V 0 01U 200V 33U EL 200 1N4148 BYM26A A733 19 40139 001 IRF630 19 70060 001 47 500V 220...

Page 38: ...ction output pin to drive vertical YOKE d Pin8 provides the vertical blank signal for vertical retrace line canceling 4 3 FEEDB OUTA GND GUARD VP VFB OUTB INB INA 9 8 7 6 5 4 3 2 1 V DY C233 R262 R263 C232 IC202 C219 R227 Q201 R237 R236 C216 C215 C231 R238 R232 R231 R228 R233 R225 R224 R250 C214 C217 C218 R229 50V 2200P D 3 3K 4 7K D 50V OPEN TDA4866 250V 0 22U EL 2W 1 H945 10K 10K 100V 100U EL 25...

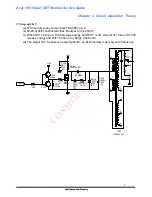
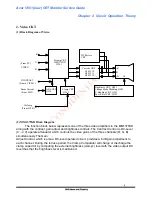
Page 39: ... MM1375XD Block Diagram The function block below represents one of the threevideo amplifiers in the MM1375XD along with the contrast gain adjust and brightness contrals The Contrast Control is DC Level 0 4 V operate attenuator which controls the video gains of the three channels R G B simultaneously The Gain Adjust Control which is also a DC level operated circuit provides a 6 dB gain adjustment t...

Page 40: ... DRIVE R CUTOFF R OUT R CLAMP R IN B CLAMP B IN CLAMP BLANK CONT G DRIVE VCC1 G CUTOFF G OUT G CLAMP GND GND VCC2 G IN 22 21 15 16 17 18 19 20 14 13 12 8 7 6 5 4 3 2 1 11 10 9 6 5 4 3 2 1 D115 D113 D111 D112 D114 D116 C109 C110 IC101 C105 C103 C101 C118 C130 C122 ZD107 R109 R101 R102 R103 R142 R110 R112 R111 R138 R137 R108 R117 R123 R131 M102 R120 C106 C102 C104 C129 C154 C108 VR105 VR104 R106 R17...

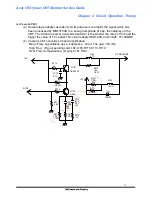
Page 41: ...smaller the value of Cob and the bigger the value of Ft is better This circuit adopts HSD1609 Cob 3 8pF ft 140MHZ b Cascode CKT concludes 3 band amplification Mean Freq capacitance open inductance short The gain Rc Re High Freq R gun peaking coil L104 L105 R115 C113 R119 Over Freq Compensation R gun C161 R161 R171 D101 Q102 R113 Q101 C113 C112 R151 C161 R161 R115 R114 R118 R119 R116 R117 L104 L105...

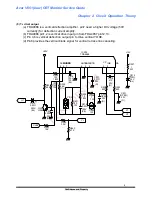
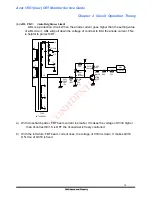
Page 42: ... stage is coupled to CRT by way of AC coupling So DC restoration CKT is needed to do the white balance adjustment b Use VR101 R145 and ZD104 to get the range of each gun bias Max 27 V c O P signal mixes DC and AC voltage Only AC signal passes C150 DC voltage is generated by VR101 cross voltage ZD104 VR101 R134 R145 C150 33V 20K 1 2W 51 20K 100 1U EL CRT CASCODE ...

Page 43: ...rent This is helpful to protect CRT 10 2 G2 HV FOCUS 8 3 9 5 6 1 12 11 13 R340 D320 Q316 C307 R352 R355 T303 R351 R350 VR301 C333 D309 330 1N4148 A733 4700P 50V D 100K 1 4W 10K 19 70060 001 6 8K 30K ABLADJ 20K 50V 1U EL 1N4148 ABL 12V CONT a With crosshatch patter FBT beam current is smaller It makes the voltage of C333 higher than Vcontrast Q316 is OFF the Vconstrast is freely controlled b With t...

Page 44: ... This is to keep the voltage cathode to G1 over the cut off voltage during the period of vertical retrace d In order to prevent the picture occurred transiently while change mode pull down the G1 voltage and let the voltage cathode to G1 over CUT OFF voltage This will make the picture blanking e While monitor turned off the discharge speed of high voltage circuit is slow since there is no deflecti...

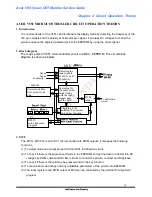
Page 45: ... PWM output To deflection circuit PC RS232 auto alignment program EEPROM Blanking Blanking Blanking Blanking SCO SC1 SCO SC1 SCO SC1 SCO SC1 Control Panel Control Panel Control Panel Control Panel Select Adjust Select Adjust Select Adjust Select Adjust UART External UART External UART External UART External adjustment function adjustment function adjustment function adjustment function MTV012 MTV0...

Page 46: ...t vertical sync generated and disable the event counter when the next vertical sync generated this time we can get the horizontal sync counts during a vertical sync period The formula is Horizontal sync frequency FH Horizontal sync counts Vertical sync period Horizontal sync frequency Horizontal sync Counts Vertical sync period 5 What are the valid key functions for user Total 4 keys for V551 cont...

Page 47: ... 15W 75V 0 07A 5 25W 12V 0 76A 9 12W 6 5V 0 6A 3 9 W Total output power 62W 2 Circuit Analysis The block diagram is shown as follow is divided into 13 portions Block Diagram Secondary Rectifier Filter V Sync Detector CKT Transformer photo coupler Bridge Rectifier Filter power MOSFET snubber ckt PWM controller control switch on off EMI filter ext sync Trigger CKT Line Input Feedback CKT DCV output ...

Page 48: ...rizontal frequency is switching That s the reason we adopt UC3842 as the control IC When load changes the voltage of the primary coil pin 6 7 of the transformer will be rectified and filtered by D608 C608 D607 C607 This voltage value will go down while the load getting heavier and it s voltage will be divided via R616 VR601 R617 then entering pin 2 of C601 Verror is direct ratio of output load Thi...

Page 49: ...these two frequency This CKT is consisted of C616 ZD603 R612 and detect the synchronous signal from the monitor FBT core After the differential of C616 ZD603 clips it s voltage and then add this signal to the pin 4 of UC3842 by way of 612 and C615 to get the synchronous 8 Transformer is mainly used for transformer and isolation it s principle is the current will pass pin 1 4 of T601 when FET on an...

Page 50: ... Acer V551 new CRT Monitor Service Guide Chapter 2 Circuit Operation Theory 20 Confidence and Property Attachment A ...

Page 51: ...available for loop compensation 2 VFB This is the inverting input of the Error Amplifier It is normally connected to the switchingt power supply output through a resistor divider 3 ISENSE Avoltage proportional to inductor current is connected to this input The PWN uses this information to terminate the output switch conduction 4 RT CT The oscillator frequency and maximum output duty cycle are prog...

Page 52: ... 1 B Adjustment For function test station only 2 2 Geometry Adjustment 2 3 Background Adjustment 3 4 Foreground Adjustment 3 5 Final Check 3 6 Focus Adjustment 4 7 Convergence Adjustment 4 8 Power Saving Function Check 4 9 Geometry Specification for Production Line 5 10 Eyelet parts 5 11 Touch up parts 7 12 Glue parts 8 13 Wire Dressing parts 9 ...

Page 53: ...zontal B to be 50 0 0 2VDC 2 Geometry Adjustment a Enter factory area Press SELECT and ADJUST at the same time then turn power switch on b Press ADJUST and ADJUST at the same time to clear user area c Input mode 31 5KHz VGA 640x480 with tilt adjustment pattern d Adjust CRT screw to meet tilt and orthogonal spec Tilt 1 mm Orthogonal 1 5mm e Input the presetting modes and supporting modes with full ...

Page 54: ... Adjustment a Input mode 53 6KHz SVGA5 with 3 inch block pattern b Check the drive VRs of VR104 105 at center position c Adjust external brightness key to cut off and external contrast key to let the light output be 15 Ft L d Adjust VR103 104 to let the color temperature meet the specification x 0 281 0 003 y 0 311 0 003 e Adjust external contrast key to let light output be 45 3 Ft L f Press SELEC...

Page 55: ...n e Input mode 53 6KHz SVGA5 with white cross hatch pattern f Re confirm the mis convergence can meet spec B D A A 0 2 mm C E B C D E 0 3 mm 8 Power Saving Function Check a Input mode 53 6KHz SVGA5 with full white pattern b Set external contrast and brightness keys to maximum position c Remove H Sync only the video and raster should be extinguished The LED shows amber color and the power consumpti...

Page 56: ...or Production Line Table 2 ITEM DESCRIPTION SPECIFICATION 1 HORI SIZE 270 4 mm 2 VERT SIZE 202 4 mm 3 SIDE PIN 2 0 mm 4 TOP BOTTOM PIN 1 0 mm 5 SIDE BARREL 1 0 mm 6 TOP BOTTOM BARREL 1 0 mm 7 TRAPEZOID 1 0 mm 8 VIDEO OFFSET 4 0 mm 9 PARALLELGRAM 2 0 mm 10 HORI LINEARITY 5 11 VERT LINEARITY 5 10 Eyelet parts 1 Q602 Heat sink ...

Page 57: ... Acer V551 new CRT Monitor Service Guide Chapter 3 Alignment Procedure 6 Confidence and Property 2 T303 3 IC202 Heat sink T302 4 M101 CRT socket ...

Page 58: ...onitor Service Guide Chapter 3 Alignment Procedure 7 Confidence and Property 11 Touch up parts The component listed below must touch up to avoid solder crack 1 Q310 3 points 2 D307 3 points 3 L302 2 points 4 CN601 3 points ...

Page 59: ...Acer V551 new CRT Monitor Service Guide Chapter 3 Alignment Procedure 8 Confidence and Property 5 Q602 3 points 6 C612 2 points 7 M101 8 points 12 Glue parts 1 G2 G4 VR add glue to fix the position of VR ...

Page 60: ... Acer V551 new CRT Monitor Service Guide Chapter 3 Alignment Procedure 9 Confidence and Property 2 R607 add glue to fix the Heat sink 13 Wire Dressing parts 1 Left side view 2 Right side view ...

Page 61: ... Acer V551 new CRT Monitor Service Guide Chapter 3 Alignment Procedure 10 Confidence and Property 3 Rear side view 4 Left Bottom degaussing fixed 5 Right Bottom degaussing fixed ...

Page 62: ...r Service Guide Chapter 4 Trouble Shooting 1 Confidence and Property Table of Contents 1 No output power 2 2 No video 3 3 No work 4 4 Unstable vertical display 5 5 H size adjust 6 6 H linearity error 7 7 Brightness CKT check 8 ...

Page 63: ...Confidence and Property 1 No output power Yes No Yes No Yes No Yes No No power Check F601 D602 D605 ok Check IC601 ZD602 ZD606 ok Replace F601 D602 D605 Replace IC601 ZD602 ZD606 Check Q602 T601 ok Replace Q602 T601 Check D701 D702 D704 D705 ok Replace D701 D702 D704 D705 ...

Page 64: ...and Property 2 No video No Yes No Yes No Yes No Yes No Yes No Check 12V Repair Check R G B input of M101 Ok Repair Check pin 2 3 4 of M103 ok Repair Check IC101 R G B input output ok Repair IC101 Check cascode circuit ok Check Q101 Q103 Q105 Q110 Q111 Q112 Check M101 Ok Repair M101 ...

Page 65: ...k No Green Amber No Yes No Yes No Yes No Check LED Ok Check G1 G2 R G B Output ok Feed back No Power flowchart Check pin 6 7 of IC201 ok Repair IC201 Check BDRV output ckt ok Check Q305 Q306 Q317 D317 Check HDRV output ckt ok Check Q315 T301 Check HV is about 24KV ok Check Q310 D307 C314 C315 C312 L302 ...

Page 66: ...de Chapter 4 Trouble Shooting 5 Confidence and Property 4 Unstable vertical display No Yes No Yes Unstable vertical display IC201 pin 24 sawtooth gererator Fv OSC 42Hz Check IC201 around ckt IC202 has output Check IC202 around ckt Check DY ...

Page 67: ...rty 5 H size adjust Yes No Yes No Yes No Yes No Yes No H size error IC801 pin 34 PWM output ok Replace IC801 Check Q301 base adjust ok Check Q301 around ckt Check EWDRV output ok Replace IC201 Check Q307 adjust range ok Check Q312 Q307 R307 R308 Is the voltage of C316 ok Check Q302 Q307 D307 ...

Page 68: ...Shooting 7 Confidence and Property 6 H linearity error Yes 2 Yes No Yes Yes Yes No Linearity error Picture the left right 1 or center side 2 asymmetery Check SC0 SC1 output Check Q322 Q323 Q314 Q333 ok Check C312 C311 C356 Repair L302 Repair IC801 Repair Repair ...

Page 69: ... Shooting 8 Confidence and Property 7 Brightness CKT check Yes No Yes No Yes No Yes Brightness control error Check IC801 PWM output ok Is the voltage of C305 190V Check Q202 base is low Check Q203 M101 Replace IC801 Check T303 R324 D303 Check Blank Hunlock ckt ...

Page 70: ...ality 6 4 4 Image Stability 6 5 User Controls 6 5 1 Basic 6 5 2 Advanced 7 6 Mechanical Characteristics 8 6 1 Dimension 8 6 2 Weight 8 6 3 Plastic 8 6 4 Carton 8 7 Pallet Shipment 9 7 1 Dimension 9 7 2 Shipping Container 9 7 3 Air Transport Container 9 8 Certification 10 8 1 Environment 10 8 2 PC Monitor 10 8 3 Safety 10 8 4 EMC 10 8 5 X Ray Requirement 11 8 6 Ergonomics 11 9 Appendix Table 12 Tab...

Page 71: ...On 75 W max LED Green DPMS Standby 5 W LED Amber Suspend 5 W LED Amber Off 5 W LED Amber Inrush Current 110 VAC 50Hz 40 Amp peak cold start Leakage Current 264 VAC 50Hz 3 5mA Hi Pot 1 1500VAC 1 sec 2 Ground test 30A 1sec w o damage 0 1 ohm in line test in lab test Power cord Length 1800 mm Color Flint Gray KC 003 1 2 Signal Interface Condition Spec OK N A Remark Pin assignment 5V on Pin 9 Video in...

Page 72: ...6 User mode No 10 Preset Resolution Fh KHz Fv Hz OK N A Remark VGA400 640x400 31 47KHz 70Hz VGA480 640x480 31 47KHz 59 94Hz 6448A 640X480 37 5KHz 75Hz 6448B 640X480 43 269KHz 85Hz SVGA4 800x600 46 88KHz 75Hz UVGA1 1024x768 48 3KHz 60Hz SVGA5 800x600 53 67KHz 85Hz Apple 16 832x624 49 71KHz 74 533Hz UVGA2 1024x768 56 476KHz 70 069Hz UVGA7 1024x768 60 023KHz 75 029Hz Super MAC 19 1024x768 60 24KHz 75...

Page 73: ...s Axis for x y z 2 Random Vibration Package Non Operating 5 100Hz 0 dB Oct 0 015g2 Hz 100 200Hz 6 dB Oct 200Hz 0 0038g2 Hz Non package Non Operating 20Hz 2000 0 0185g2 Hz Drop With packing Package Non Operating 13 7kg 76cm Height 1 corner 3 edges 6 faces Electrostatic Discharge IEC801 2 standard Contact 8KV Air 15KV 0 5 8KV tip table no blanking Acoustical Noise 40 dB A Power Line Transient IEC801...

Page 74: ... trio missing as approval sheet see table 2 4 Front of Screen 4 1 Geometry OK N A Remark Magnetic Environment Northern Hemisphere H 0 0 05 V 0 45 0 05 Southern Hemisphere H 0 0 05 V 0 45 0 05 Equatorial H 0 0 05 V 0 0 05 Size Hor 270 4 mm Ver 202 4 mm Centering Hor Ver A B C D 4 mm See table 4 Geometric Distortion Top Bottom Side Pincushion 2 mm Top Bottom Side Barreling 2 mm Hor Ver Trapezoid 2 m...

Page 75: ...rit cut off Cont max x 0 281 0 010 y 0 311 0 010 UVGA5 800x600 53 6KHz 85Hz Purity W R G B X max X min Y max Y min 0 015 Color Tracking Brightness cut off x y nominal 0 015 Max Brightness with ABL Full white pattern 28Ft L min Cut off Max Brightness no ABL 3 Block 40Ft L min Cut off Brightness Uniformity Full white pattern 70 center to corner Raster light O P Bright Cont Max 0 5 1 5Ft L Contrast r...

Page 76: ...cation 7 Confidence and Property Parallelogram Trapezoid I Key 5 2 Advanced Function Spec OK N A Remark OSD position Color Gain Corner Pin balance Tilt Color Temp C1 C2 9300K 6500K Manual Degauss Recall Languages 5 languages Mis Convergence adj Moire adj D sub BNC switch ...

Page 77: ... Tilt and Swivel range Tilt 4 5 12 5 degree Swivel 45 45 degrees 6 2 Weight Spec OK N A Remark Monitor Net 12 0 Monitor w packaging Gross 13 7 6 3 Plastic Spec OK N A Remark Flammability UL 94 V0 Heat deflection To ABS PC ABS 65 70 UV stability ABS PC ABS Delta E 5 after 300Hr Xted test Delta E 1 5 after 300Hr Xted test MPR2 Model TCO Model Resin MPR2 ABS TCO PC ABS Texture RE 6625 Color Light Gra...

Page 78: ...ping Container Stowing Type Quantity of products sets Quantity of Products sets Quantity of pallet sets Every container Every Pallet Every Container 20 300 Pallet A 30 Pallet A 10 Pallet B X Pallet B With pallet 40 630 Pallet A 30 Pallet A 21 Pallet B X Pallet B X 20 X X X X Without pallet 40 X X X X 7 3 Air Transport Container Container Type Quantity of products sets Every container Quantity of P...

Page 79: ...61000 3 2 Harmonics TCO92 95 TCO99 8 2 PC Monitor Condition Spec OK N A Remark Microsoft Windows PC98 99 DPMS VESA DDC 1 2B Version 3 0 USB External 8 3 Safety Condition Spec OK N A Remark UL USA UL 1950 3rd edition CSA Canada C22 2 No 950 M89 DNSF EN60950 IEC950 A1 A2 A3 A4 EN60950 A1 A2 A3 A4 73 23 EEC CB Nordics TUV GS EN60950 CCIB China EIAJ JEIDA Japan NOM Mexico IAA Korea 8 4 EMC Condition S...

Page 80: ... Confidence and Property BCIQ Taiwan C Tick Australia AS3548 RRL Korean 8 5 X Ray Requirement Condition Spec OK N A Remark DHHS 21 CFR USA X Ray Standard DNHW PTB German X Ray standard MPRII MPRIII 8 6 Ergonomics Condition Spec OK N A Remark ZH1 618 German ergonomic ISO 9241 3 7 8 ...

Page 81: ...use 0 if n a 11 Year of Manufacture year 1990 12 01 EDID version 1 13 01 Revision 1 14 08 Video Input Define see Note 1 15 1B Max H Image Size 270 mm 16 14 Max V Image Size 202 mm 17 gamma 100 100 see Note 3 18 E8 DPMS see Note 2 19 Red Green Bits Rx1Rx0Ry1Ry0Gx1Gx0Gy1Gy0 1A Blue White Bits Bx1Bx0By1By0Wx1Wx0Wy1Wy0 1B Red x bit9 2 1C Red y bit9 2 1D Green x bit9 2 see Note 3 1E Green y bits9 2 1F ...

Page 82: ... 01 2 29 01 2A 01 3 2B 01 2C 01 4 2D 01 2E 01 5 2F 01 30 01 6 31 01 32 01 7 33 01 34 01 8 35 01 36 00 Detailed Timing Description 1 37 00 38 00 39 FE 3A 00 3B 4D 3C 6F 3D 6E 3E 69 3F 74 40 6F 41 72 42 0A 43 47 20 48 00 Detailed Timing Description 2 49 00 4A 00 4B FE 4C 00 4D 4D 4E 6F 4F 6E 50 69 51 74 52 6F 53 72 54 0A 55 20 56 20 ...

Page 83: ...n 57 20 58 20 59 20 5A 00 Detailed Timing Description 3 5B 00 5C 00 5D FE 5E 00 5F 4D 60 6F 61 6E 62 69 63 74 64 6F 65 72 66 0A 67 20 68 20 69 20 6A 20 6B 20 6C 00 Detailed Timing Description 4 6D 00 6E 00 6F FE 70 00 71 4D 72 6F 73 6E 74 69 75 74 76 6F 77 72 78 0A 79 20 7A 20 7B 20 7C 20 7D 20 7E 00 Extension Flag 7F Check sum ...

Page 84: ...e following but provisions have been made in anticipation of a common video output standard for Flat Panel Display FPD use 6 5 Signal Level Standard 6 5 Refer to the following bit definitions Identified by the level of reference white volts above blank followed by the level of the sync tips in volts below blank Bit 6 Bit 5 Operation 0 0 0 700V 0 300V 1 000V p p 0 1 0 714V 0 286V 1 000V p p 1 0 1 0...

Page 85: ...or display 1 0 Non RGB multicolor display example RGY 1 1 Undefined Bit 2 0 Reserved Set at 00h until defined Note 3 CRT Vender Chunghwa Hitachi Samsung Philips Orion 17h BC A6 7E BB E2 CRT Vender Chunghwa Hitachi Samsung Philips Orion 19h 06 0E FB A2 07 1Ah 4E 6E BE AE 4E 1Bh A0 A0 A1 9E A0 1Ch 57 57 55 59 57 1Dh 4F 48 4B 4E 4A 1Eh 97 99 97 99 9A 1Fh 26 26 24 27 26 20h 10 10 10 10 10 21h 47 47 47...

Page 86: ...er 1 Engineering Specification 17 Confidence and Property Table 2 Geometry Fig Fig 1 Linearity Measurements X1 X2 X3 X4 X6 X7 X8 X9 X10 X11 X18 Y0 Y1 Y2 Y3 Y4 Y5 Y8 Y10 Y7 Y6 Y11 Y12 Y13 X5 Y9 Xmax Xmin X 100 5 Xmax Xmin Ymax Ymin X 100 5 Ymax Ymin ...

Page 87: ...neering Specification 18 Confidence and Property Fig 2 General Pincushion Measurements P Amm a1 S b2 R a2 Q Bmm b1 A B represented as display area width and height Top Bottom Pincushion a1 or a2 Side Pincushion b1 or b2 Substituted A by PS QR 2 B by PQ RS 2 ...

Page 88: ...r 1 Engineering Specification 19 Confidence and Property Fig 3 Trapezoid Measurements 2 5 2 5 2 5 2 5 2 5 2 5 2 5 2 5 D C A B Each of the 4 corners of picture shall fall within the relevant area F illustrated up hatched ABCD is the picture outlines ...

Page 89: ...hapter 1 Engineering Specification 20 Confidence and Property Fig 4 Picture Distortion Phase Measurements b2 a1 b1 a2 Tilt orthogoal A B C D V2 H2 Peak Total H1 V1 D1 D2 02 0 2 1 5 0 2 1 H H H H 02 0 2 1 5 0 2 1 V V V V 03 0 2 1 5 0 2 1 D D D D ...

Page 90: ...lack Diagram of Video 9 2 MM1375XD Block Diagram 9 3 Preamp CKT 10 4 Cascode CKT 11 5 DC Restore CKT 12 6 ABL CKT Auto Brightness Limit 13 7 Brightness V blank change mode blank spot killer CKT 14 ACER V551 MICROCONTROLLER CIRCUIT OPERATION THEORY 15 1 Introduction 15 2 Block diagram 15 3 MCU 15 4 How to detect mode timing 16 1 Vertical sync frequency measurement 16 2 Horizontal sync frequency mea...

Page 91: ...223 C206 R220 D201 ZD201 R207 Q204 C208 C210 C209 C212 R203 C205 C201 R212 R214 R215 R219 R217 R218 R208 R206 R210 R209 R213 R201 R202 R211 R223 R204 R205 IC201 C211 C202 C207 C213 50V 0 1U D 56K 9 1K 47K 22K OPEN 1N41481N4148 OPEN HVADJ OPEN OPEN 180 180 1 8K OPEN OPEN OPEN 1 4W 27K 10K 25V 100U EL D 50V 4700P 2 7K 1N4148 30V 6 8K H945 100V 0 1U PE 100V 1000P PE 100V 0 33U PE 100V 6800P PE 100K 2...

Page 92: ... 31 H regulation 2 11 pin 32 focus 3 X ray protection AFC Auto Frequency Control a AFC in other words is HFLB Horizontal Flyback IC201 pin1 its for synchronize the second stage horizontal deflection with first stage input signal H sync b TDA4858 pin2 sense the voltage separated by R217 R218 and R219 from FBT pin9 40V The TDA 4857 pin2 trigger voltage is 6 14V When the FBT pin9 40V increase to let ...

Page 93: ...gh Q307 inverting amplify the modulating wave to control Q302 Q303 Darlington pair to control H size e R307 and R308 separate the voltage B then provide the different voltage for different horizontal frequency to H size modulation circuit Fh SC0 SC1 45KHz 1 1 40K 45K 1 0 45 40KHz 0 1 35KHz 0 0 Cs truth table C320 D314 D318 R328 R327 R305 D321 Q301 Q312 Q307 R345 R346 R301 R344 R307 R302 R312 R308 ...

Page 94: ...ring the Q310 at ON cycle provides the plus part and during Q310 at latter OFF cycle provides the minus part through the flyback diode D307 c R333 and C318 series is a snubber circuit to inhibit spike d C324 R329 D313 and D310 is used to compensate the cross over distortion when the D307 OFF Q310 ON 2 1 2 3 1 10 2 G2 HV FOCUS 8 3 9 5 6 1 12 11 6 5 4 3 1 R313 Q310 H DY C324 D307 C313 C318 C339 C315...

Page 95: ...23 R384 R383 C317 Q333 T302 Q318 D306 C325 R316 C324 D307 C357 C310 C313 C339 C315 R317 R392 R311 R339 R387 R315 R314 R337 R391 R389 R338 R336 R329 D313 D356 D310 D312 D305 D323 J303 L303 Q314 M301 T301 C314 C312 C311 C356 R330 L302 OPEN 1 2W OPEN OPEN OPEN BU2508AF OPEN 250V MPS 20 60047 104 OPEN OPEN H945 H945 OPEN OPEN 50V OPEN EL 4 7K 4 7K 50V OPEN D IRF630 OPEN LIN COIL OPEN OPEN 100V OPEN PE...

Page 96: ...04 storage energy and D317 is off when Q317 turns off L304 release energy and D317 turns on to charge C326 to B d The higher Hor frequency needs higher B so B Drive duty must vary with frequency 10 2 G2 HV FOCUS 8 3 9 5 6 1 12 11 13 Q305 C309 C326 R347 D316 D317 Q306 L304 Q317 T303 R373 C363 R363 C364 H945 D 500V 0 01U 200V 33U EL 200 1N4148 BYM26A A733 19 40139 001 IRF630 19 70060 001 47 500V 220...

Page 97: ...ction output pin to drive vertical YOKE d Pin8 provides the vertical blank signal for vertical retrace line canceling 4 3 FEEDB OUTA GND GUARD VP VFB OUTB INB INA 9 8 7 6 5 4 3 2 1 V DY C233 R262 R263 C232 IC202 C219 R227 Q201 R237 R236 C216 C215 C231 R238 R232 R231 R228 R233 R225 R224 R250 C214 C217 C218 R229 50V 2200P D 3 3K 4 7K D 50V OPEN TDA4866 250V 0 22U EL 2W 1 H945 10K 10K 100V 100U EL 25...

Page 98: ... MM1375XD Block Diagram The function block below represents one of the threevideo amplifiers in the MM1375XD along with the contrast gain adjust and brightness contrals The Contrast Control is DC Level 0 4 V operate attenuator which controls the video gains of the three channels R G B simultaneously The Gain Adjust Control which is also a DC level operated circuit provides a 6 dB gain adjustment t...

Page 99: ... DRIVE R CUTOFF R OUT R CLAMP R IN B CLAMP B IN CLAMP BLANK CONT G DRIVE VCC1 G CUTOFF G OUT G CLAMP GND GND VCC2 G IN 22 21 15 16 17 18 19 20 14 13 12 8 7 6 5 4 3 2 1 11 10 9 6 5 4 3 2 1 D115 D113 D111 D112 D114 D116 C109 C110 IC101 C105 C103 C101 C118 C130 C122 ZD107 R109 R101 R102 R103 R142 R110 R112 R111 R138 R137 R108 R117 R123 R131 M102 R120 C106 C102 C104 C129 C154 C108 VR105 VR104 R106 R17...

Page 100: ...smaller the value of Cob and the bigger the value of Ft is better This circuit adopts HSD1609 Cob 3 8pF ft 140MHZ b Cascode CKT concludes 3 band amplification Mean Freq capacitance open inductance short The gain Rc Re High Freq R gun peaking coil L104 L105 R115 C113 R119 Over Freq Compensation R gun C161 R161 R171 D101 Q102 R113 Q101 C113 C112 R151 C161 R161 R115 R114 R118 R119 R116 R117 L104 L105...

Page 101: ... stage is coupled to CRT by way of AC coupling So DC restoration CKT is needed to do the white balance adjustment b Use VR101 R145 and ZD104 to get the range of each gun bias Max 27 V c O P signal mixes DC and AC voltage Only AC signal passes C150 DC voltage is generated by VR101 cross voltage ZD104 VR101 R134 R145 C150 33V 20K 1 2W 51 20K 100 1U EL CRT CASCODE ...

Page 102: ...rent This is helpful to protect CRT 10 2 G2 HV FOCUS 8 3 9 5 6 1 12 11 13 R340 D320 Q316 C307 R352 R355 T303 R351 R350 VR301 C333 D309 330 1N4148 A733 4700P 50V D 100K 1 4W 10K 19 70060 001 6 8K 30K ABLADJ 20K 50V 1U EL 1N4148 ABL 12V CONT a With crosshatch patter FBT beam current is smaller It makes the voltage of C333 higher than Vcontrast Q316 is OFF the Vconstrast is freely controlled b With t...

Page 103: ... This is to keep the voltage cathode to G1 over the cut off voltage during the period of vertical retrace d In order to prevent the picture occurred transiently while change mode pull down the G1 voltage and let the voltage cathode to G1 over CUT OFF voltage This will make the picture blanking e While monitor turned off the discharge speed of high voltage circuit is slow since there is no deflecti...

Page 104: ... PWM output To deflection circuit PC RS232 auto alignment program EEPROM Blanking Blanking Blanking Blanking SCO SC1 SCO SC1 SCO SC1 SCO SC1 Control Panel Control Panel Control Panel Control Panel Select Adjust Select Adjust Select Adjust Select Adjust UART External UART External UART External UART External adjustment function adjustment function adjustment function adjustment function MTV012 MTV0...

Page 105: ...t vertical sync generated and disable the event counter when the next vertical sync generated this time we can get the horizontal sync counts during a vertical sync period The formula is Horizontal sync frequency FH Horizontal sync counts Vertical sync period Horizontal sync frequency Horizontal sync Counts Vertical sync period 5 What are the valid key functions for user Total 4 keys for V551 cont...

Page 106: ... 15W 75V 0 07A 5 25W 12V 0 76A 9 12W 6 5V 0 6A 3 9 W Total output power 62W 2 Circuit Analysis The block diagram is shown as follow is divided into 13 portions Block Diagram Secondary Rectifier Filter V Sync Detector CKT Transformer photo coupler Bridge Rectifier Filter power MOSFET snubber ckt PWM controller control switch on off EMI filter ext sync Trigger CKT Line Input Feedback CKT DCV output ...

Page 107: ...rizontal frequency is switching That s the reason we adopt UC3842 as the control IC When load changes the voltage of the primary coil pin 6 7 of the transformer will be rectified and filtered by D608 C608 D607 C607 This voltage value will go down while the load getting heavier and it s voltage will be divided via R616 VR601 R617 then entering pin 2 of C601 Verror is direct ratio of output load Thi...

Page 108: ...these two frequency This CKT is consisted of C616 ZD603 R612 and detect the synchronous signal from the monitor FBT core After the differential of C616 ZD603 clips it s voltage and then add this signal to the pin 4 of UC3842 by way of 612 and C615 to get the synchronous 8 Transformer is mainly used for transformer and isolation it s principle is the current will pass pin 1 4 of T601 when FET on an...

Page 109: ... Acer V551 new CRT Monitor Service Guide Chapter 2 Circuit Operation Theory 20 Confidence and Property Attachment A ...

Page 110: ...available for loop compensation 2 VFB This is the inverting input of the Error Amplifier It is normally connected to the switchingt power supply output through a resistor divider 3 ISENSE Avoltage proportional to inductor current is connected to this input The PWN uses this information to terminate the output switch conduction 4 RT CT The oscillator frequency and maximum output duty cycle are prog...

Page 111: ...r Service Guide Chapter 4 Trouble Shooting 1 Confidence and Property Table of Contents 1 No output power 2 2 No video 3 3 No work 4 4 Unstable vertical display 5 5 H size adjust 6 6 H linearity error 7 7 Brightness CKT check 8 ...

Page 112: ...Confidence and Property 1 No output power Yes No Yes No Yes No Yes No No power Check F601 D602 D605 ok Check IC601 ZD602 ZD606 ok Replace F601 D602 D605 Replace IC601 ZD602 ZD606 Check Q602 T601 ok Replace Q602 T601 Check D701 D702 D704 D705 ok Replace D701 D702 D704 D705 ...

Page 113: ...and Property 2 No video No Yes No Yes No Yes No Yes No Yes No Check 12V Repair Check R G B input of M101 Ok Repair Check pin 2 3 4 of M103 ok Repair Check IC101 R G B input output ok Repair IC101 Check cascode circuit ok Check Q101 Q103 Q105 Q110 Q111 Q112 Check M101 Ok Repair M101 ...

Page 114: ...k No Green Amber No Yes No Yes No Yes No Check LED Ok Check G1 G2 R G B Output ok Feed back No Power flowchart Check pin 6 7 of IC201 ok Repair IC201 Check BDRV output ckt ok Check Q305 Q306 Q317 D317 Check HDRV output ckt ok Check Q315 T301 Check HV is about 24KV ok Check Q310 D307 C314 C315 C312 L302 ...

Page 115: ...de Chapter 4 Trouble Shooting 5 Confidence and Property 4 Unstable vertical display No Yes No Yes Unstable vertical display IC201 pin 24 sawtooth gererator Fv OSC 42Hz Check IC201 around ckt IC202 has output Check IC202 around ckt Check DY ...

Page 116: ...rty 5 H size adjust Yes No Yes No Yes No Yes No Yes No H size error IC801 pin 34 PWM output ok Replace IC801 Check Q301 base adjust ok Check Q301 around ckt Check EWDRV output ok Replace IC201 Check Q307 adjust range ok Check Q312 Q307 R307 R308 Is the voltage of C316 ok Check Q302 Q307 D307 ...

Page 117: ...Shooting 7 Confidence and Property 6 H linearity error Yes 2 Yes No Yes Yes Yes No Linearity error Picture the left right 1 or center side 2 asymmetery Check SC0 SC1 output Check Q322 Q323 Q314 Q333 ok Check C312 C311 C356 Repair L302 Repair IC801 Repair Repair ...

Page 118: ... Shooting 8 Confidence and Property 7 Brightness CKT check Yes No Yes No Yes No Yes Brightness control error Check IC801 PWM output ok Is the voltage of C305 190V Check Q202 base is low Check Q203 M101 Replace IC801 Check T303 R324 D303 Check Blank Hunlock ckt ...

Reviews: