background image

Downloaded from Projector.com

,QVWDOODWLRQ

$FHU 6OLP

,167$//$7,21

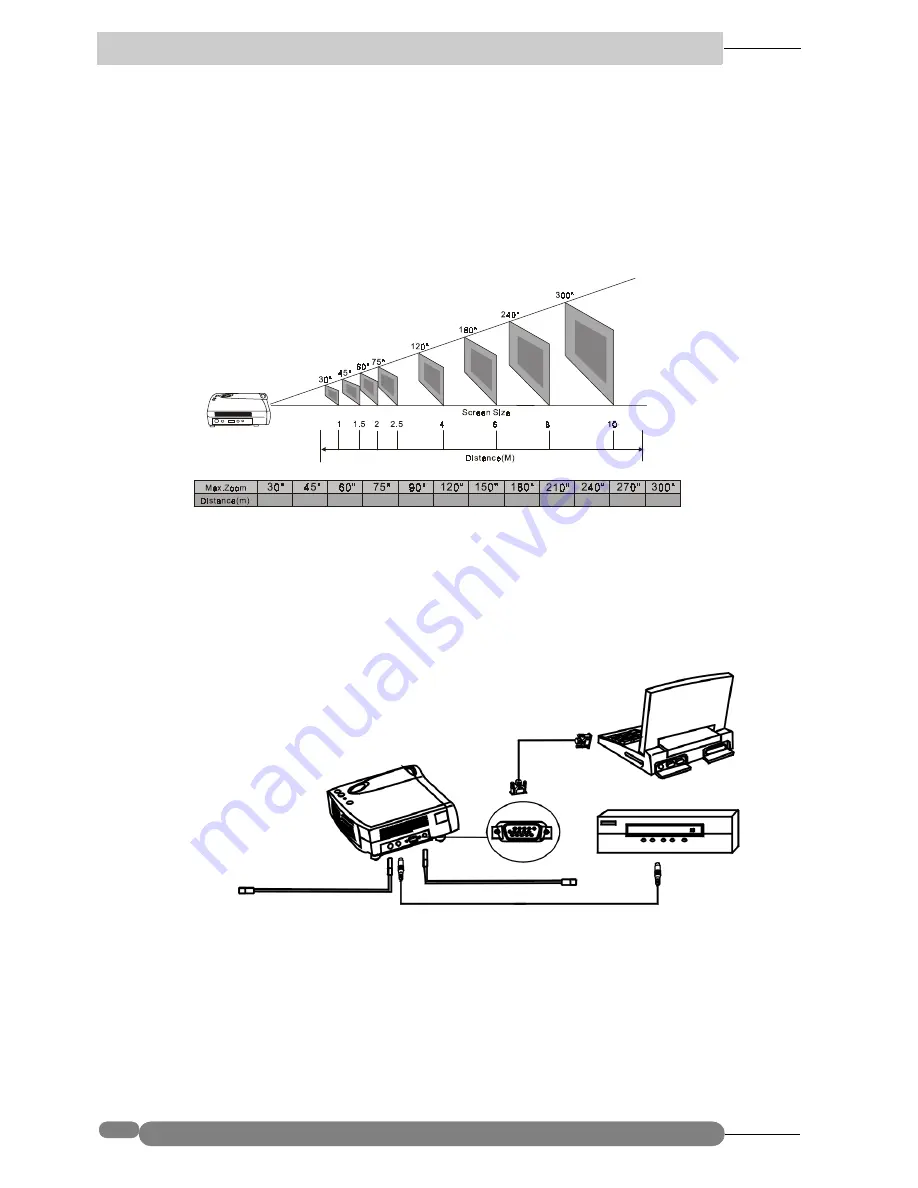
Screen Size

Place the projector at the required distance from the screen according to the 
desired picture size (see the table below). 

Connecting to Various Equipment 

It only takes a few seconds to connect your SL700 Series projector to your 
computer/notebook, VCR or other systems. However, a Mac adapter (an optional 
accessory) is needed for connection for Macintosh users.   

   1            

1 .5            

2              

2 .5            

3              

4              

5              

6                

7              

8             

9             

1 0

Computer

VHS

Audio

S-Video

RCA

Summary of Contents for SL 700S

Page 1: ...e do not make any claim of copyright The copyright remains the property of their respective owners ABOUT PROJECTOR COM Projector com http www projector com is your review and buying guide resource for DLP and LCD video projectors Visit the site to read the latest projector news and reviews read and comment on projector specifications download user manuals and much more ...

Page 2: ...ntrol Description Remote Control Features The remote control sensors are located in the front back of the projector The distance between the sensor and the remote control should not excede 6 meters Power Source Auto Zoom In Zoom Out Freeze Return Volume Mute Blank Keystone Exit Menu ...

Page 3: ...con will appear in the lower right corner of the screen for three seconds when the freeze function is released ZOOM IN OUT By pressing ZOOM IN the center of the picture can be magnified When the button is pressed again the picture is further magnified up to four times the original size By pressing ZOOM OUT the size of the image is reduced When the button is pressed again the picture is further red...

Page 4: ...stall CR2025 as indicated by the diagram inside the compartment Position the lid over the compartment and snap it back into place Caution Avoid excessive heat and humidity Danger of explosion if battery is incorrectly replaced Replace only with the same or equivalent type recommended by the manu facturer Dispose of used batteries according to the manufacturer s instructions ...

Page 5: ...n according to the desired picture size see the table below Connecting to Various Equipment It only takes a few seconds to connect your SL700 Series projector to your computer notebook VCR or other systems However a Mac adapter an optional accessory is needed for connection for Macintosh users 1 1 5 2 2 5 3 4 5 6 7 8 9 1 0 Computer VHS Audio S Video RCA ...

Page 6: ...p 1 Plug the power cord into a wall socket 2 Press POWER for 1 second The back lit POWER key blinks green and stays green when the power is turned on When the power is turned off there is a 60 second cooling period before the projector can be re started 3 Switch on all connected equipment ...

Page 7: ...iding bar labeled Keystone as needed Press to correct keystoning at the top of the image Press to correct keystoning at the bottom of the image Auto Adjustment In some cases you may have to optimize the picture quality manually To do this press the AUTO key on the control panel of the projector or on the remote control Within 3 seconds the built in Intelligent Auto Adjustment function of the Acer ...

Page 8: ...lect a sub menu Press Menu again to select items in the sub menu Projector Remote control Source Auto Source Blank Mute Menu Bar Sub menu Display Image Control Source PC input without AV Input Keystone Brightness Contrast Color Balance Auto resize Phase Frequency H position V position Language Mirror Auto off Reset Source Volume Tremble Bass Mute Video Input Keystone Brightness Contrast Sharpness ...

Page 9: ...D o w n l o a d e d f r o m P r o j e c t o r c o m 2SHUDWLRQ FHU 6OLP 1 Display Menu Keystone Brightness ...

Page 10: ...n l o a d e d f r o m P r o j e c t o r c o m 2SHUDWLRQ FHU 6OLP Contrast Color Balance 2 Image Menu Auto resize Press On and the Auto Resize function will automatically adjust the image to fit on the screen ...

Page 11: ...D o w n l o a d e d f r o m P r o j e c t o r c o m 2SHUDWLRQ FHU 6OLP Phase Auto Resize OFF Frequency Auto Resize OFF H position V position ...

Page 12: ... e c t o r c o m 2SHUDWLRQ FHU 6OLP 3 Sub menu image with AV Input This menu is only available when the input signal is from Video or S Video Image Ratio 4 3 Normal 16 9 Video System Auto PAL M PAL N SECAM Color Less More Tint Red Green ...

Page 13: ...uage English En French Fr German De Italian It Spanish Es Portuguese Po Traditional Chinese TC Mirror Normal V Inv Vertically Inverted H Inv Horizontally Inverted H V Inv Horizontally and Vertically Inverted will invert the image for proper display according to the desired projector position ...

Page 14: ... 2SHUDWLRQ FHU 6OLP Auto off This will turn off the power after 60 minutes Reset This will restore the projector to its factory default settings 1 Default 3 Rear screen projection 2 Ceiling mounted projection 4 Ceiling mounted and Rear screen projection ...

Page 15: ...D o w n l o a d e d f r o m P r o j e c t o r c o m 2SHUDWLRQ FHU 6OLP 5 Source Menu Source Volume Treble Bass Mute PC Video S Video Off On ...

Page 16: ...ess POWER and the lamp will shut down 2 The fan will continue to run for approximately 60 seconds 3 Disconnect the power cord from the wall socket Caution Please do not unplug the power cord before POWER is shut down or during the cooling process for 60 seconds Projector Remote control ...

Page 17: ... Indicators When this LED shows red continuously it is warning you that the lamp life has exceeded 1500 hours Replace the projection lamp with a new one immediately CHANGE THE LAMP AND RESET THE LAMP TIMER The lamp has been in operation for 1200 hours Change a new lamp for optimal performance CHANGE THE LAMP THE POWER WILL TURN OFF AFTER 20 HOURS The lamp has been in operation for 1479 hours and t...

Page 18: ...mmended you use a magnetic headed screwdriver if possible Pull the handle to remove the lamp housing If the screws are not loosened completely they could injure your fingers Do not insert your hand into the box after the lamp is removed If you touch the optical parts inside this could cause color unevenness etc 4 Replace the lamp with the new one Insert it in the projector and tighten the screws f...

Page 19: ...ch the empty lamp compartment when the lamp is removed This lamp contains mercury Consult your local hazardous waste regulations to dis pose of this lamp in a proper manner Resetting Lamp Hours If you replace the lamp after 1500 hours of operation please proceed as follows within 10 minutes of powering on OSD FUNCTION Press the Exit button on the projector for 3 seconds to display the total used l...

Page 20: ... Inc at http www acerCM com Description Part Number Power cord EU 27 01218 191 Power cord US 27 01118 131 Power cord UK 27 02718 201 Signal cable 50 J0508 502 RCA cable 50 J1303 501 S Video cable 50 72920 011 PC PC Audio cable 50 T4405 501 Audio PC Audio cable 50 J0705 501 Soft carrying case 98 J1302 001 Lens cover 42 J1345 001 Remote control 98 J1301 001 3 2 converter 22 91007 001 Skin case 98 J1...

Page 21: ...rove its angle on the screen Use the Keystone correction key on the control panel of the projector or the remote control unit POOR COLOR Select the correct video system Adjust brightness contrast or saturation BLURRED IMAGE Press Auto on the control panel of the projector or the remote control unit to get better picture quality Adjust the focus Reposition the unit to improve its screen angle Ensur...

Page 22: ... OF RANGE Input signal s frequency exceeds the projector s CHANGE THE LAMP AND RESET THE LAMP TIMER The lamp has been in operation for 1200 hours Lamp replacement is recommended CHANGE THE LAMP THE POWER WILL TURN OFF AFTER 20 HOURS The lamp has been in operation for 1479 hours and the power will turn off after 20 more hours Replace the lamp as soon as possible CHANGE THE LAMP The lamp has been in...

Page 23: ...i SVGA Optical Display system 1 CHIP DMD Lens F Number F 2 6 Focal Length F 36 mm Lamp 120W VIP lamp Electrical Power supply AC90 240V 6 5A 2 9A 50 60 Hz Automatic Power consumption 200 W Max Mechanical Dimensions 229 mm W x 53 mm H x 178 mm D Operating temperature range 0 C 40 C Weight 3 lbs Input terminal Computer Input RGB input D sub 15 pin female Video Signal Input S VIDEO Mini DIN 4 pin term...

Page 24: ...0 0 720x400 37 9 85 1 VESA 640x480 31 5 60 0 VESA 640x480 37 9 72 8 VESA 640x480 35 66 7 Macintosh 640x480 43 3 85 0 VESA 800x600 35 2 56 3 VESA 800x600 37 9 60 3 VESA 800x600 46 9 75 0 VESA 800x600 48 1 72 2 VESA 800x600 53 7 85 1 VESA 832x624 49 7 74 5 Macintosh 1024x768 48 4 60 0 VESA 1024x768 56 5 70 1 VESA 1024x768 60 0 75 0 VESA 1024x768 68 7 85 0 VESA 1280x1024 64 0 60 0 VESA ...

Page 25: ...D o w n l o a d e d f r o m P r o j e c t o r c o m LPHQVLRQV FHU 6OLP 0 16 216 ...

Page 26: ...e do not make any claim of copyright The copyright remains the property of their respective owners ABOUT PROJECTOR COM Projector com http www projector com is your review and buying guide resource for DLP and LCD video projectors Visit the site to read the latest projector news and reviews read and comment on projector specifications download user manuals and much more ...

Reviews: